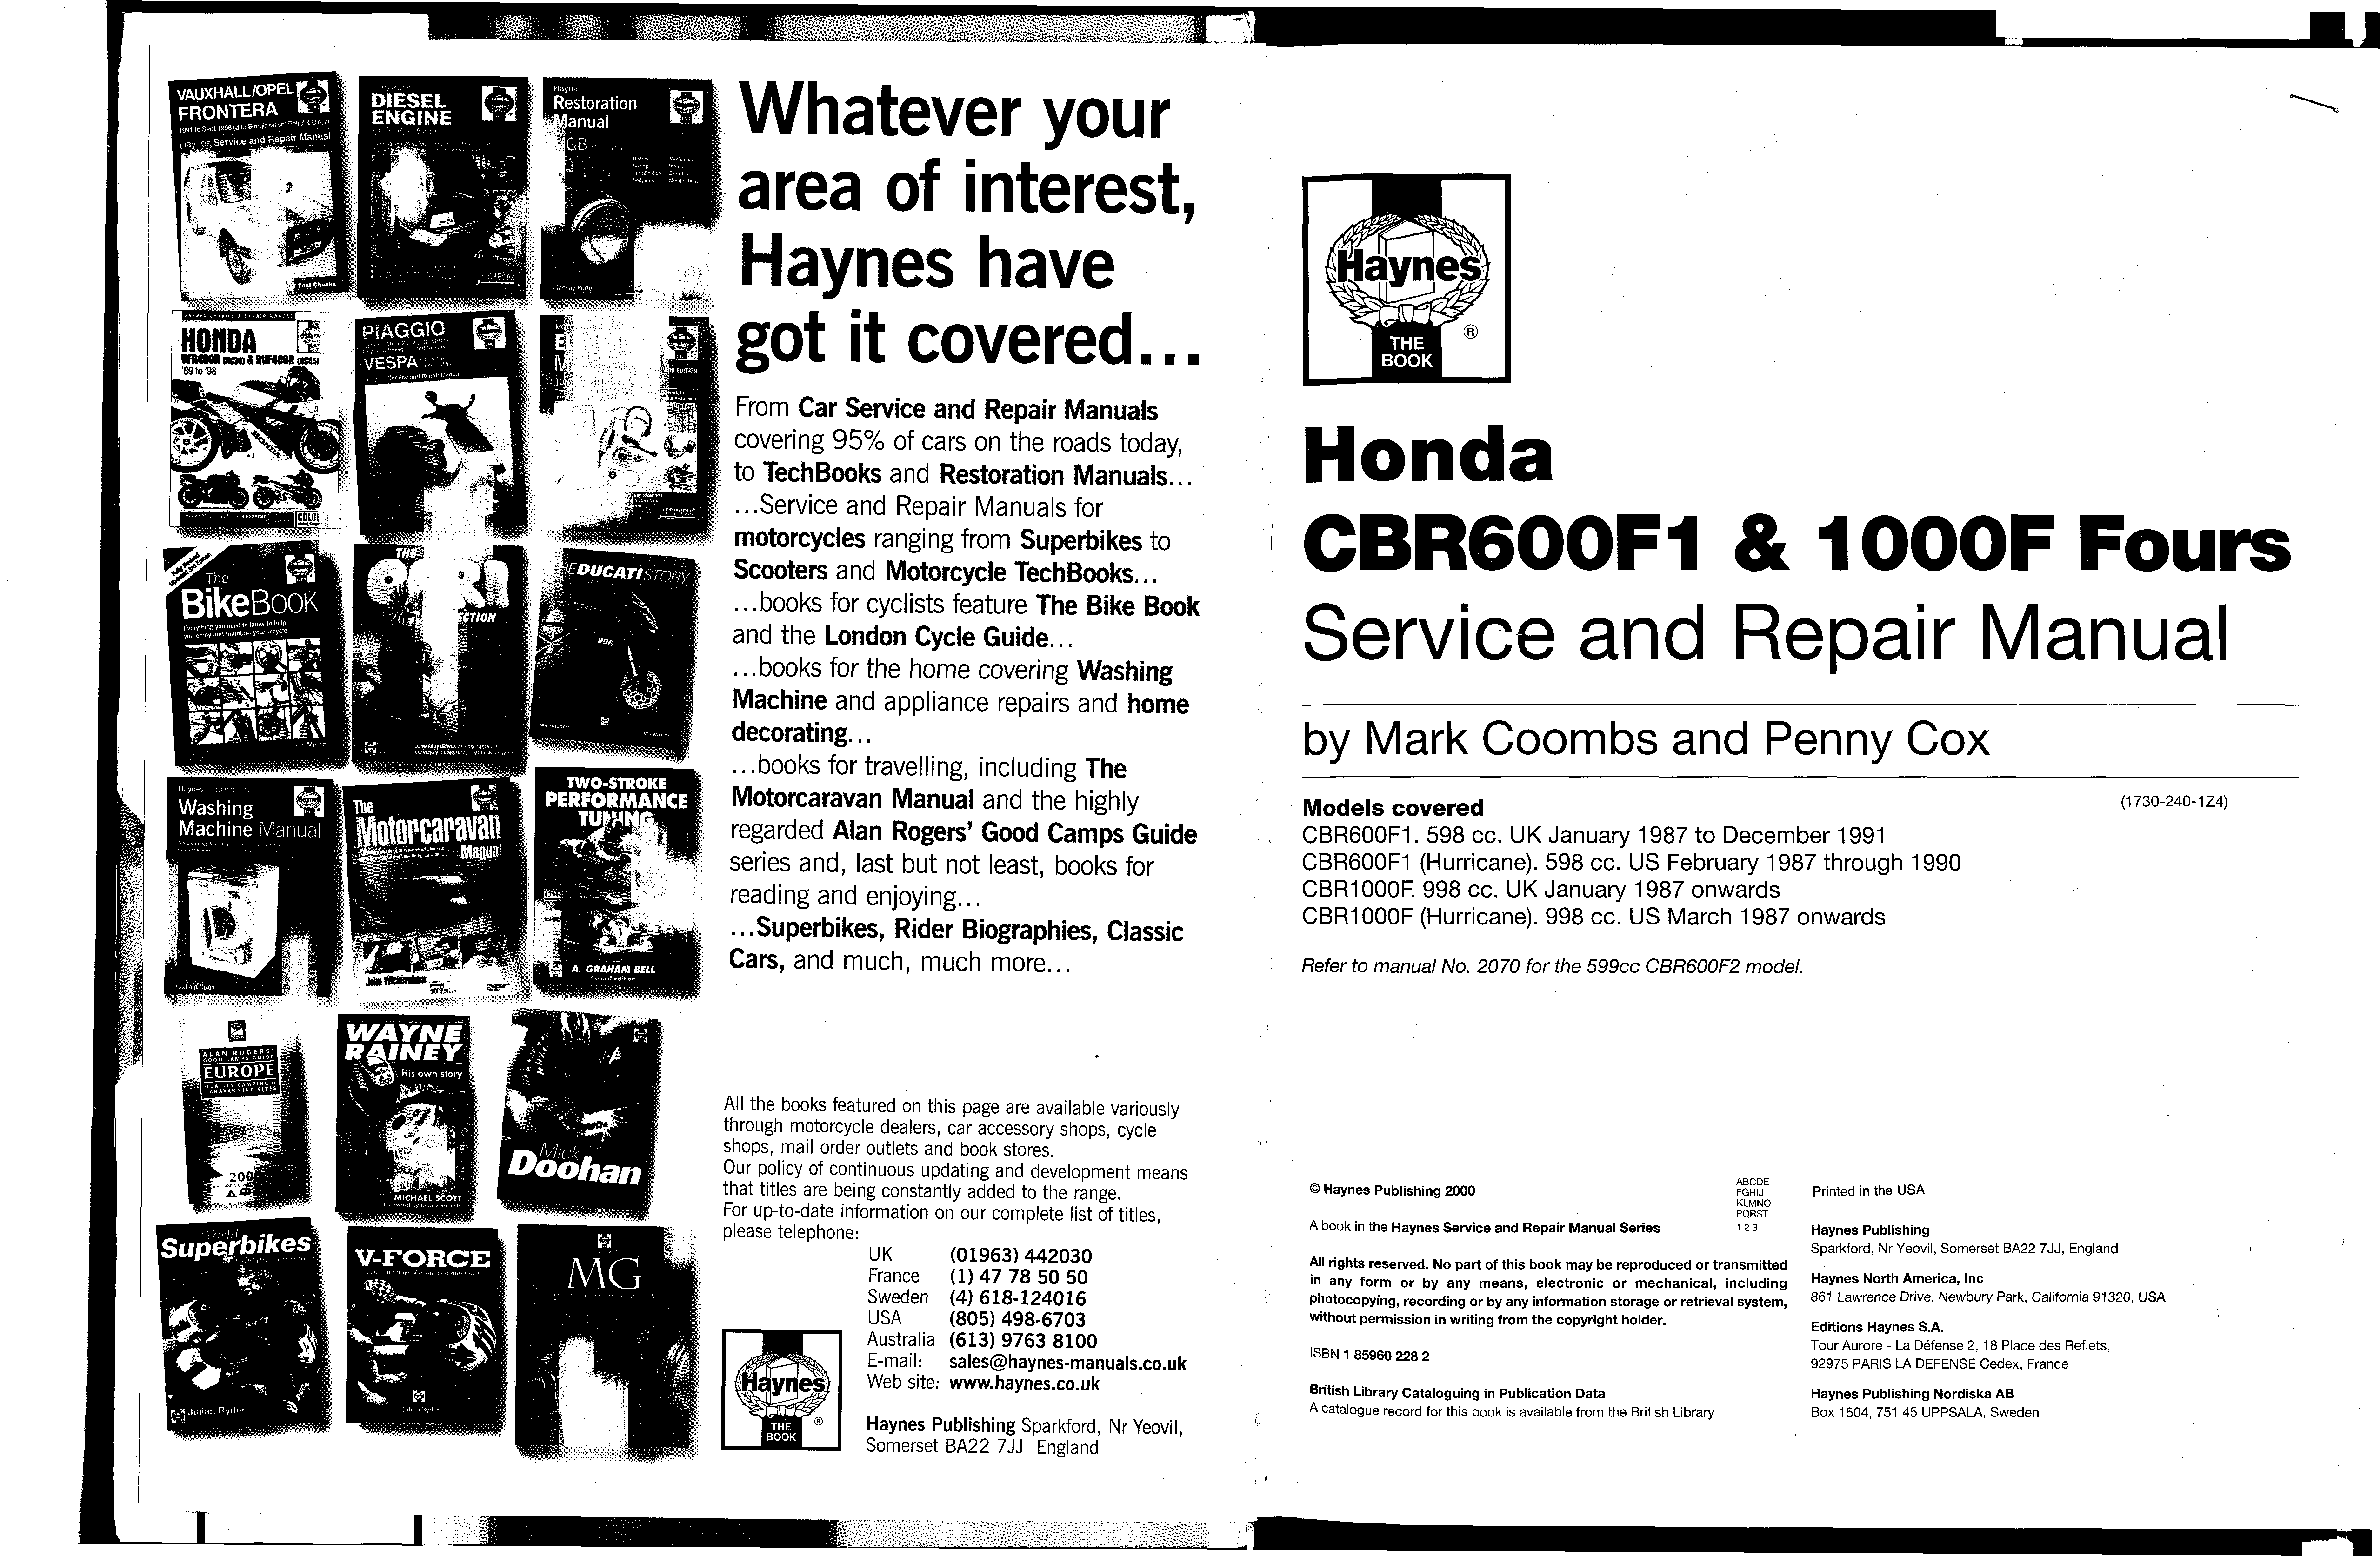
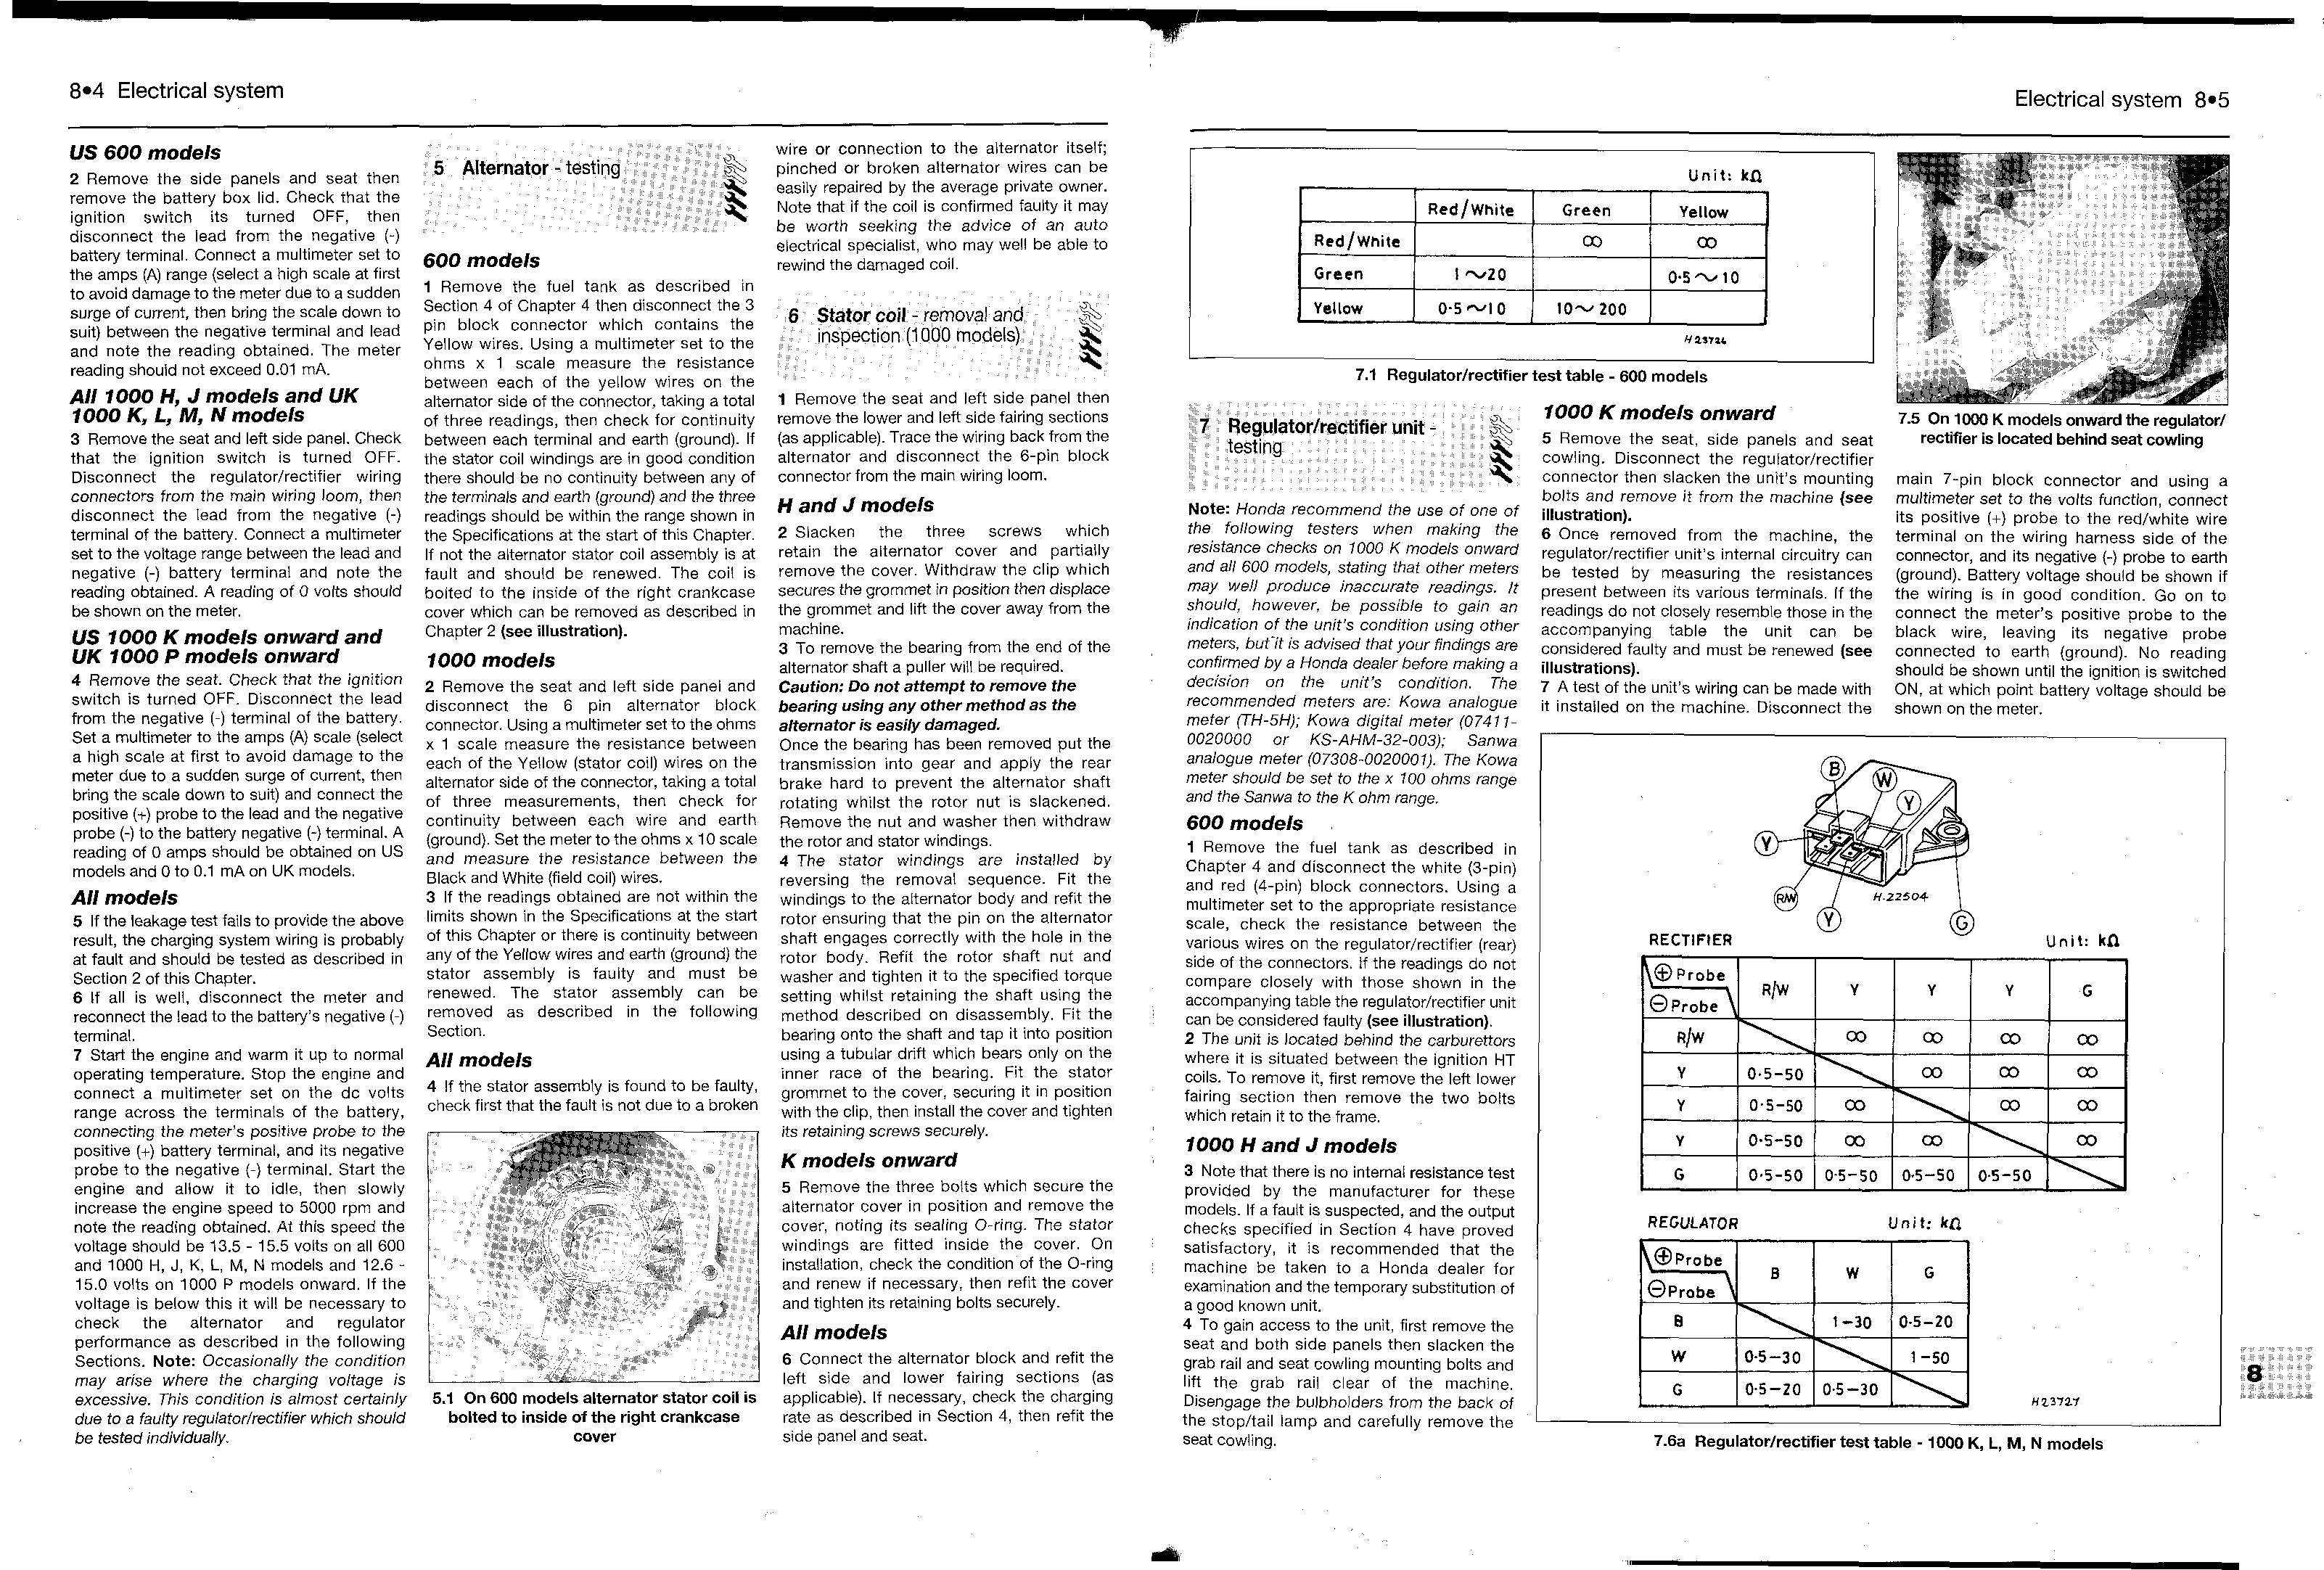
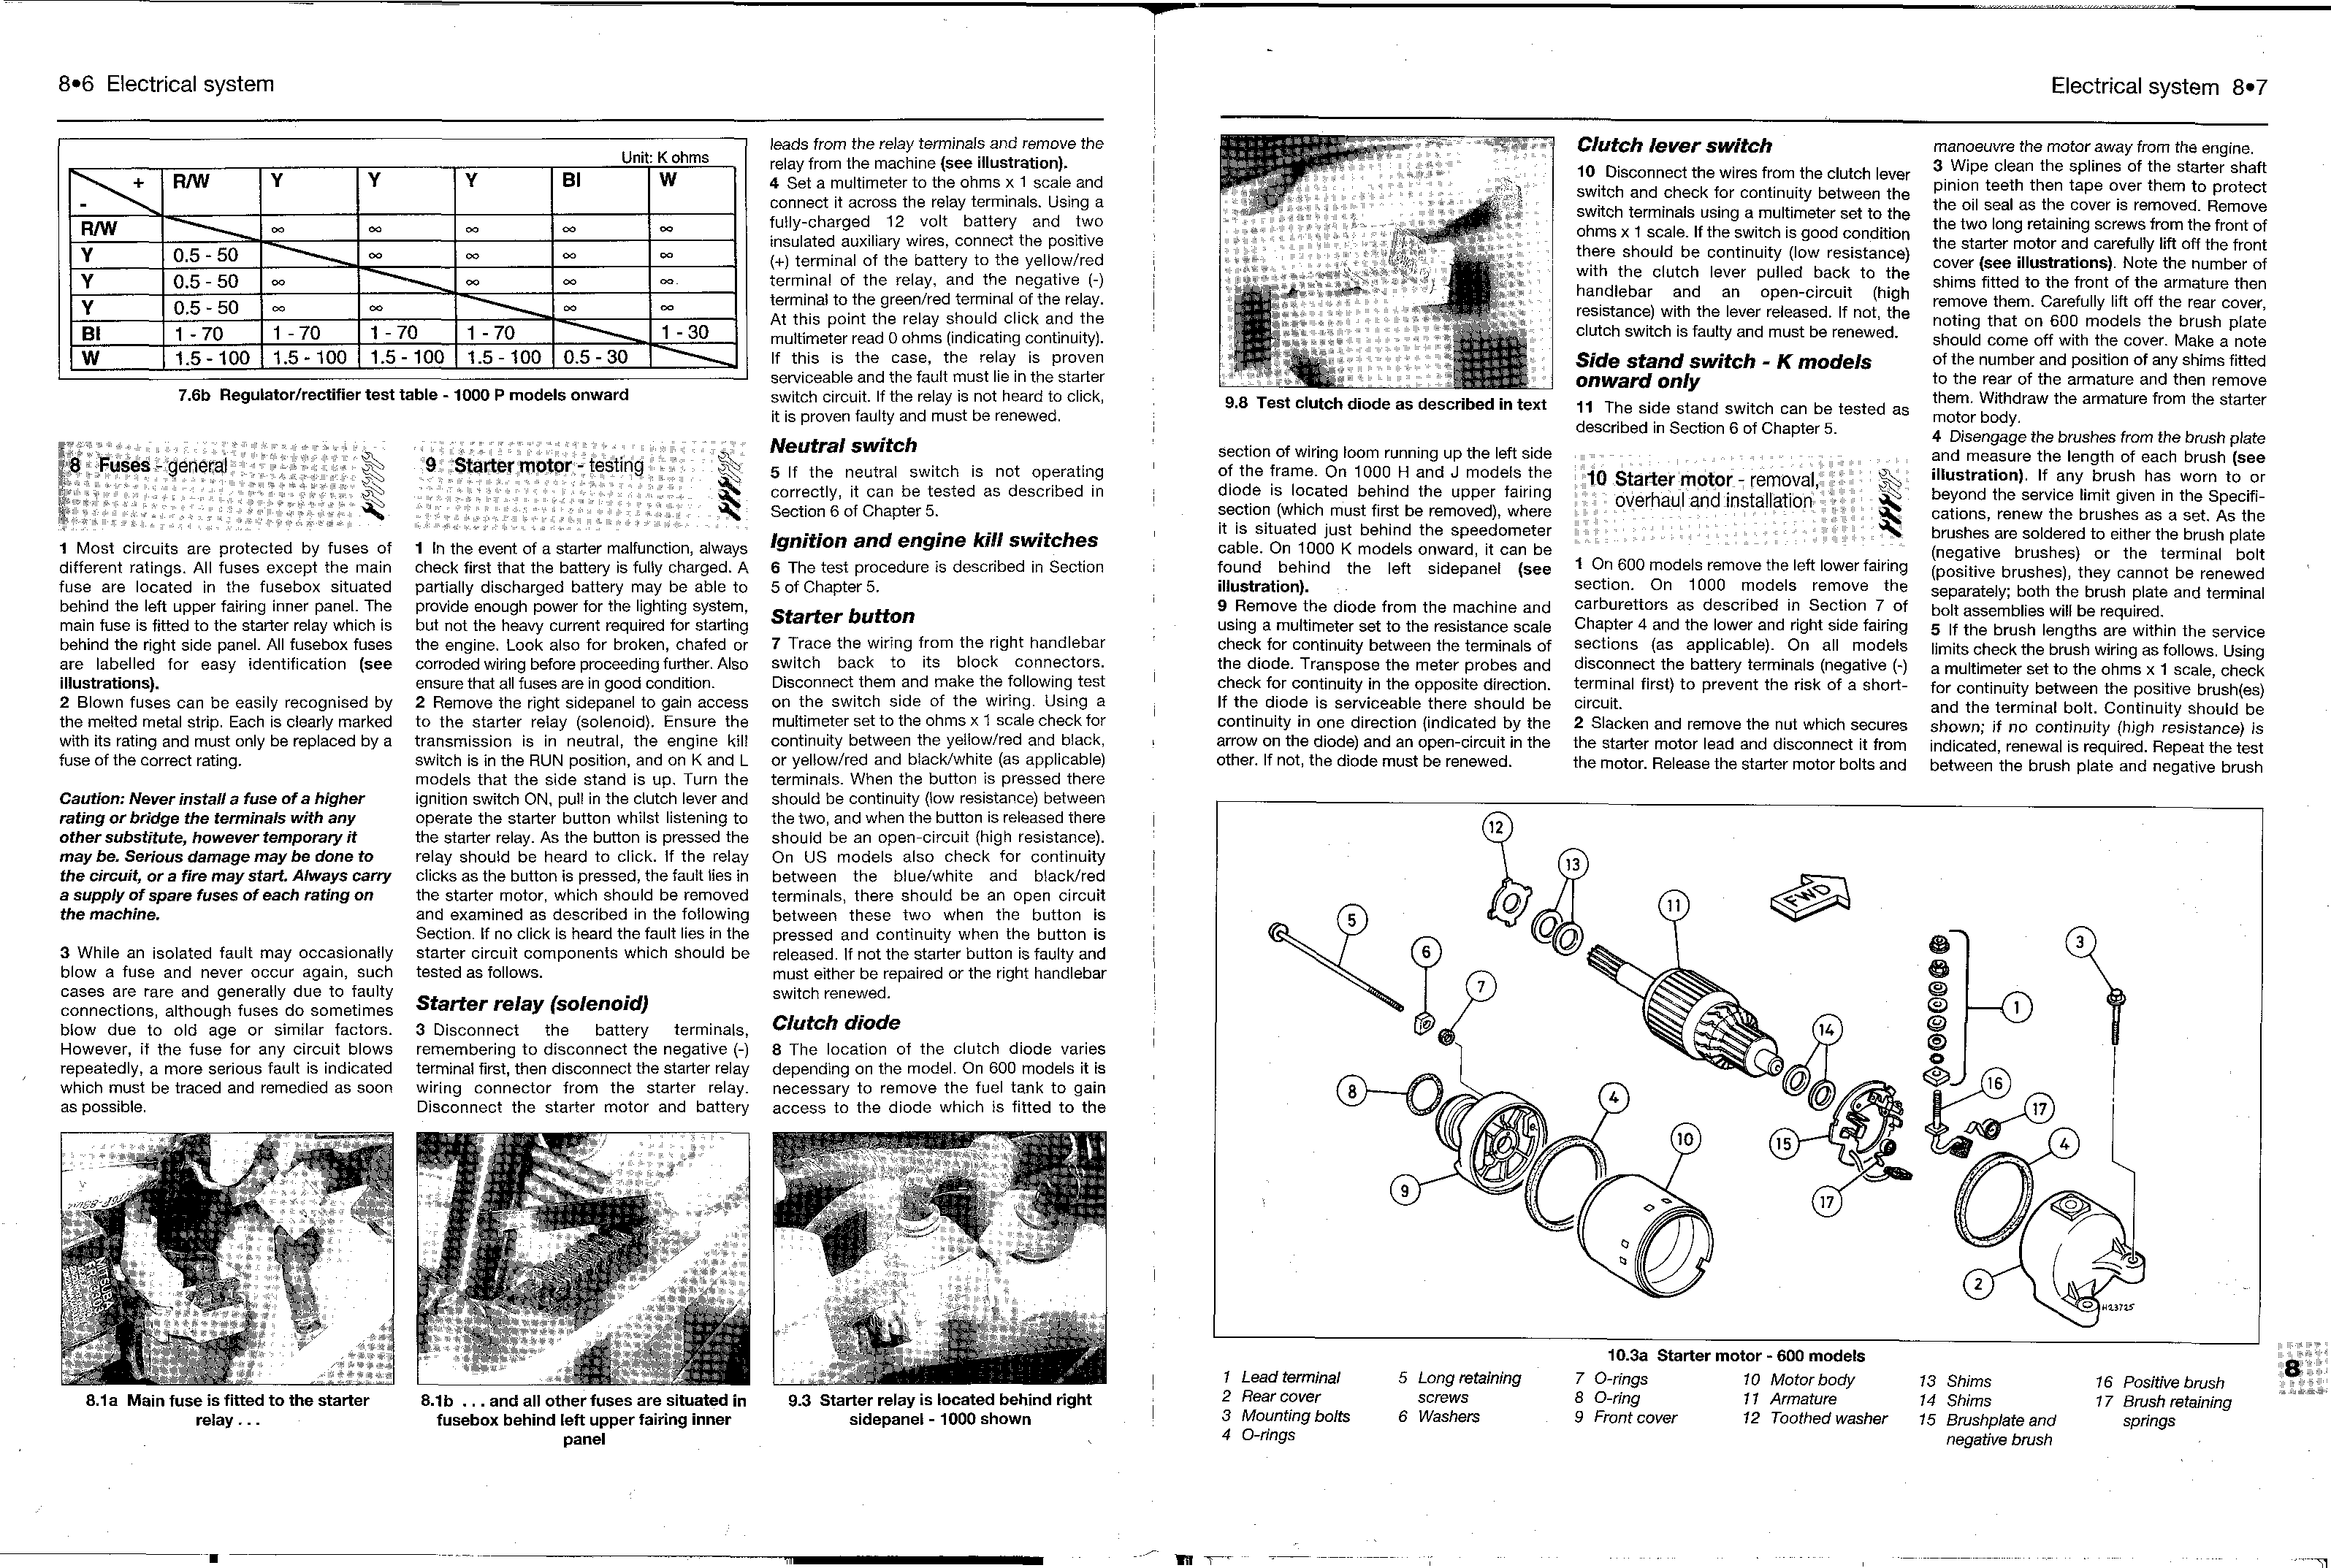
Honda CBR600F1 & 1000F Fours Service and Repair Manual
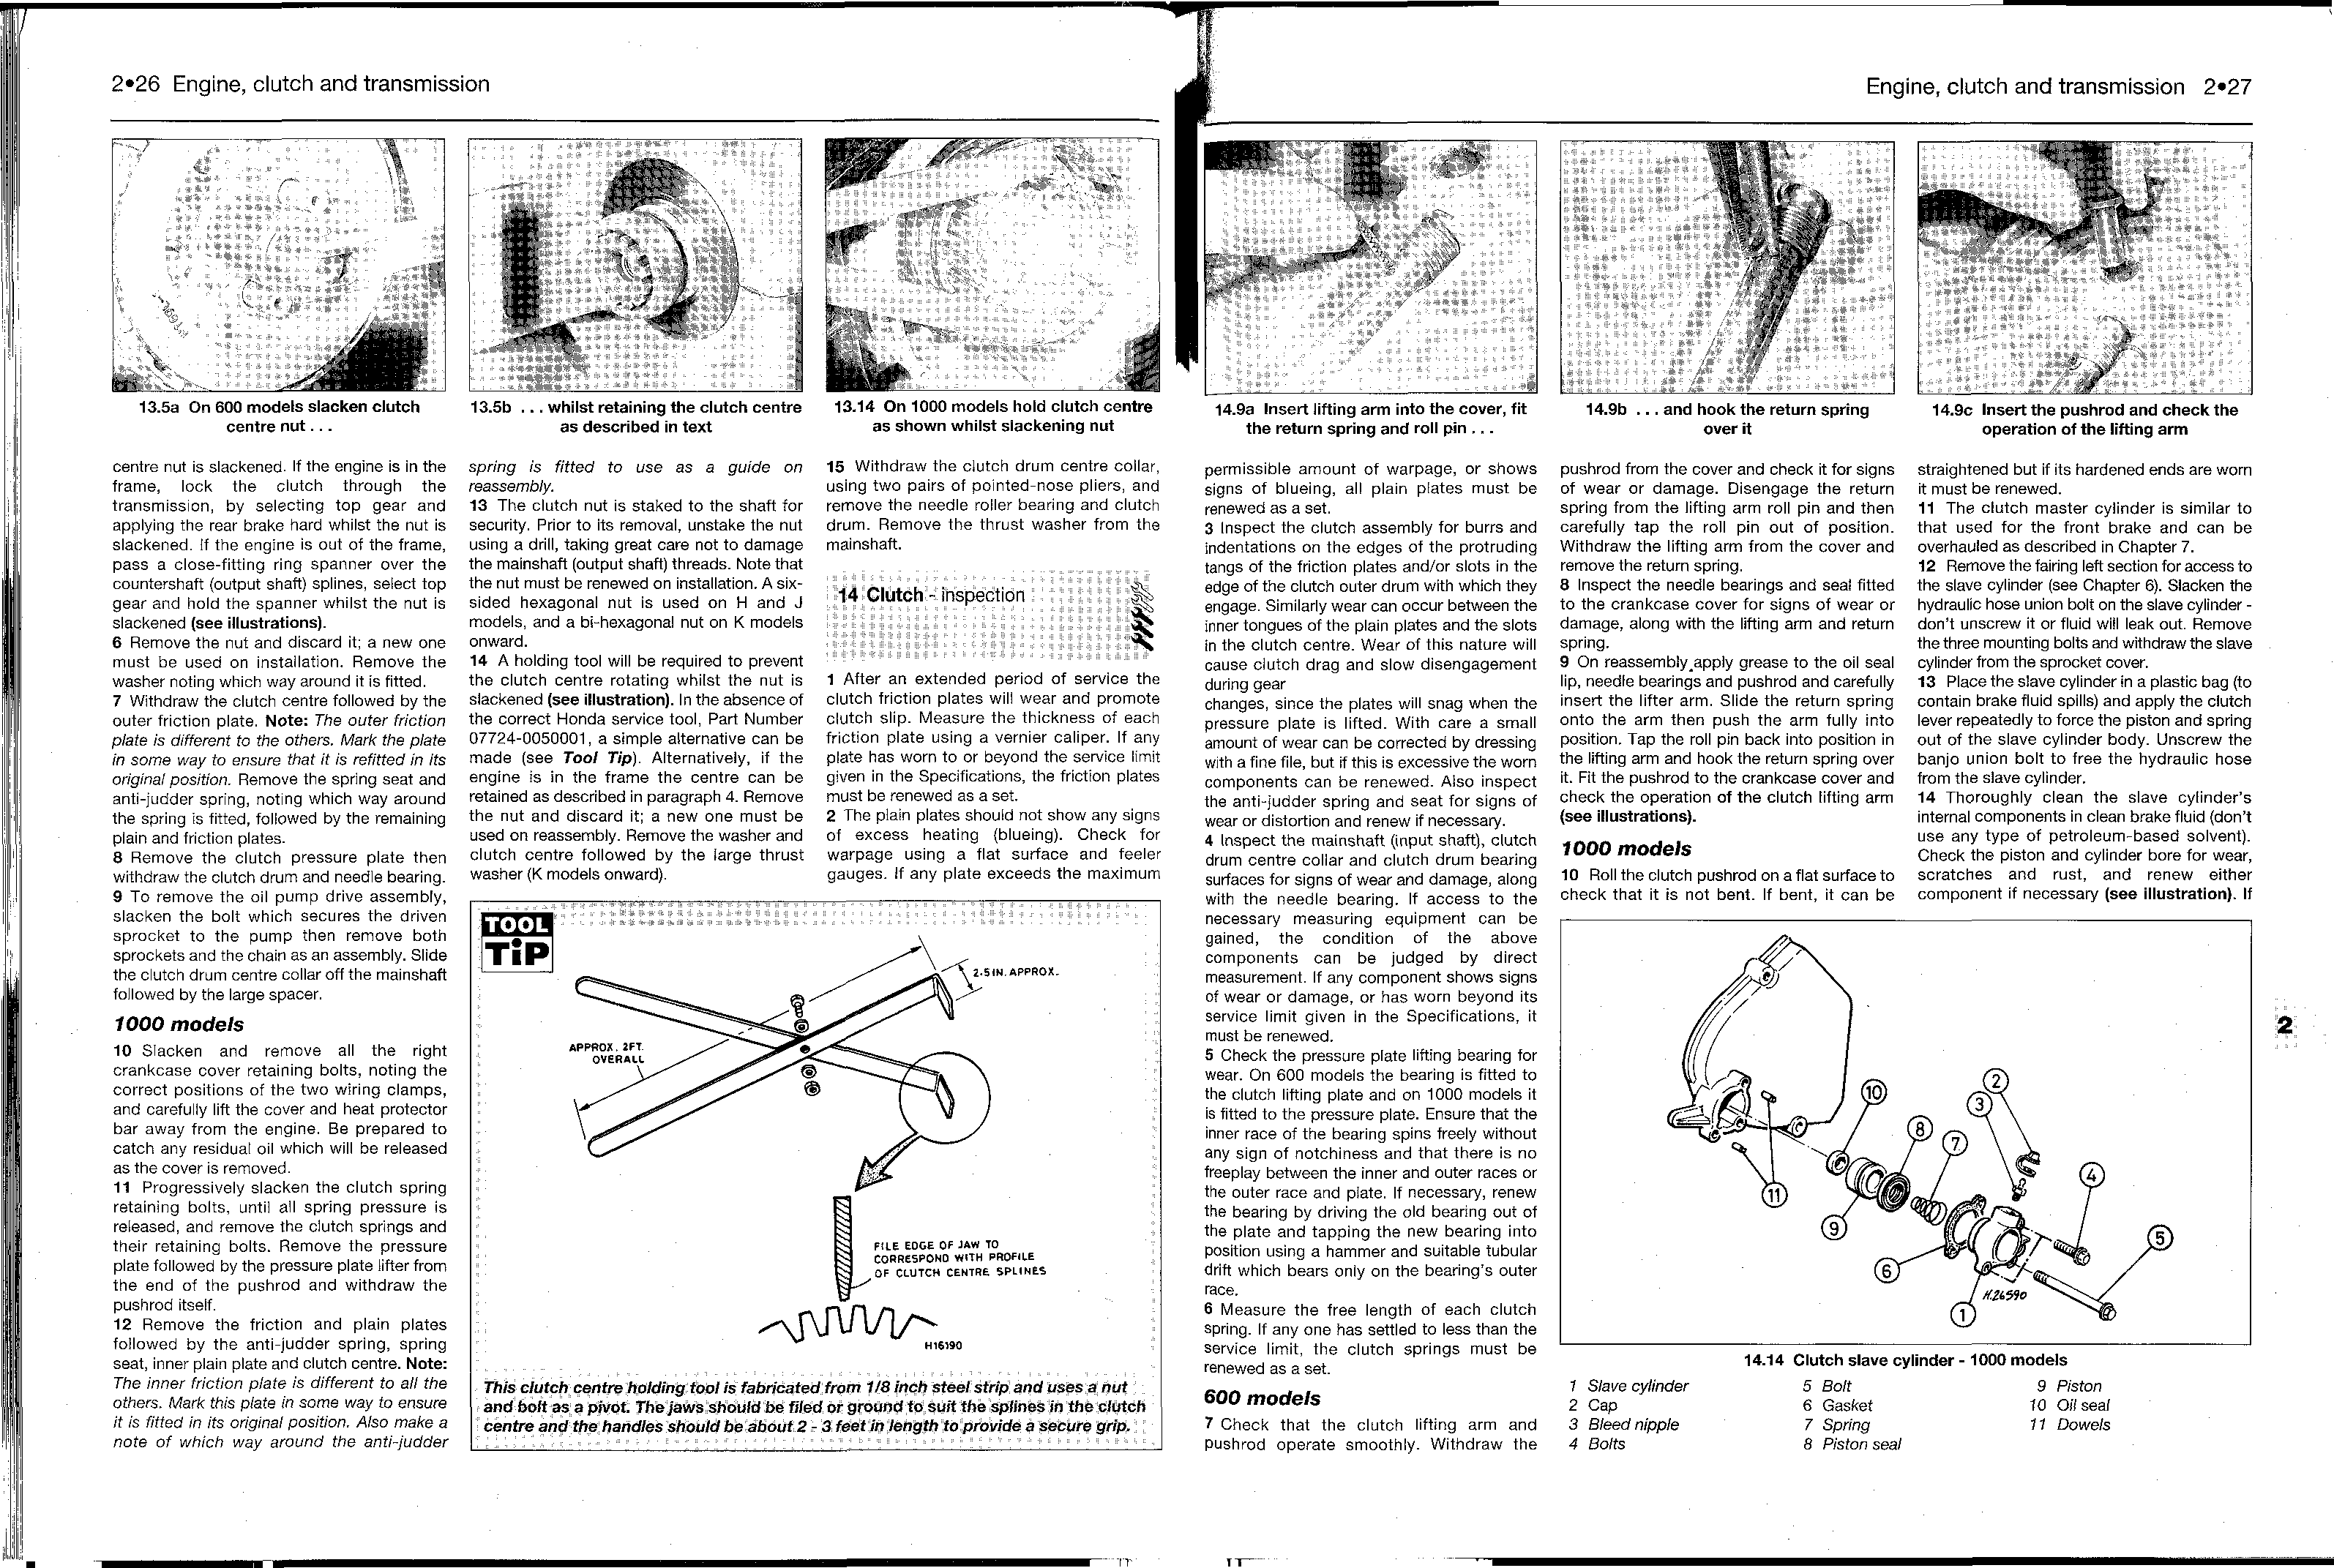
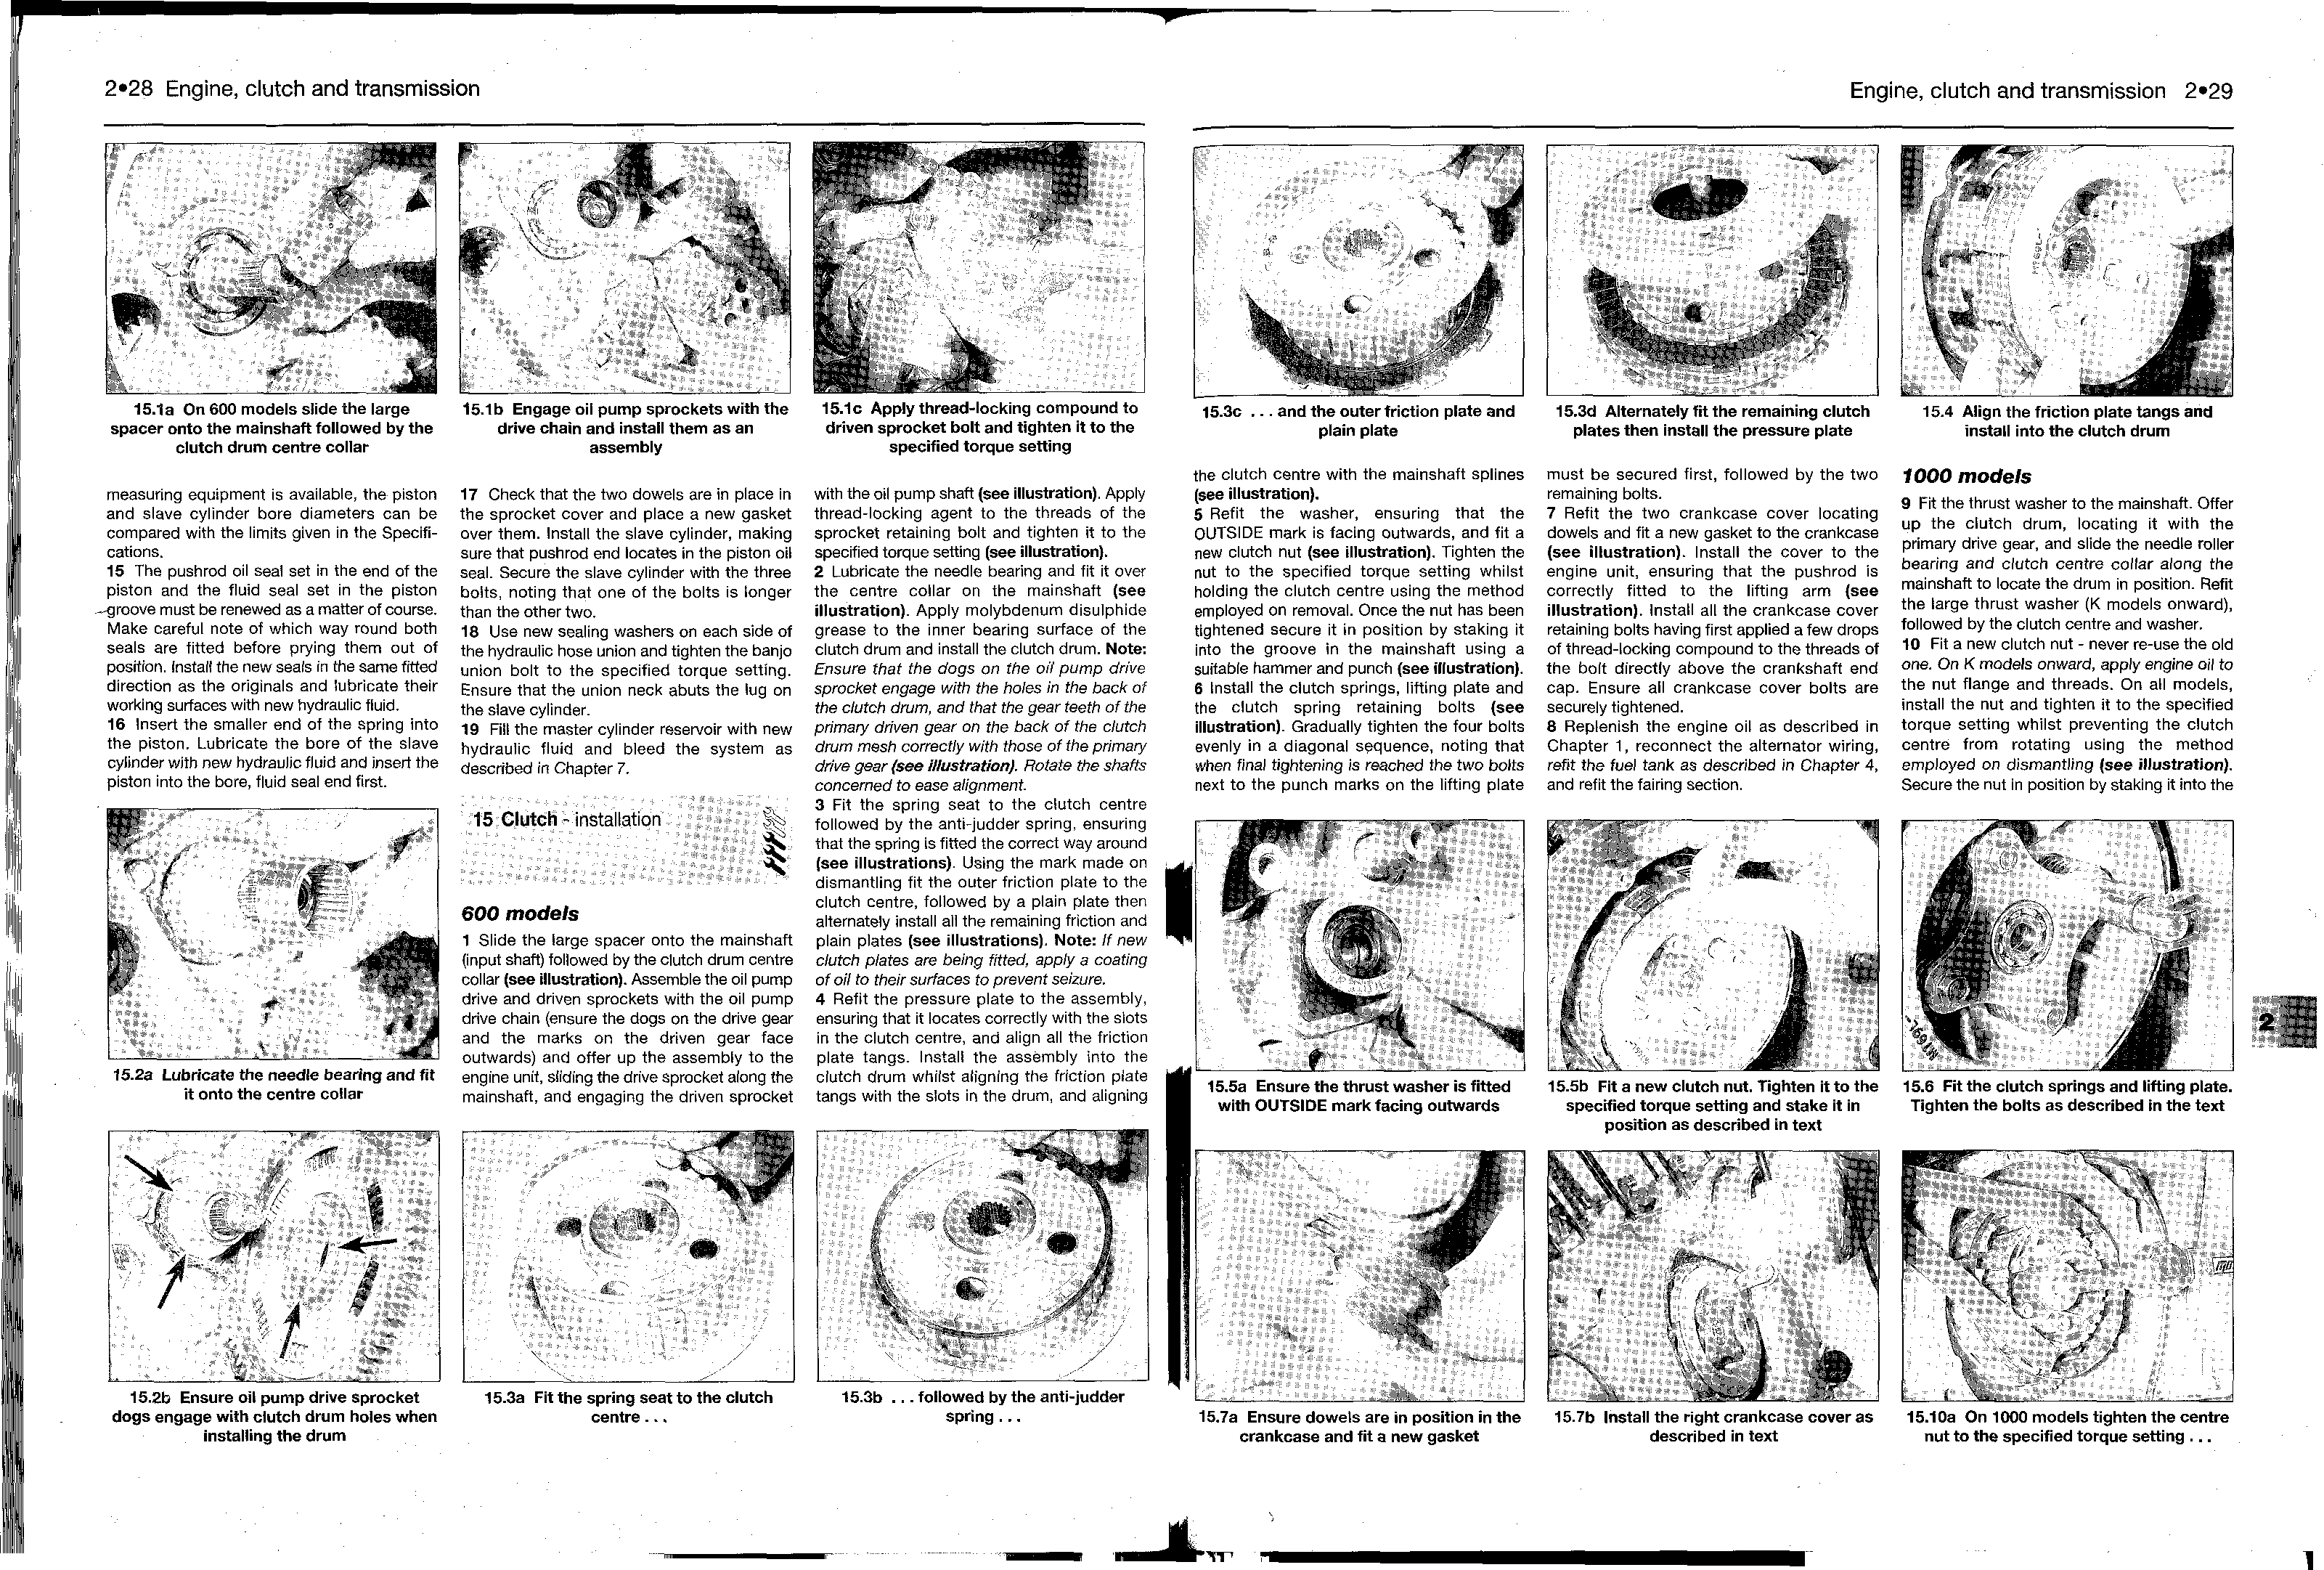
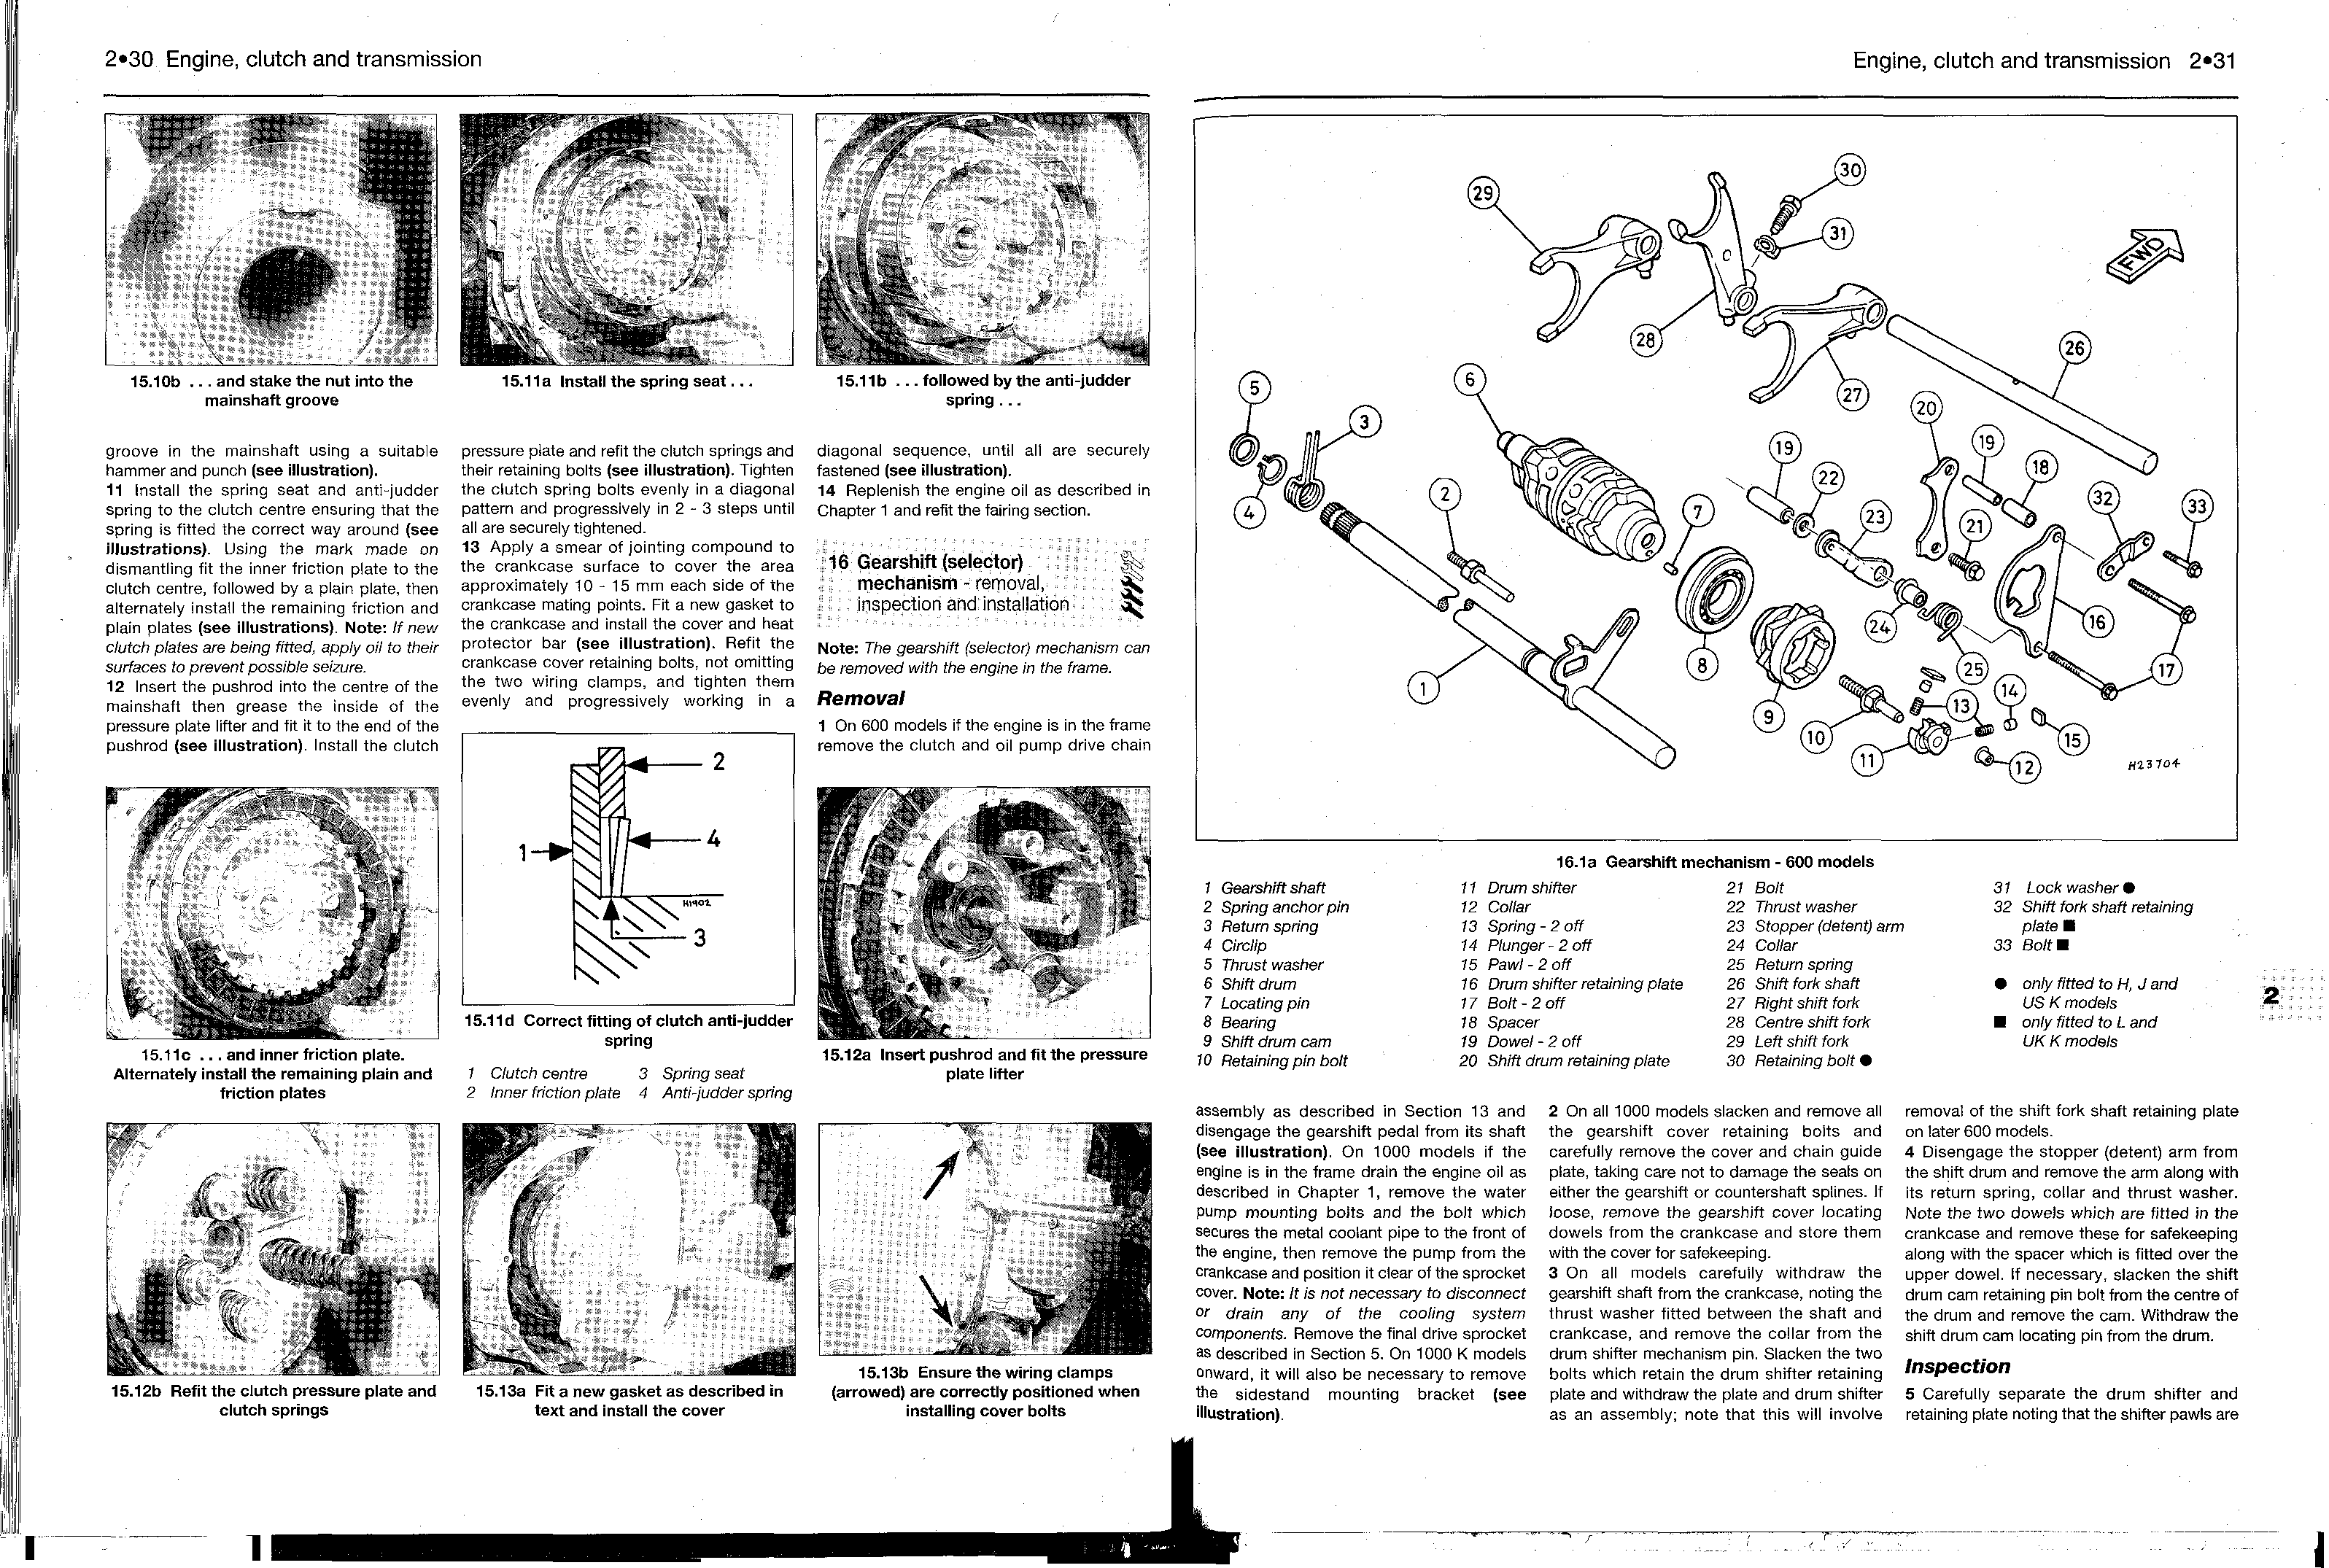
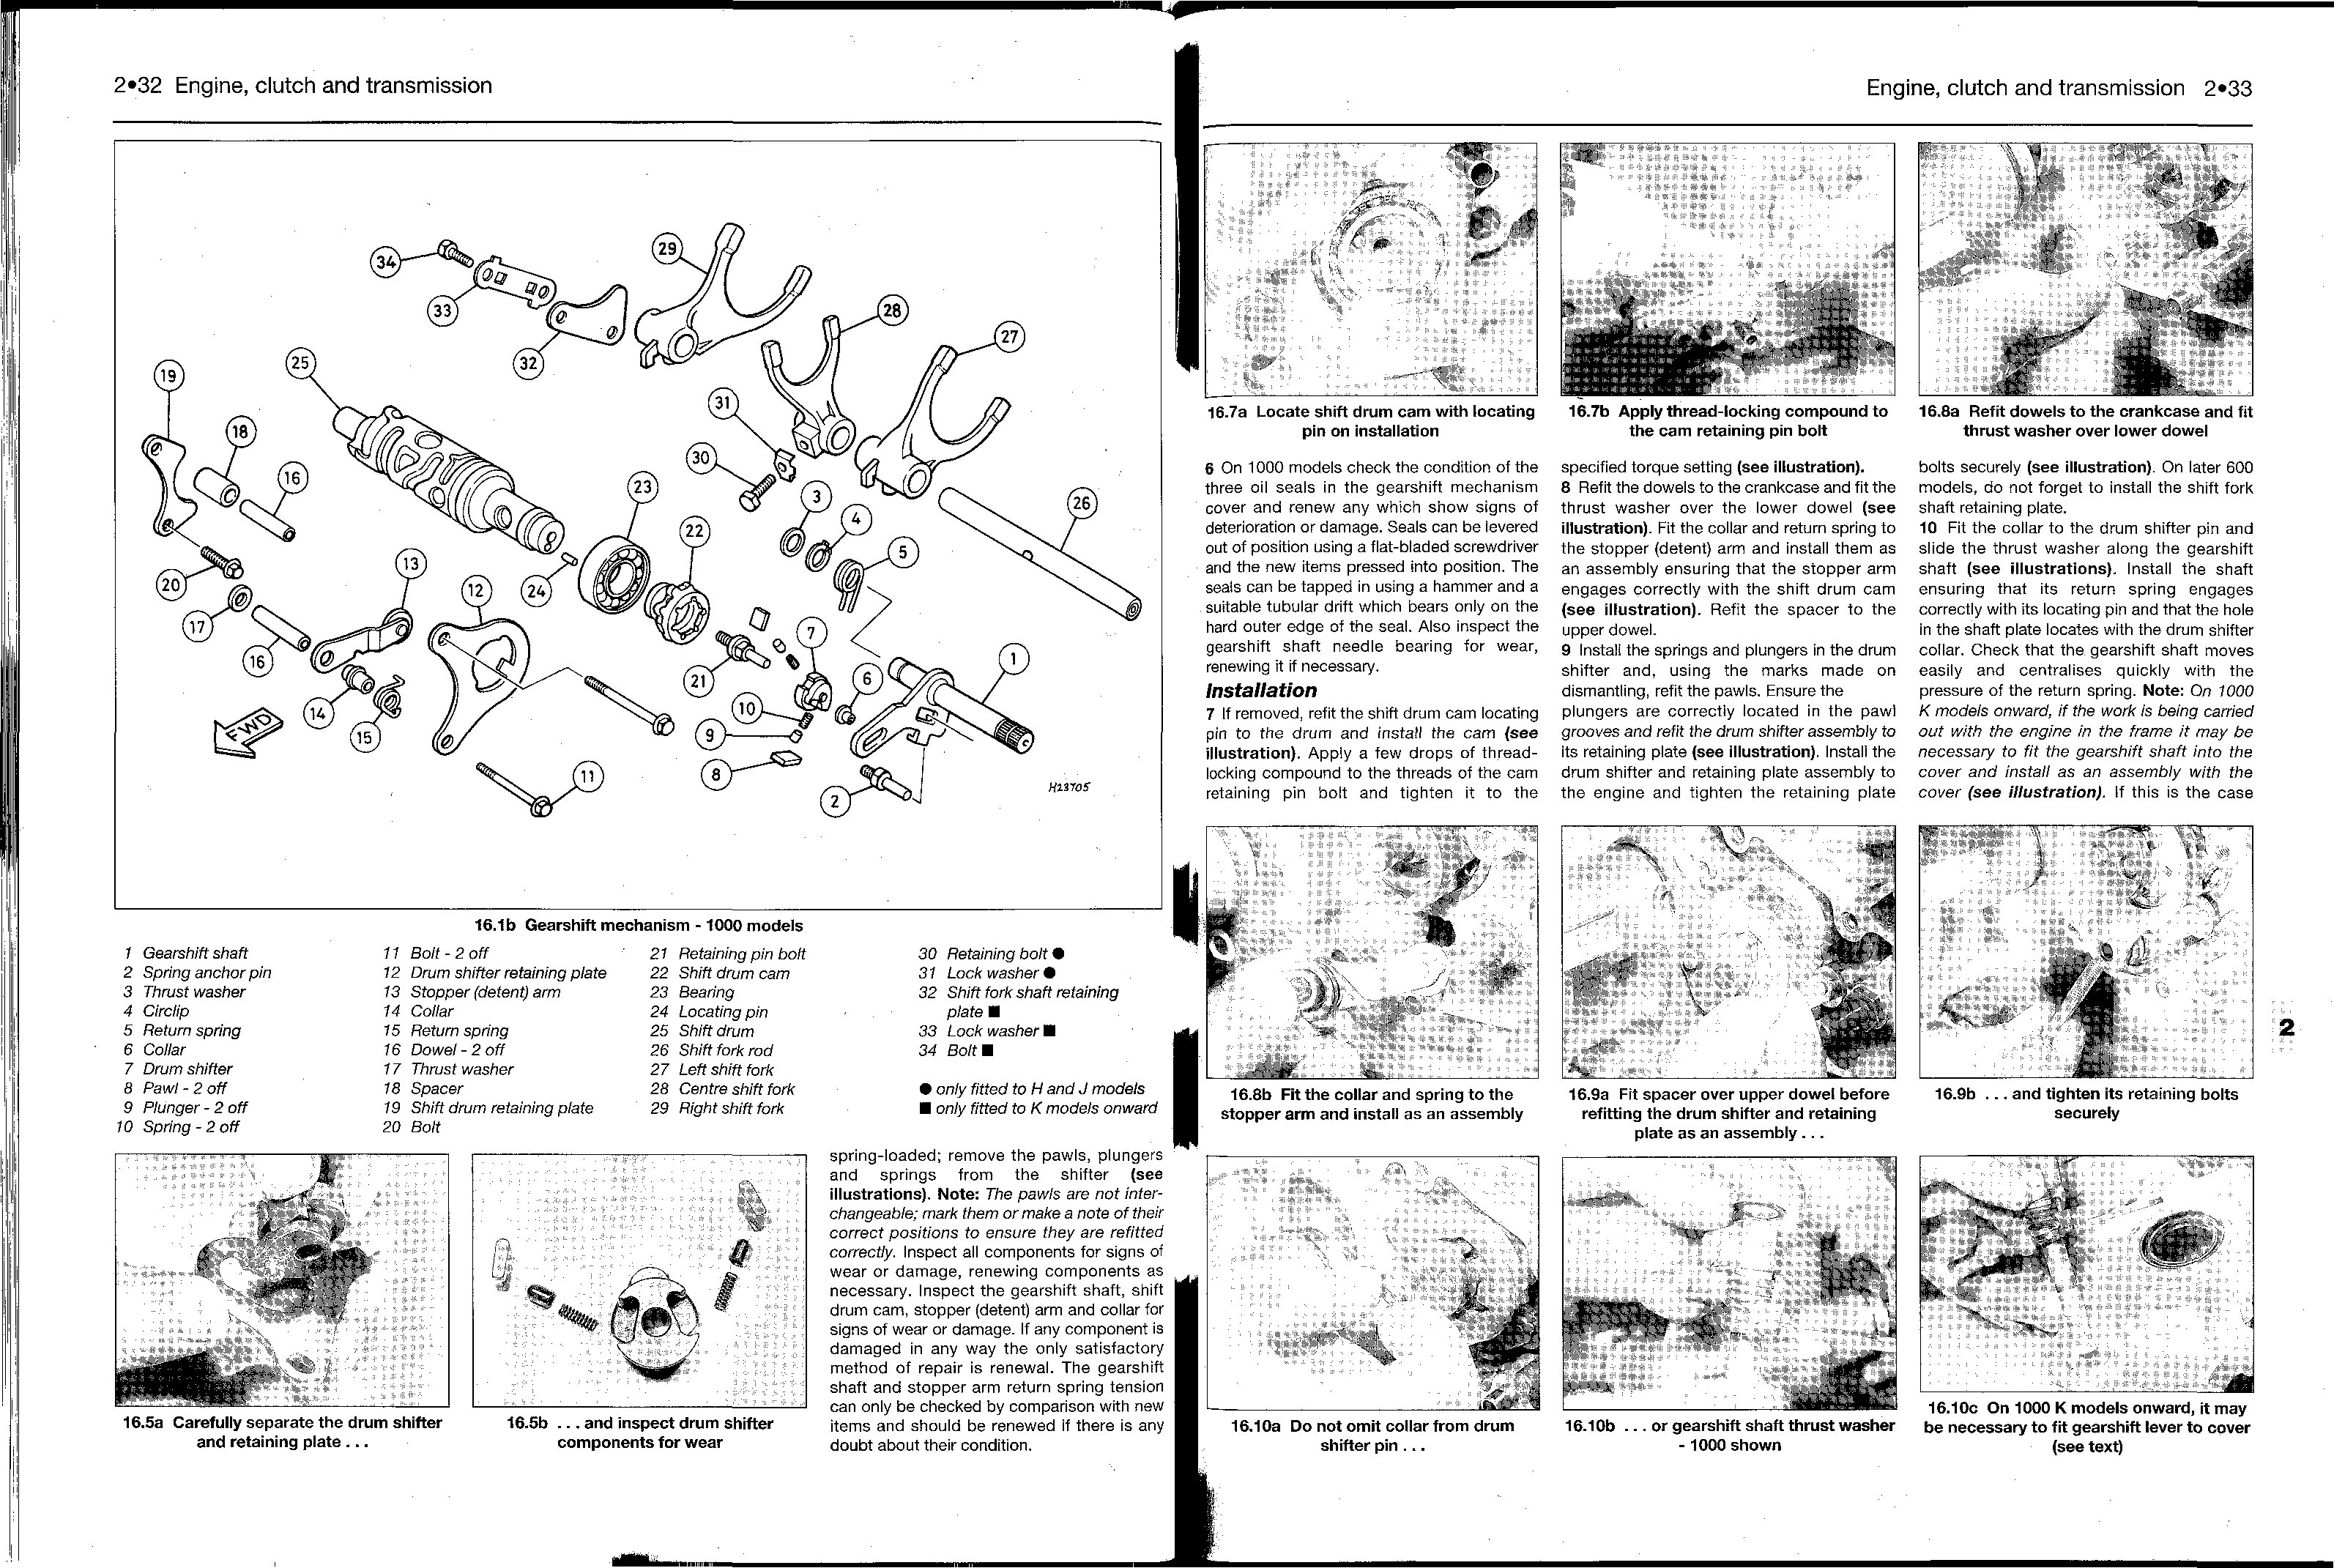
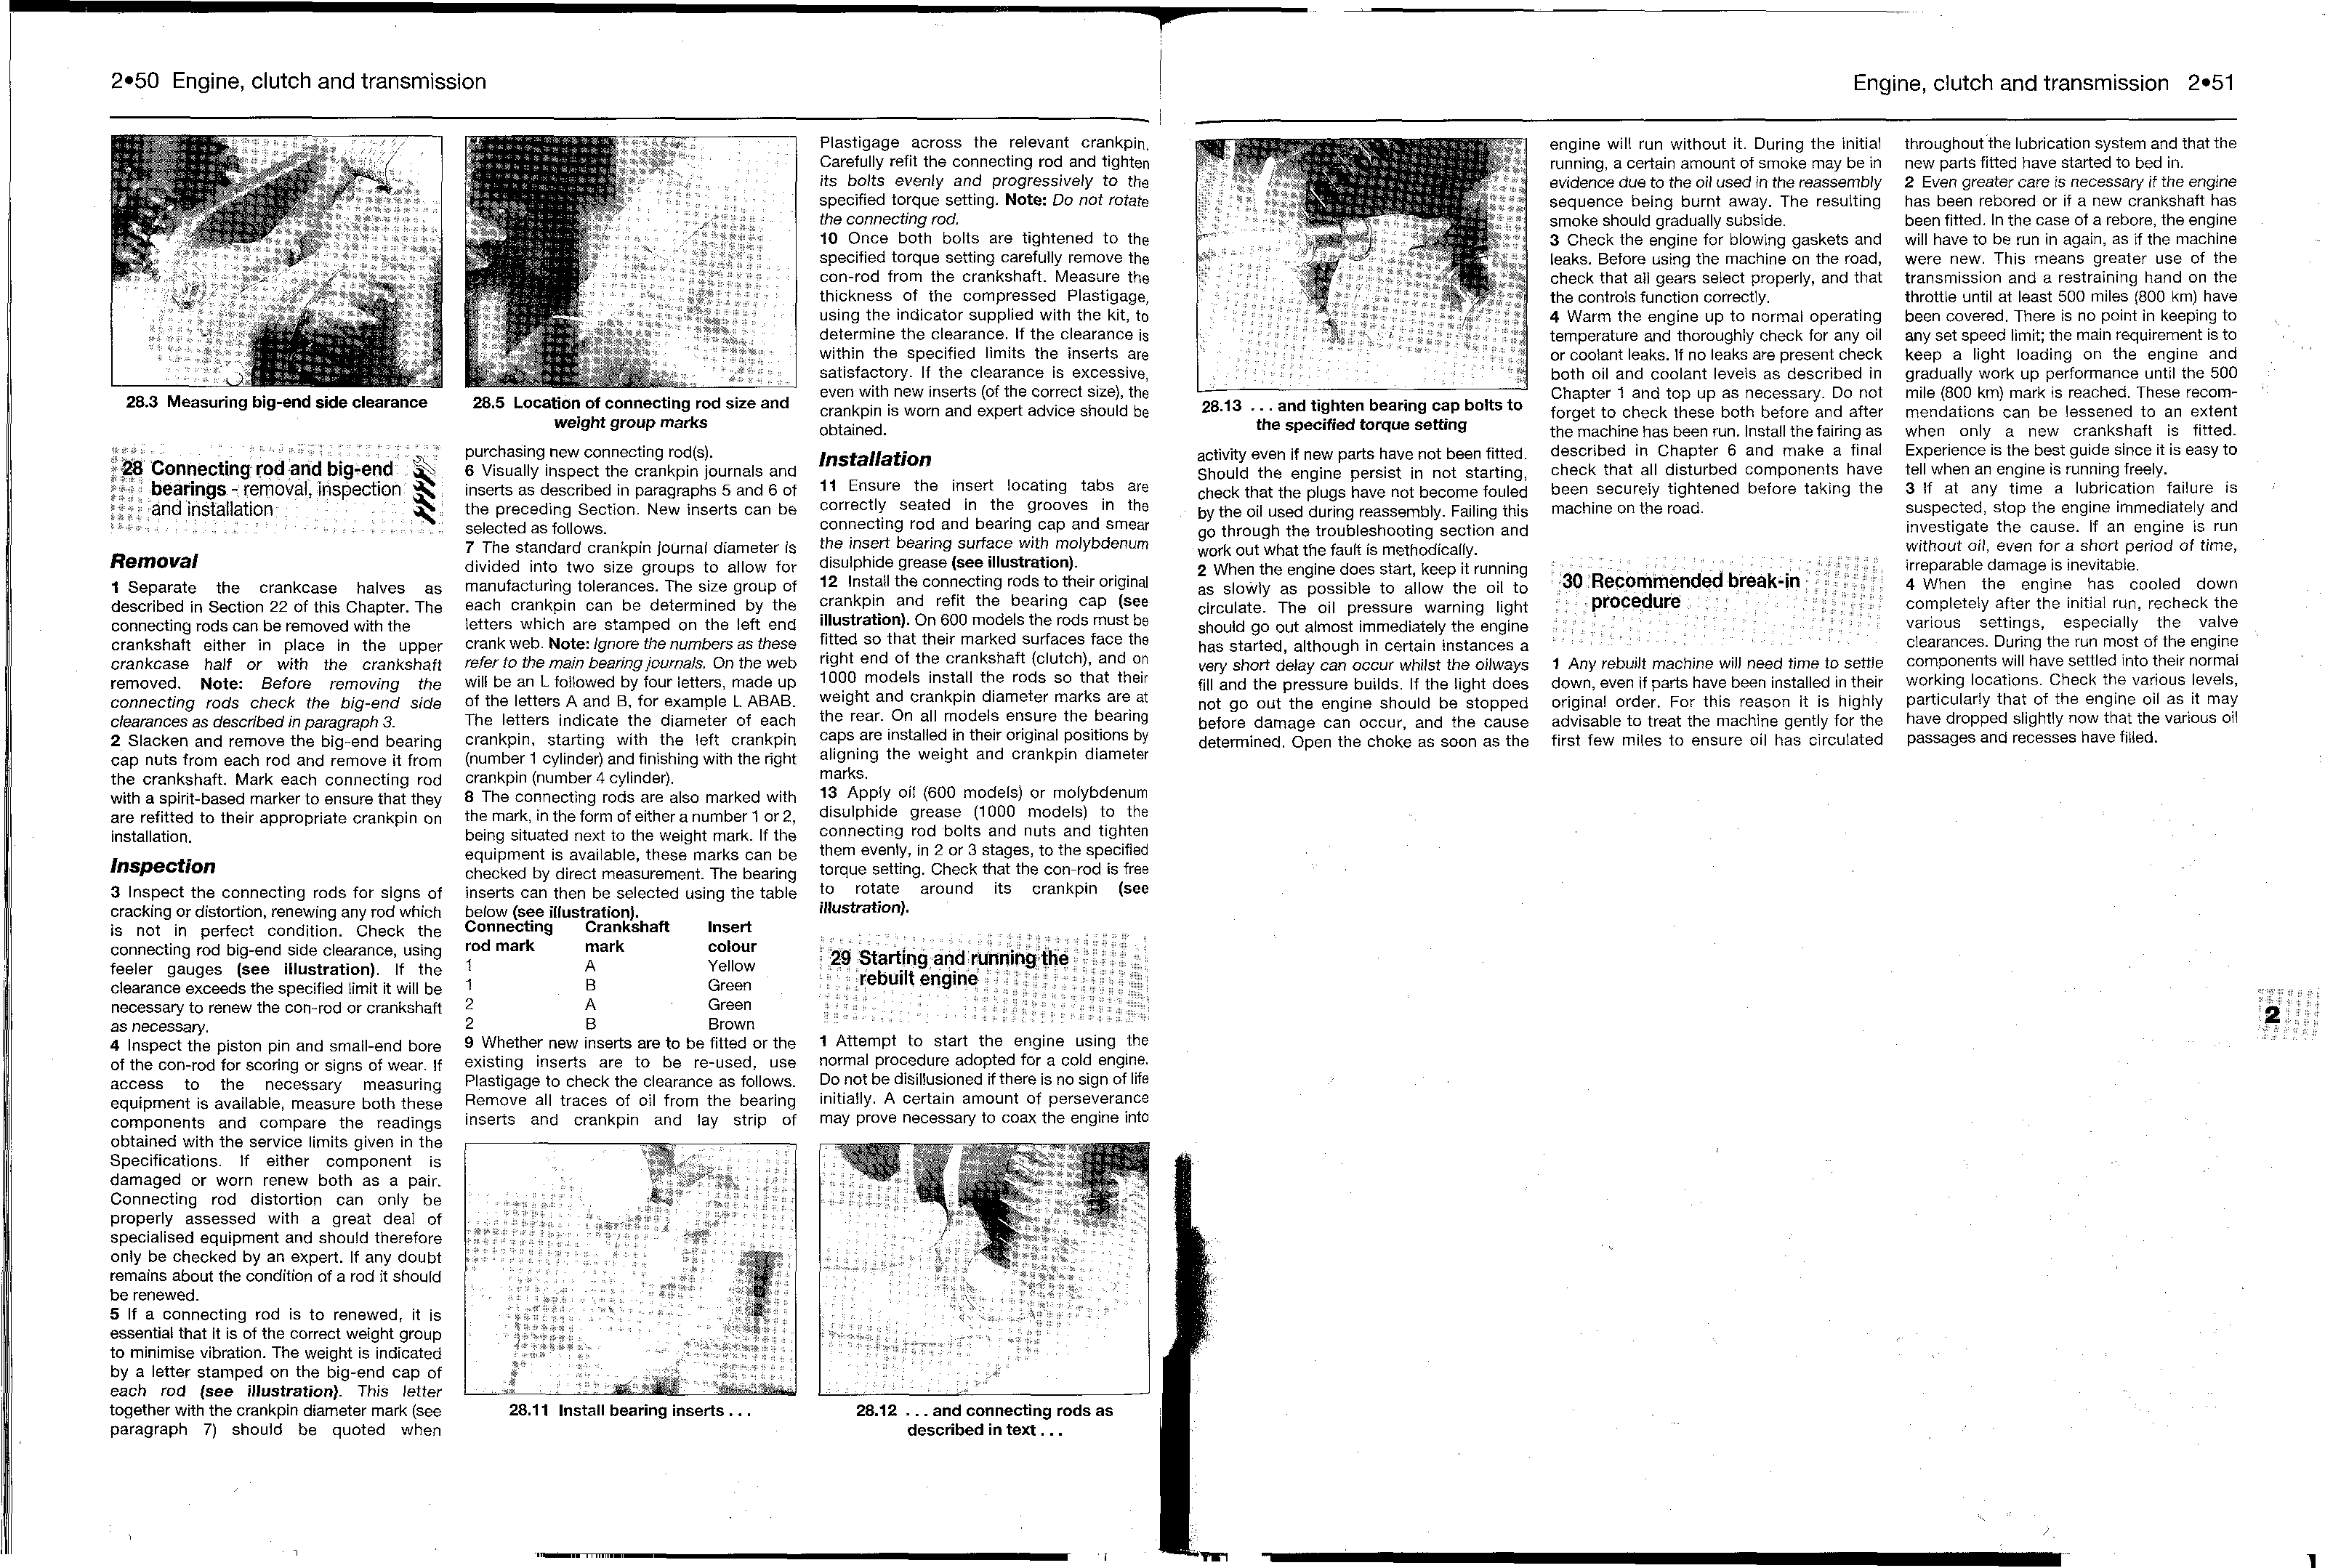
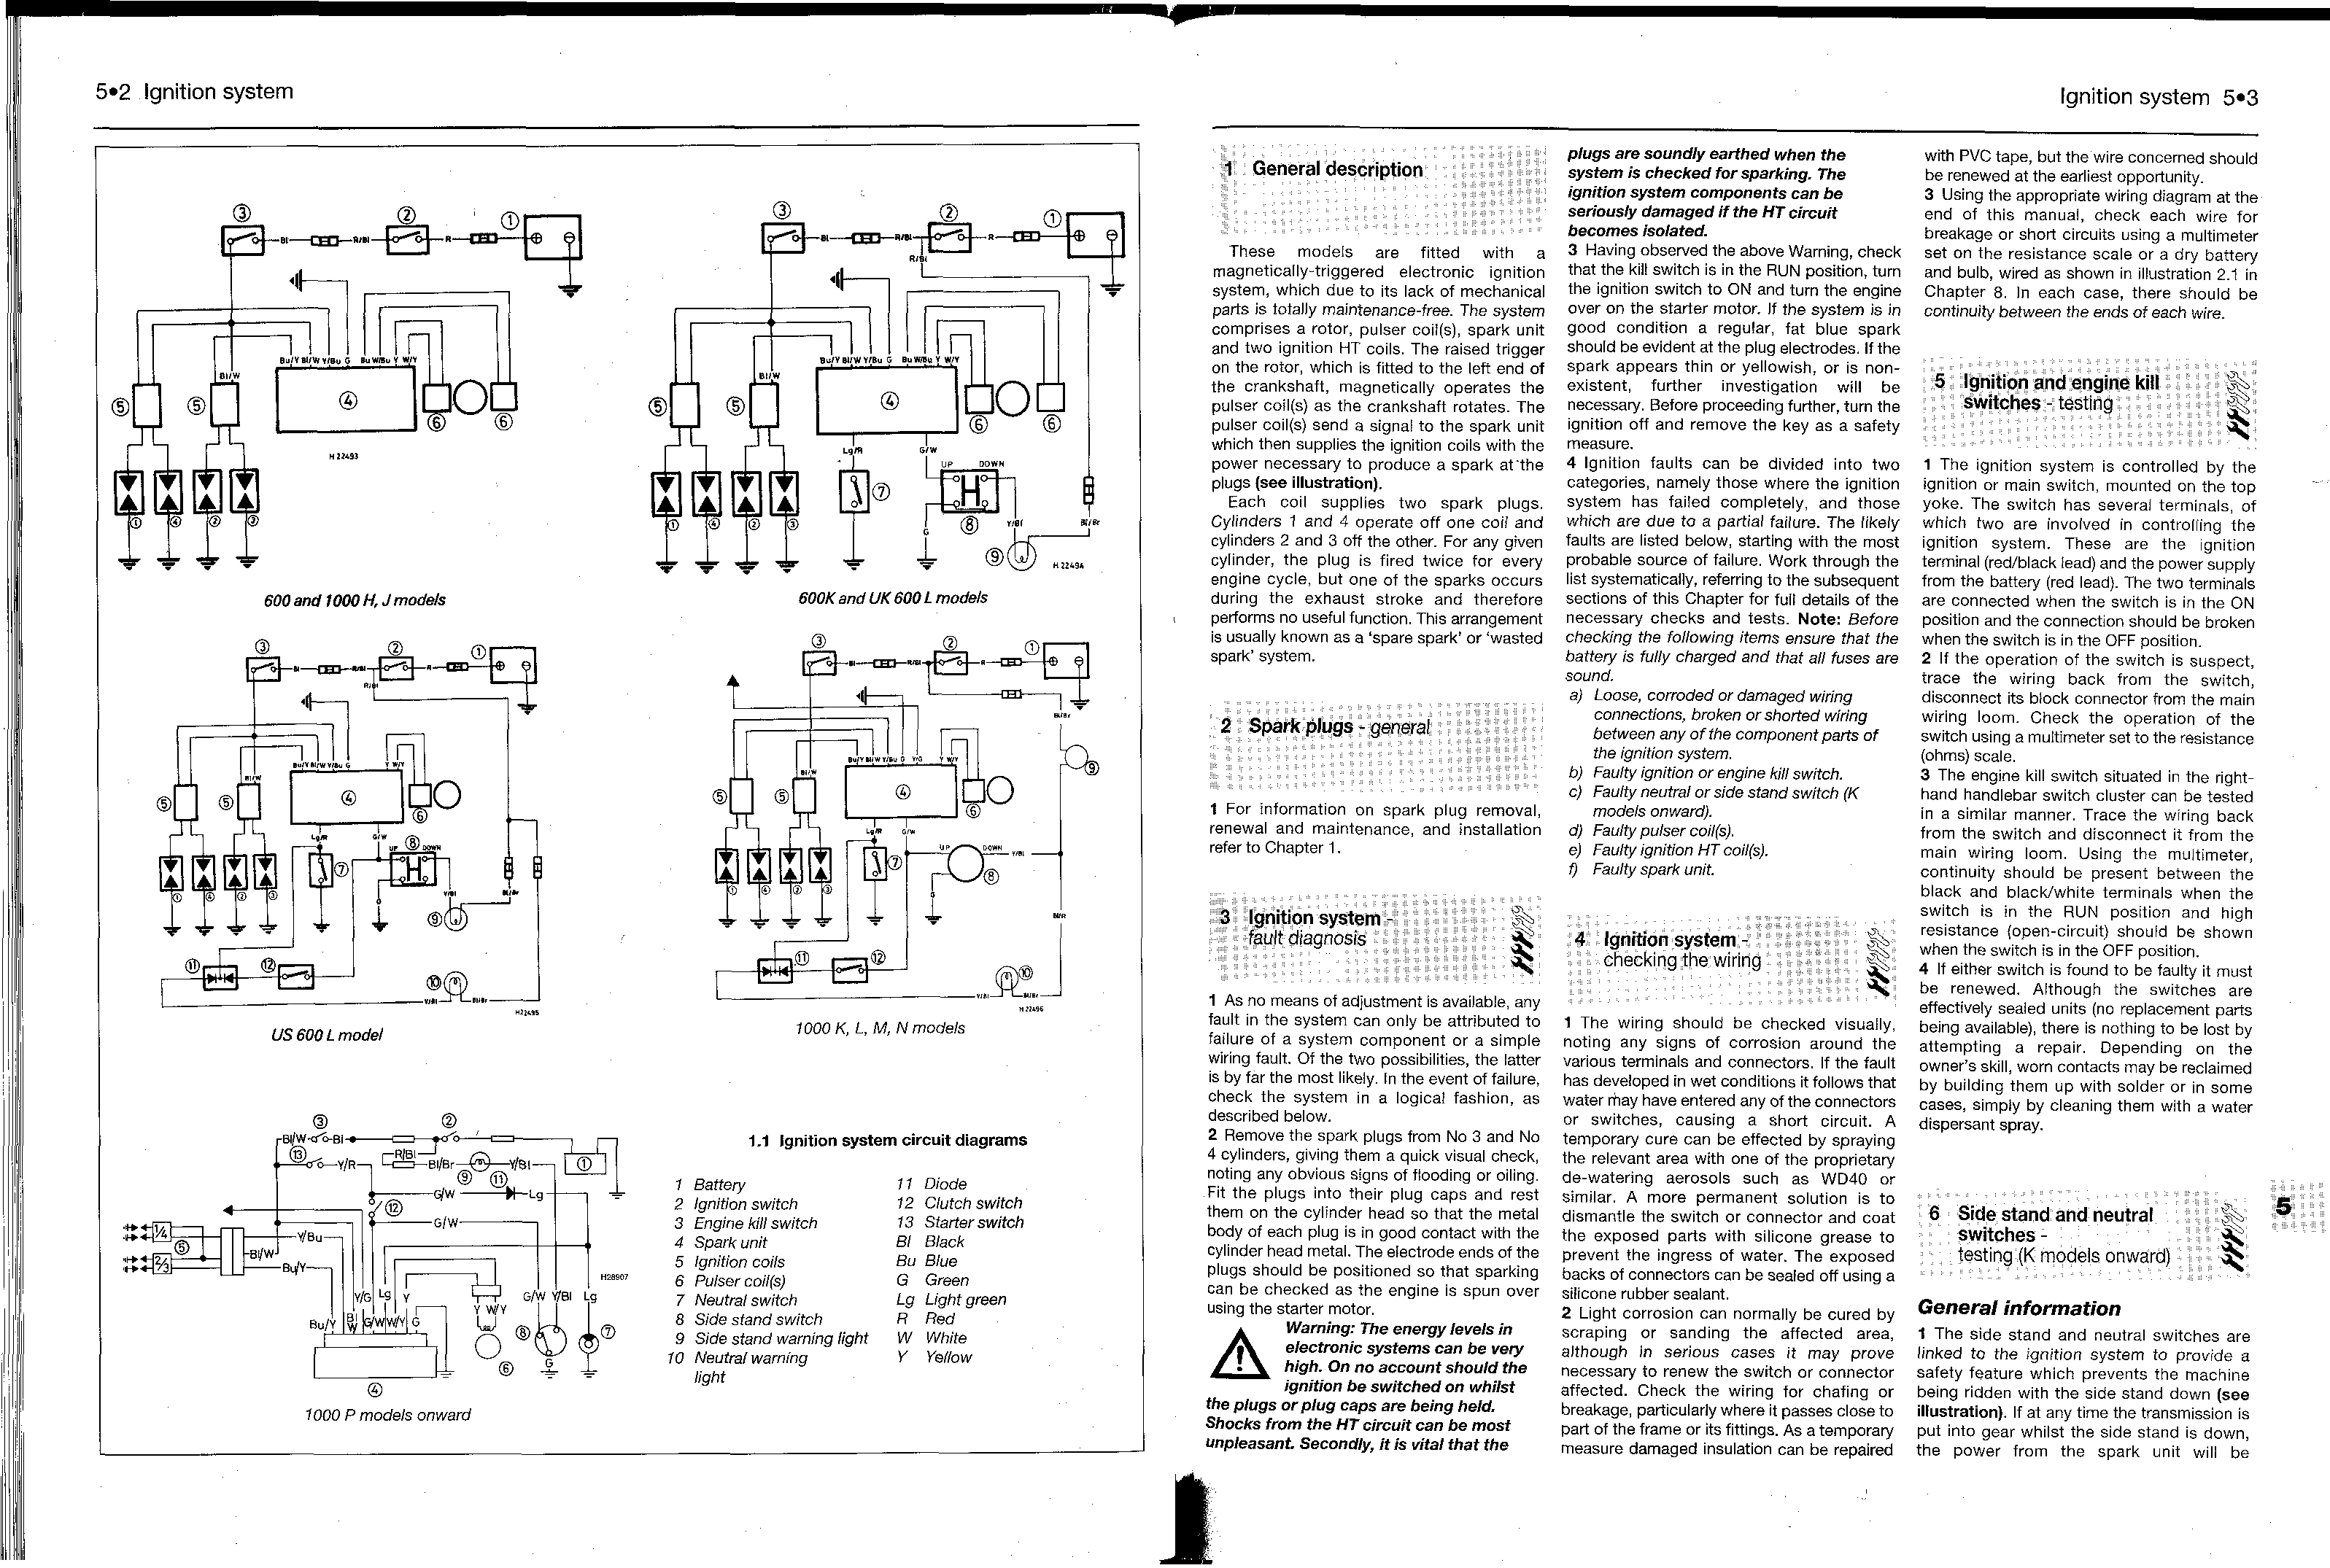
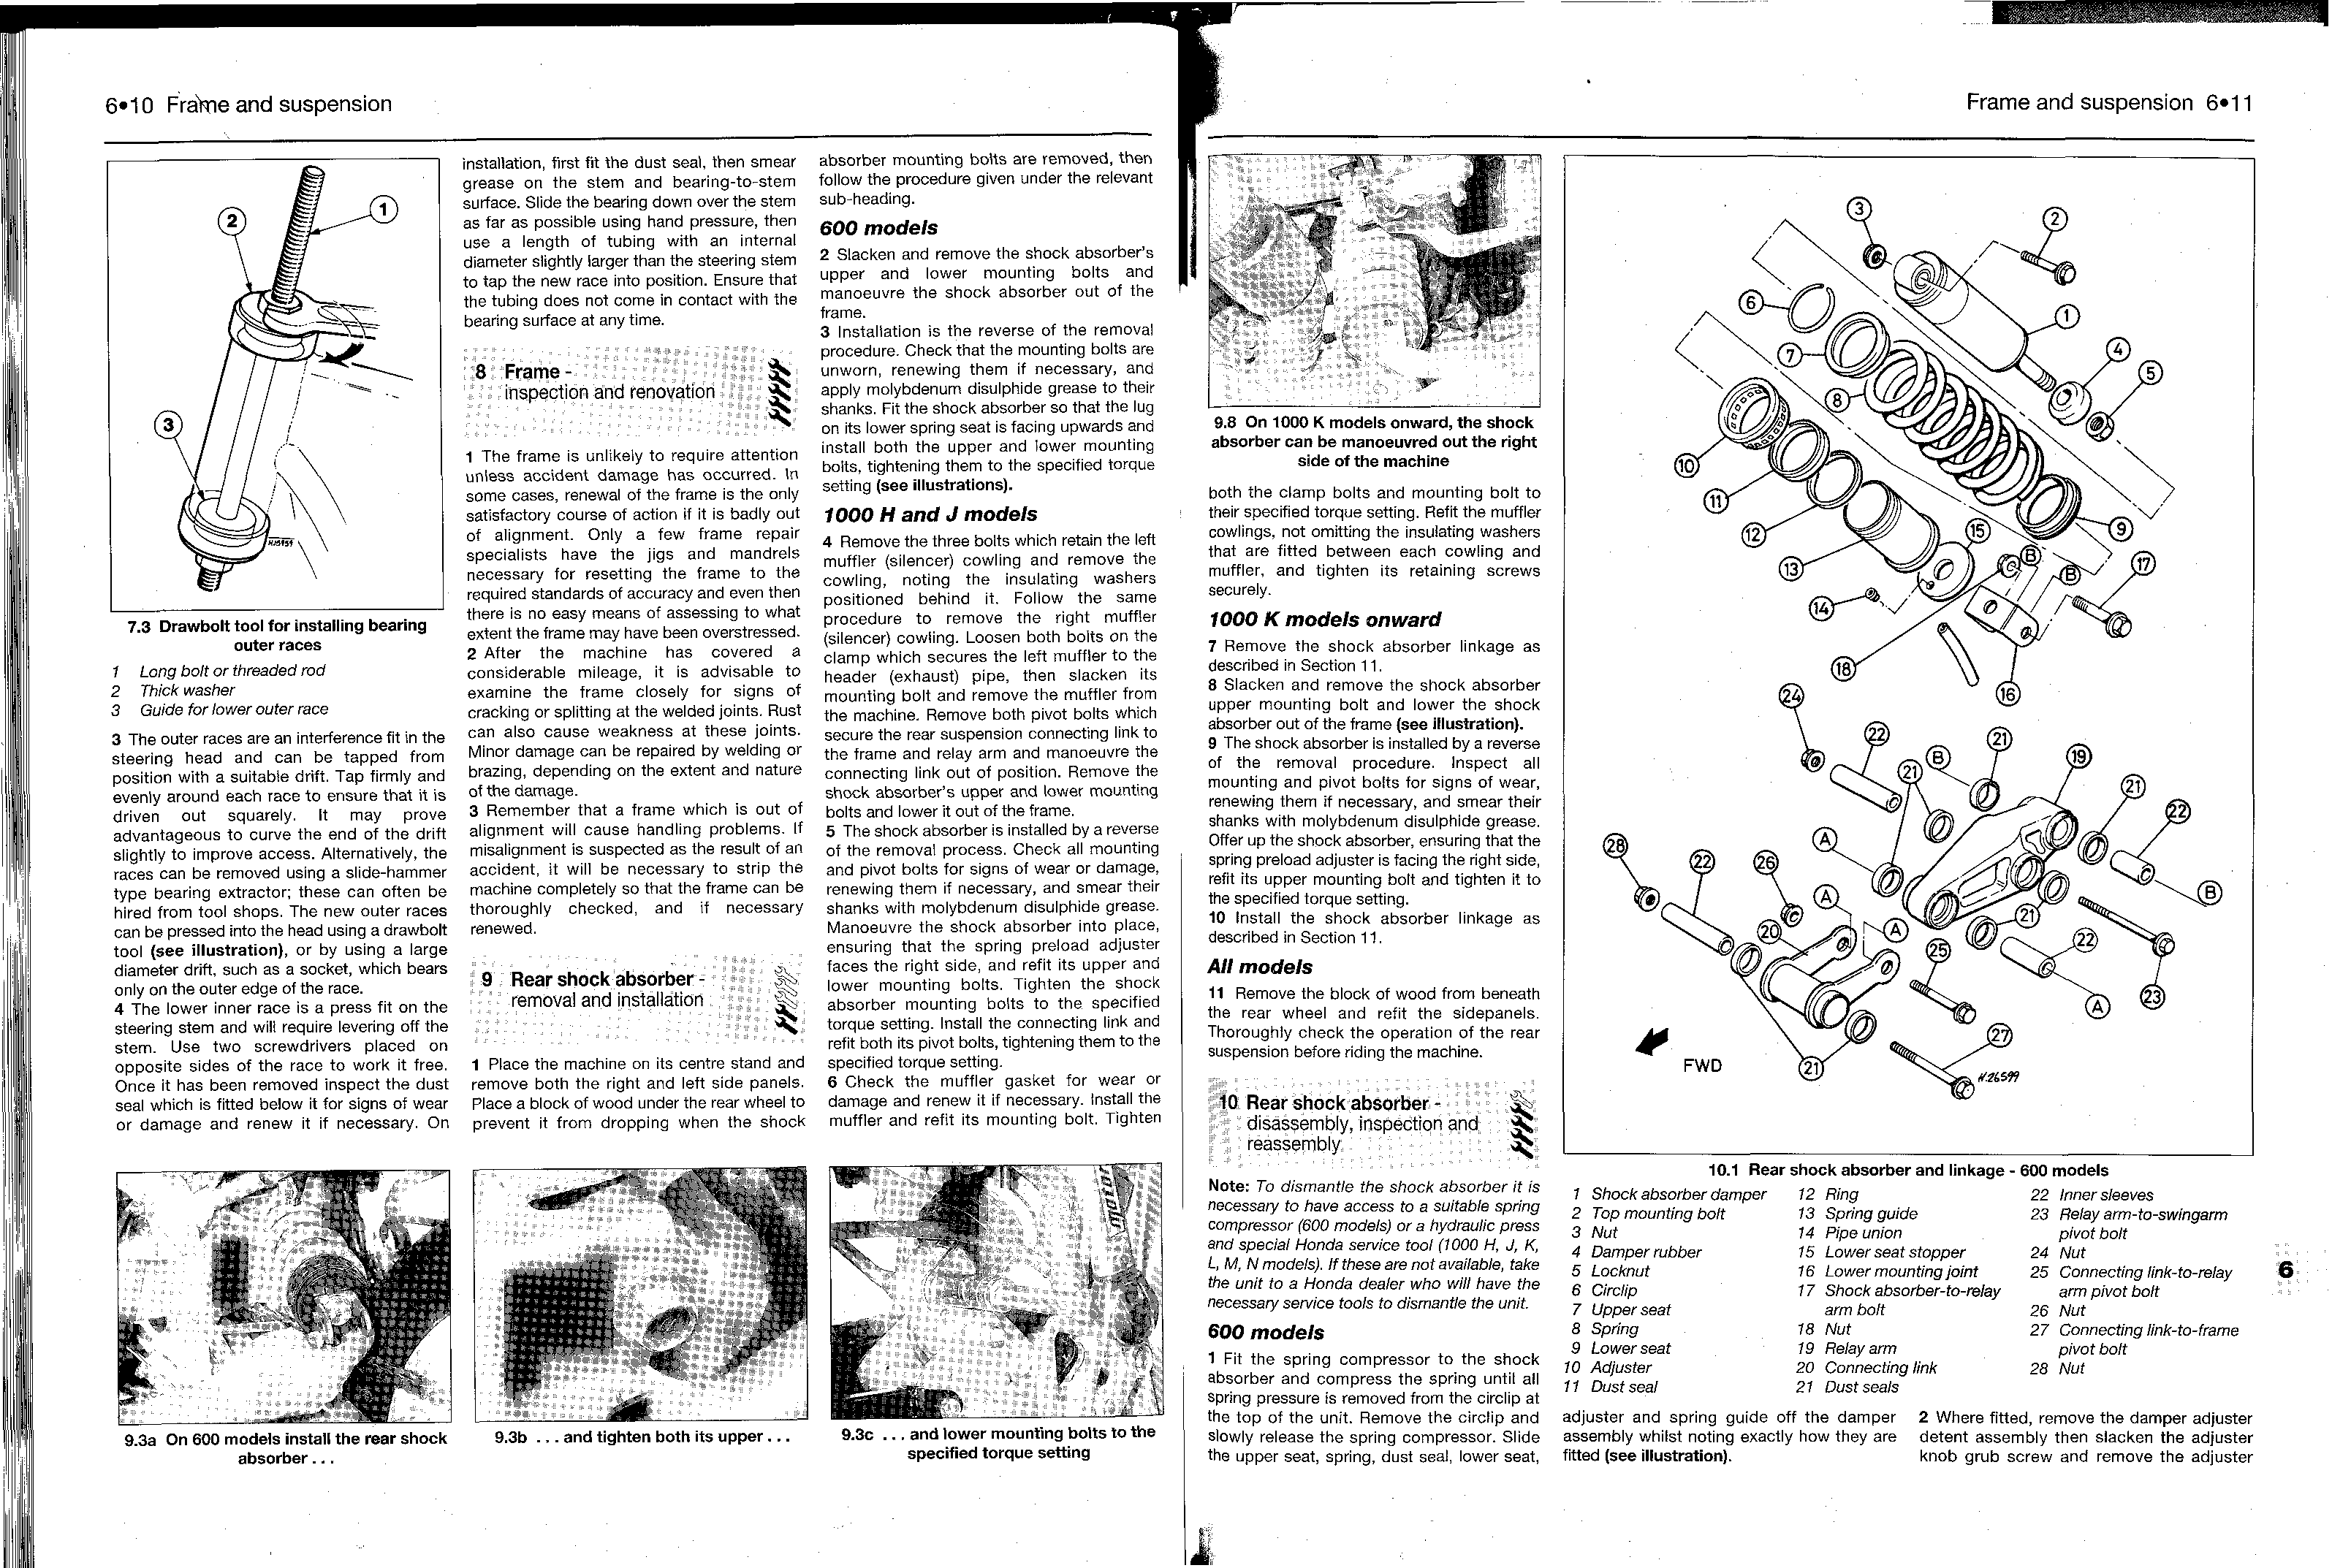
by Mark Coombs and Penny Cox
Models covered:
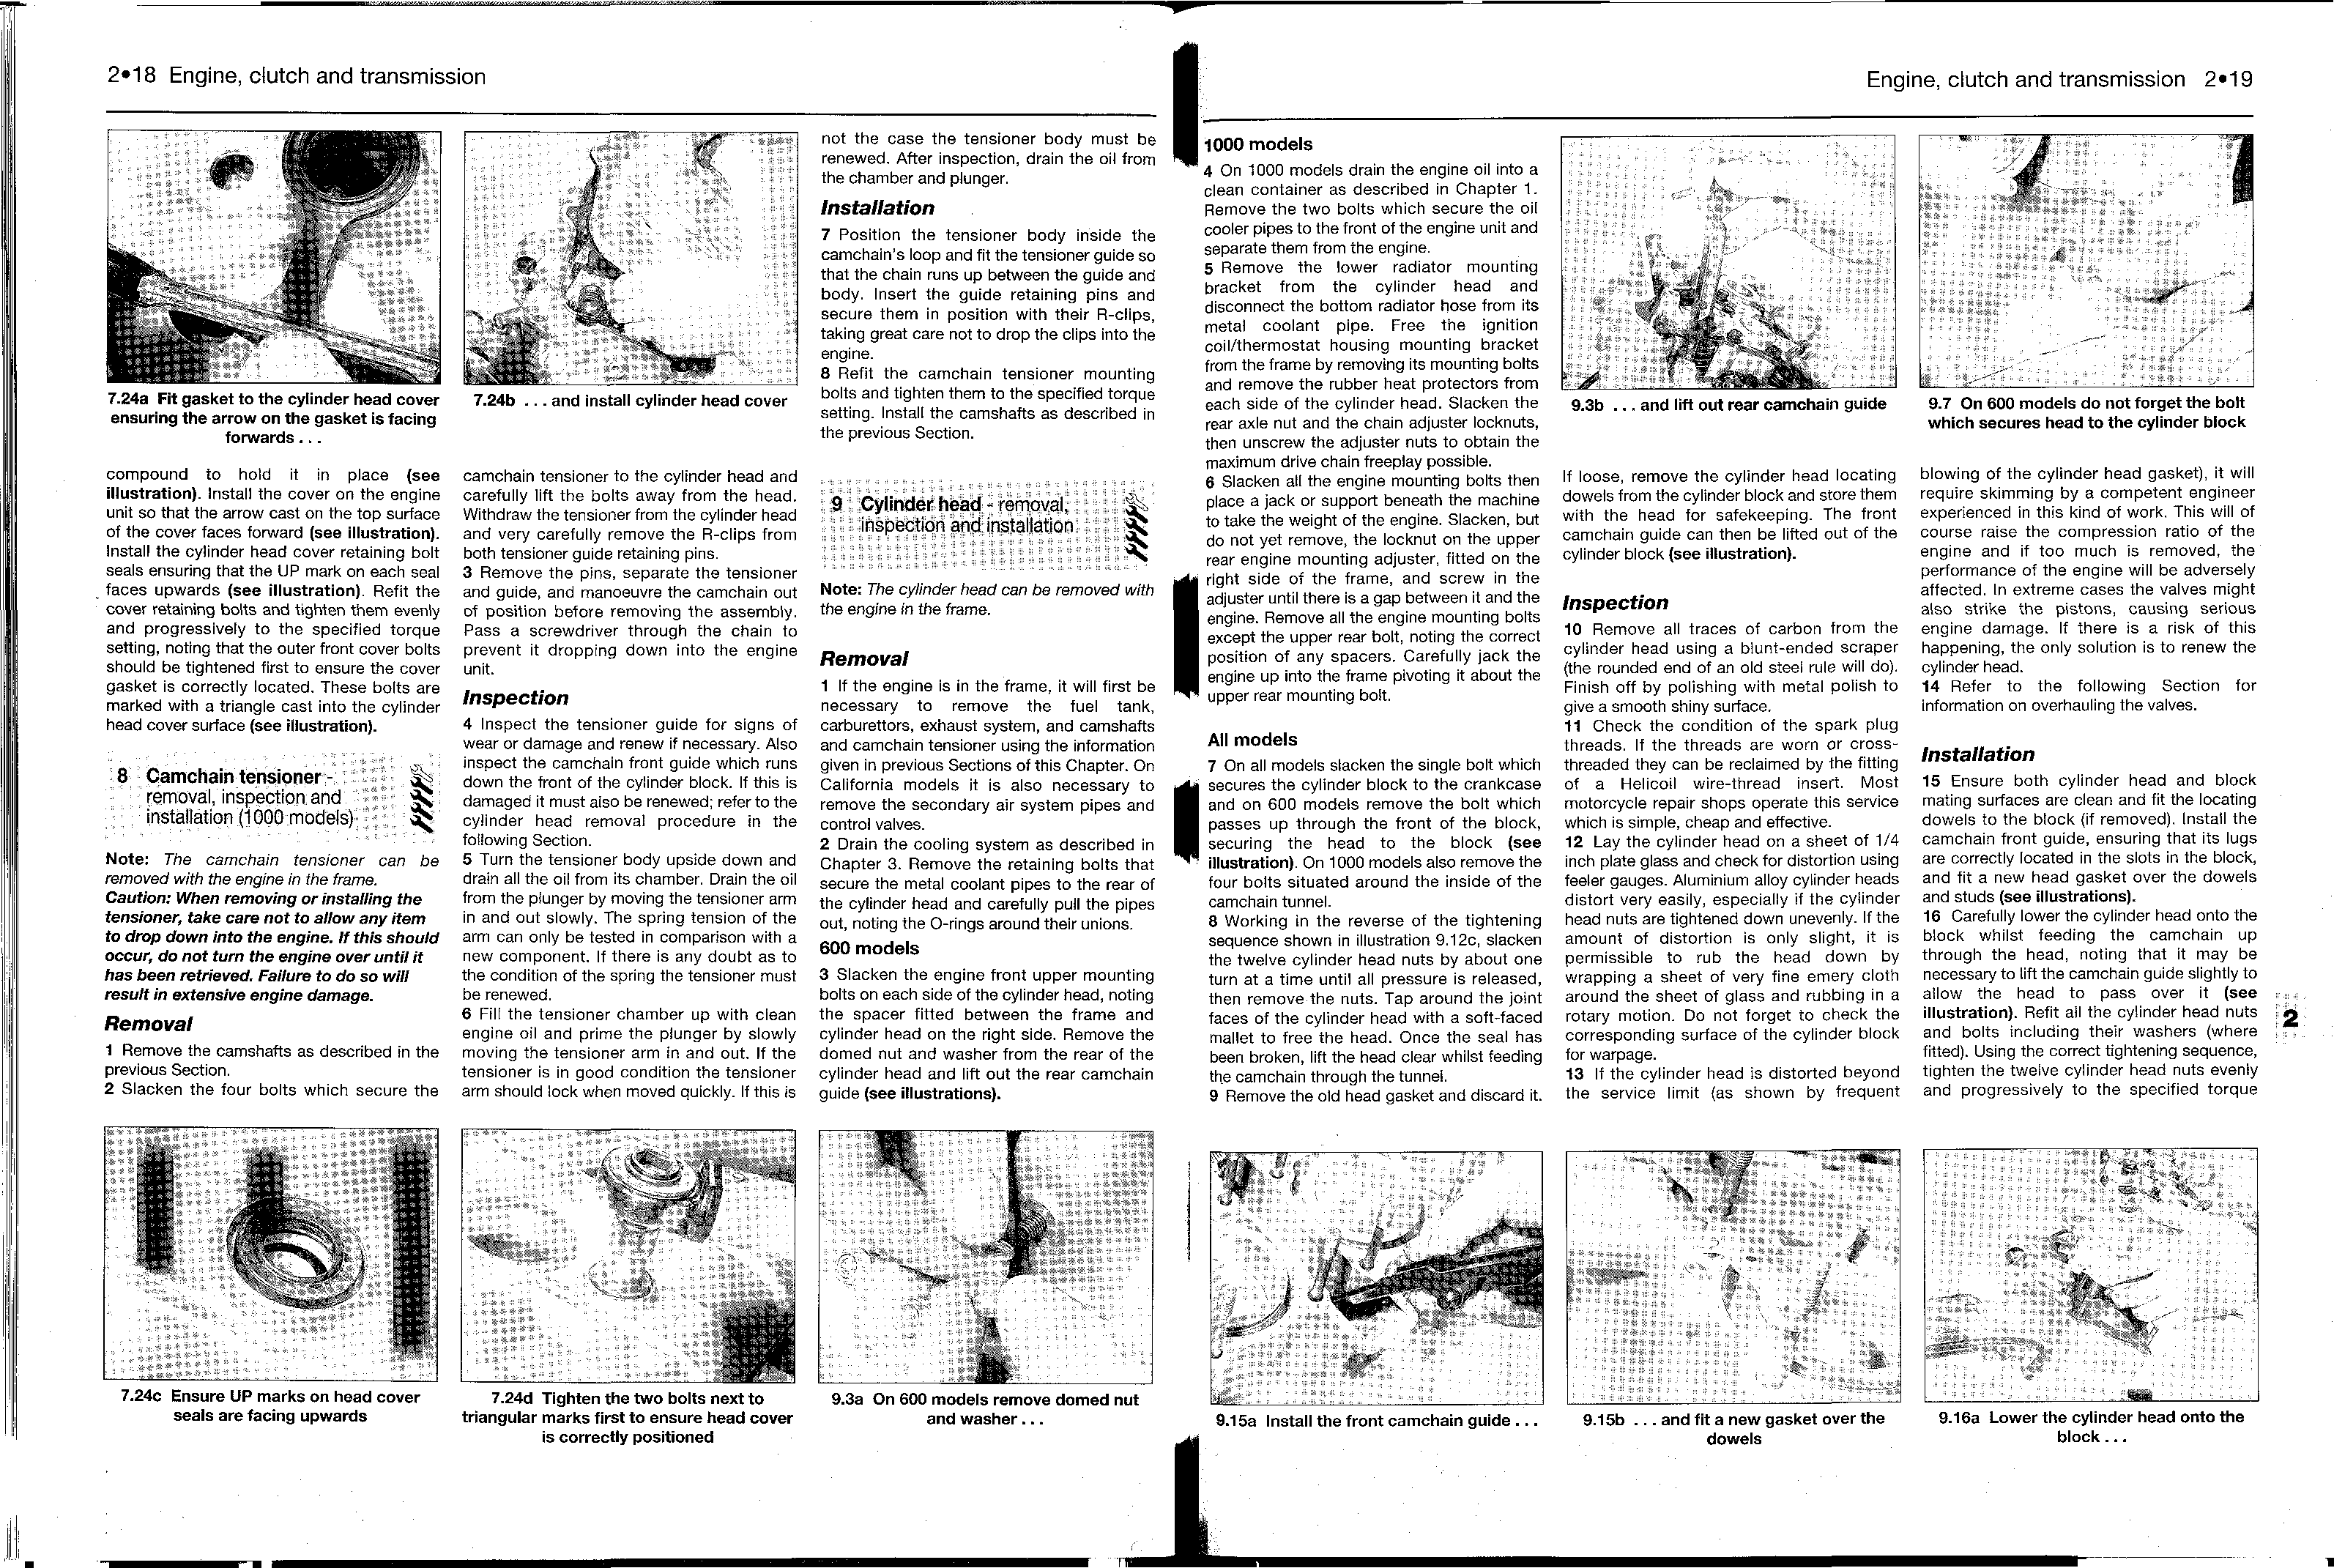
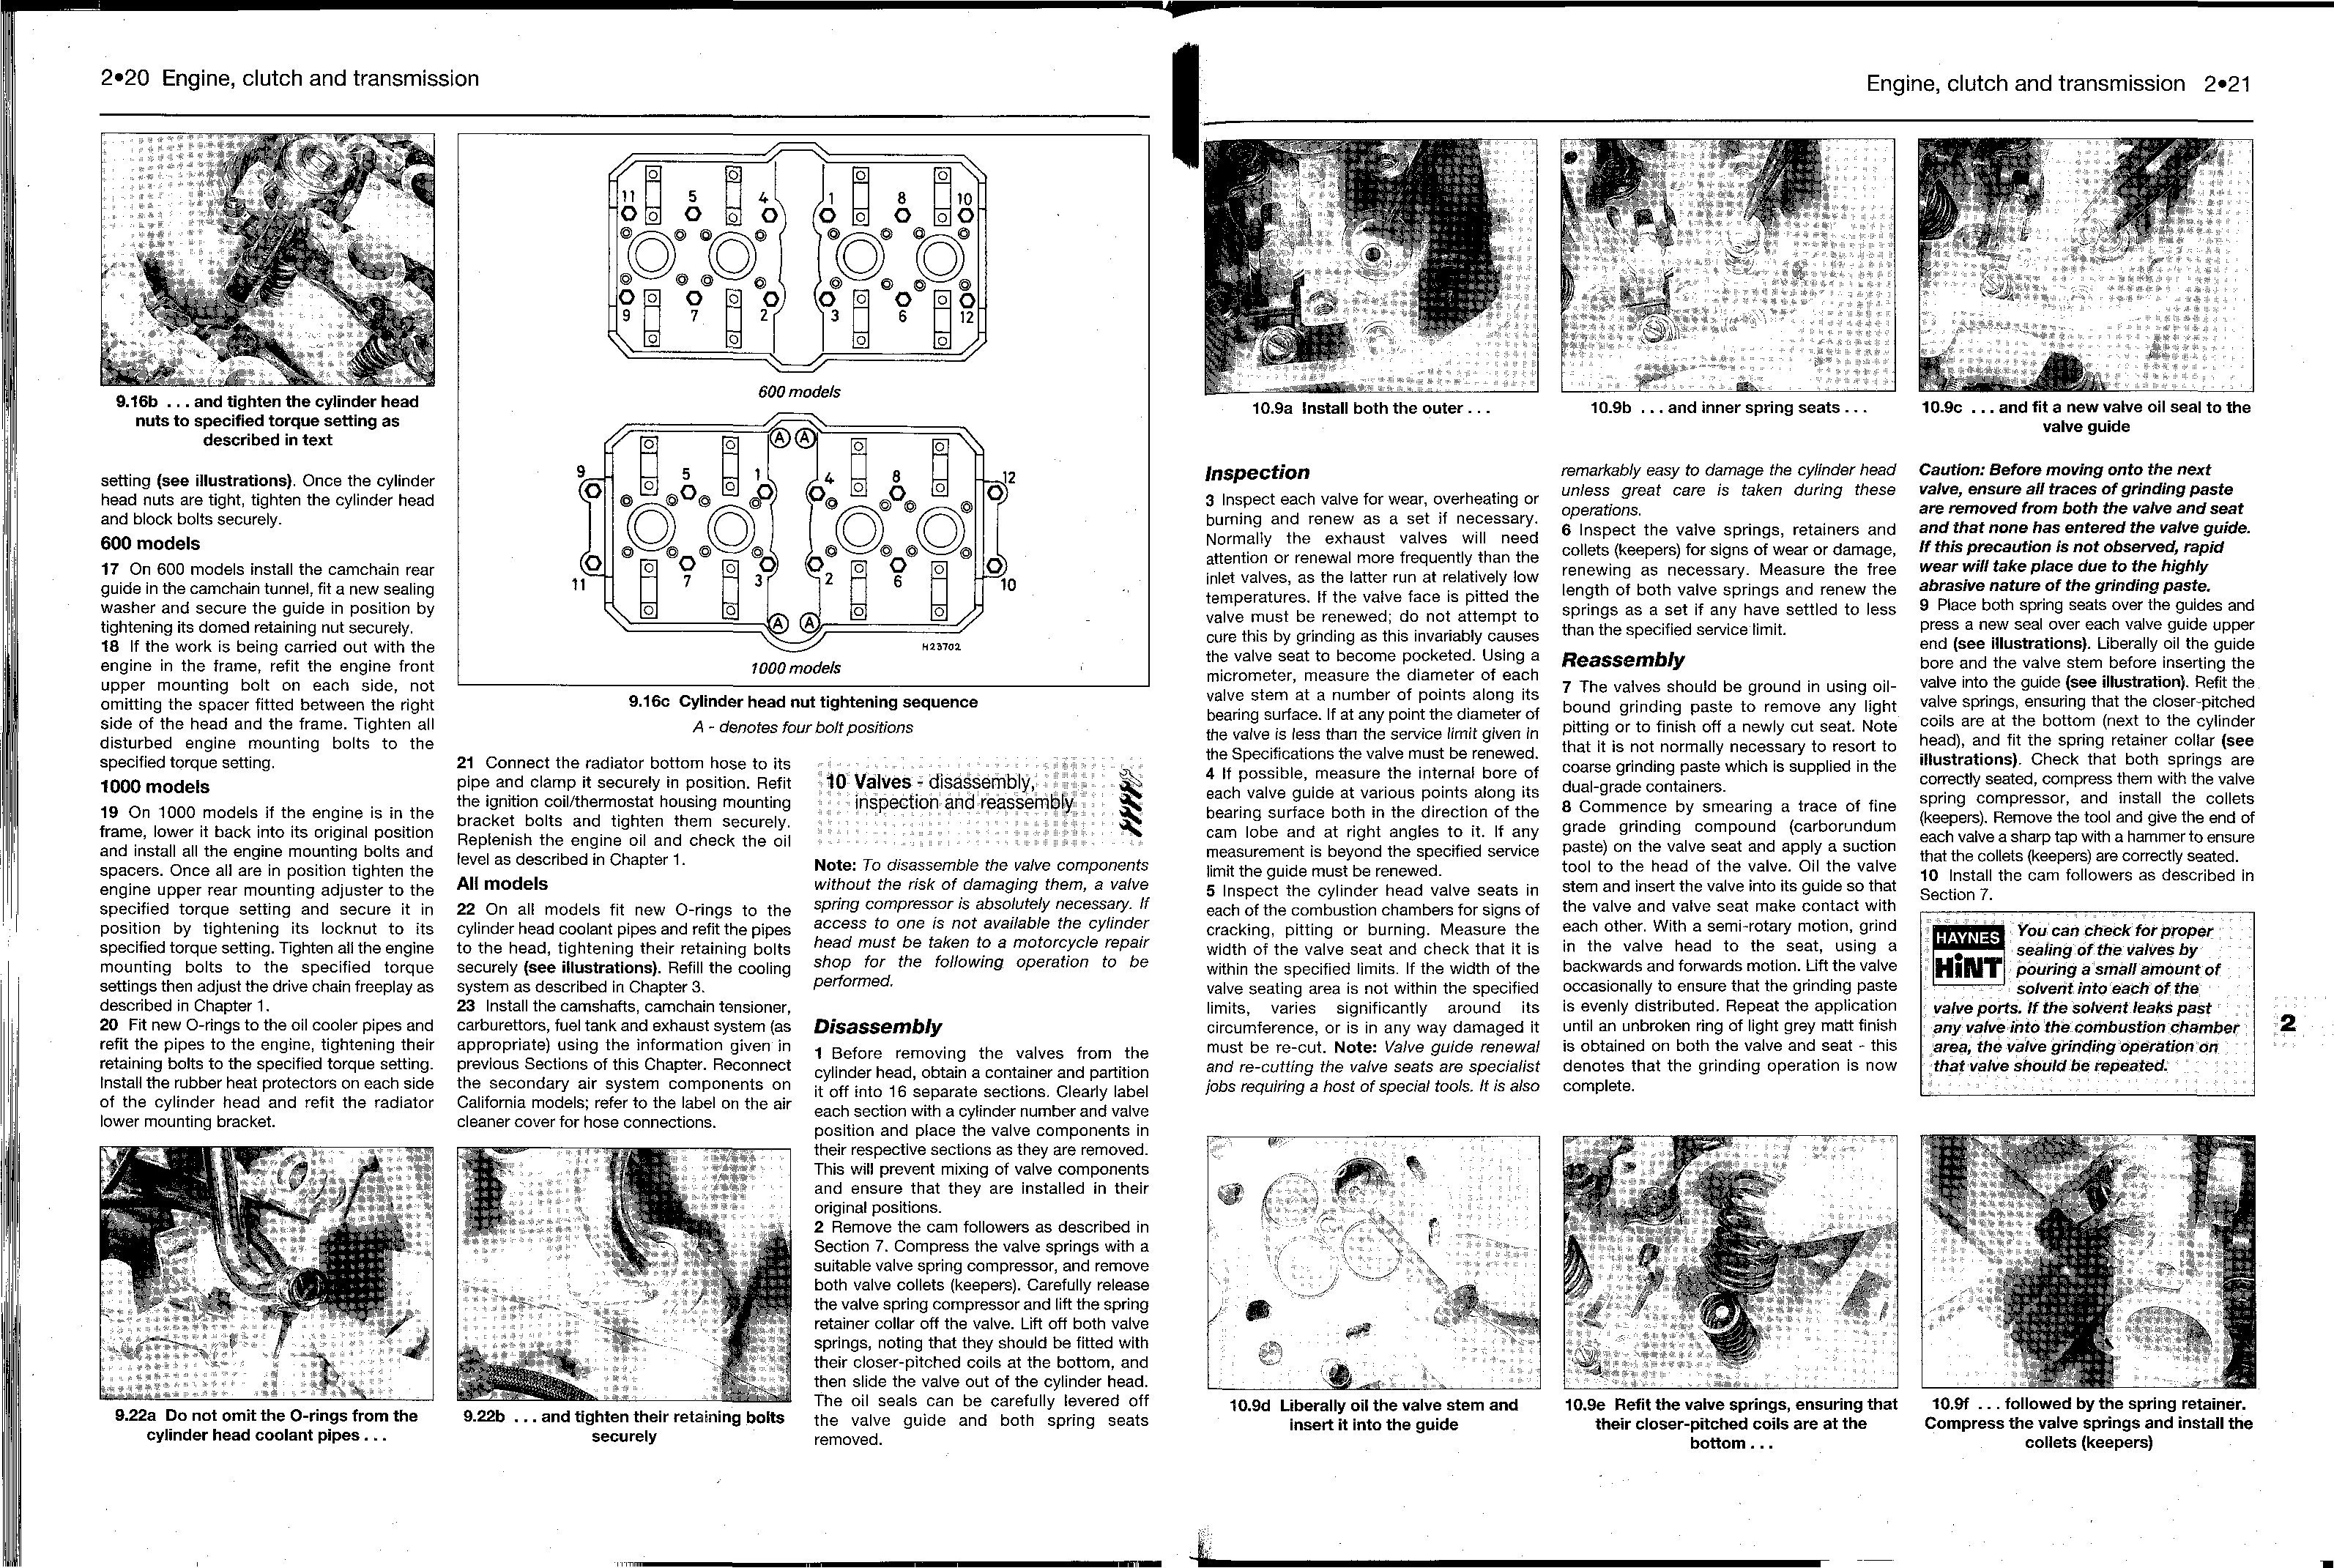
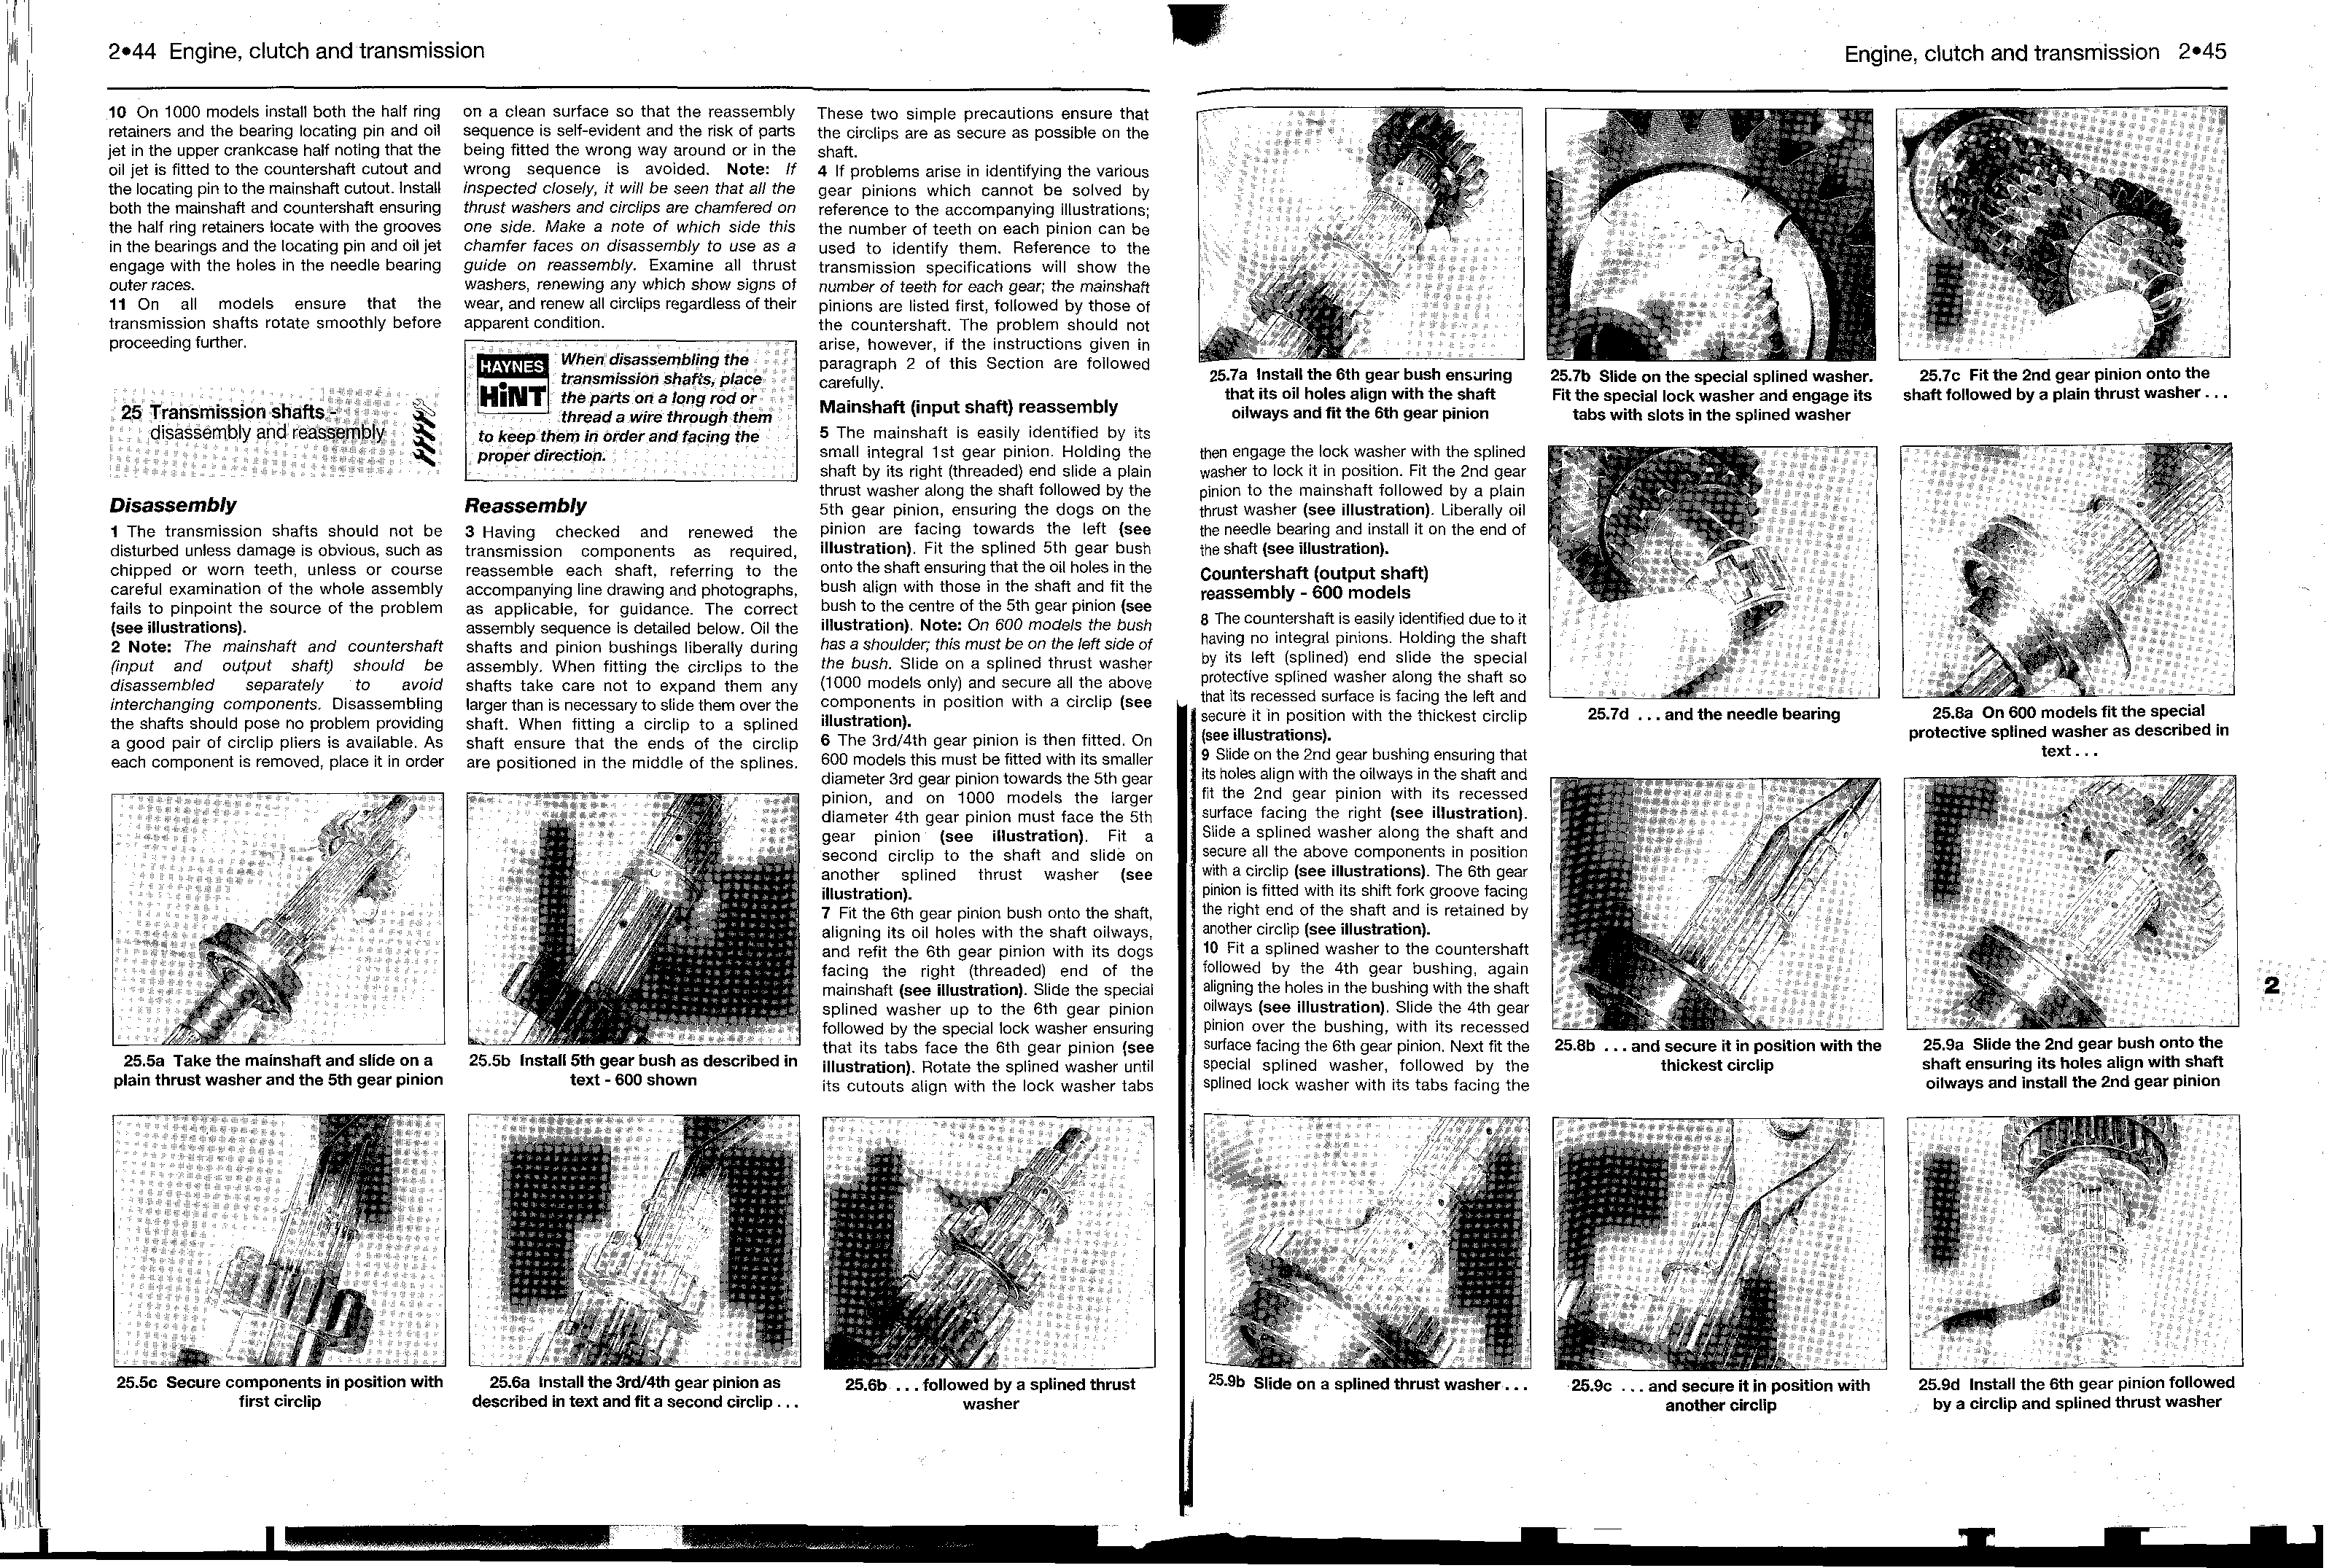
- CBR600F1. 598 cc. UK January 1987 to December 1991
- CBR600F1 (Hurricane). 598 cc. US February 1987 through 1990
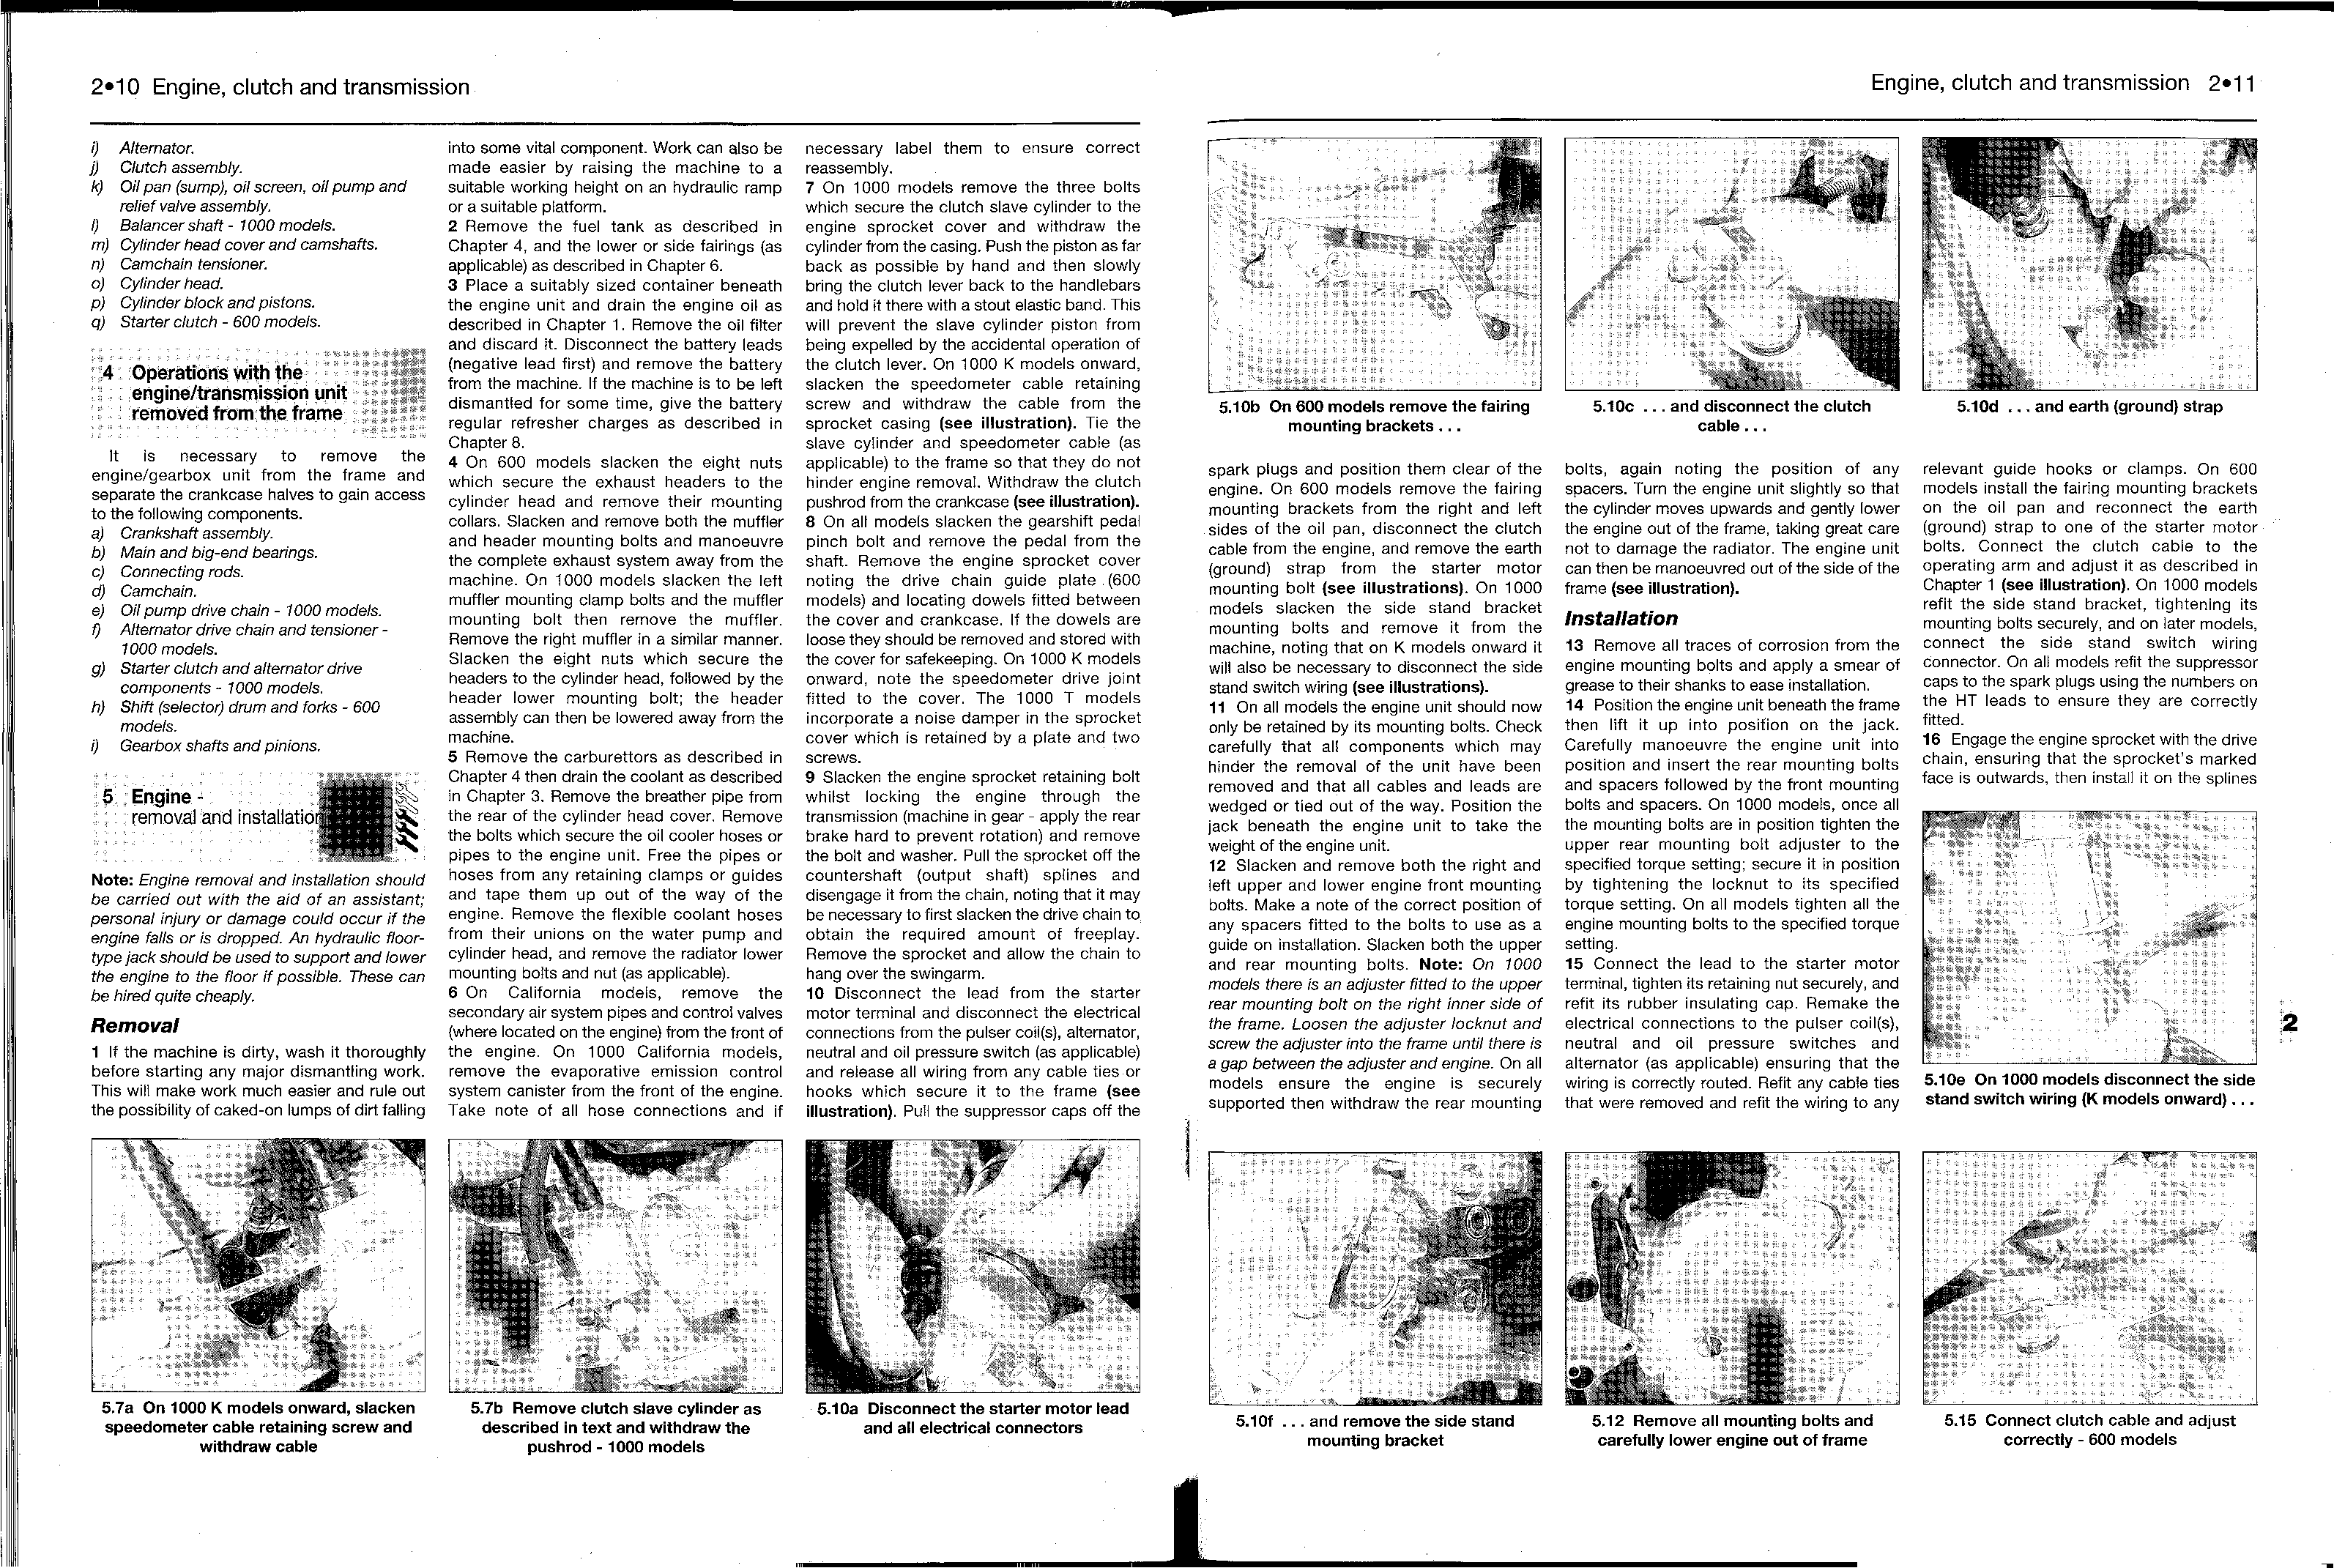
- CBR1000F. 998 cc. UK January 1987 onwards
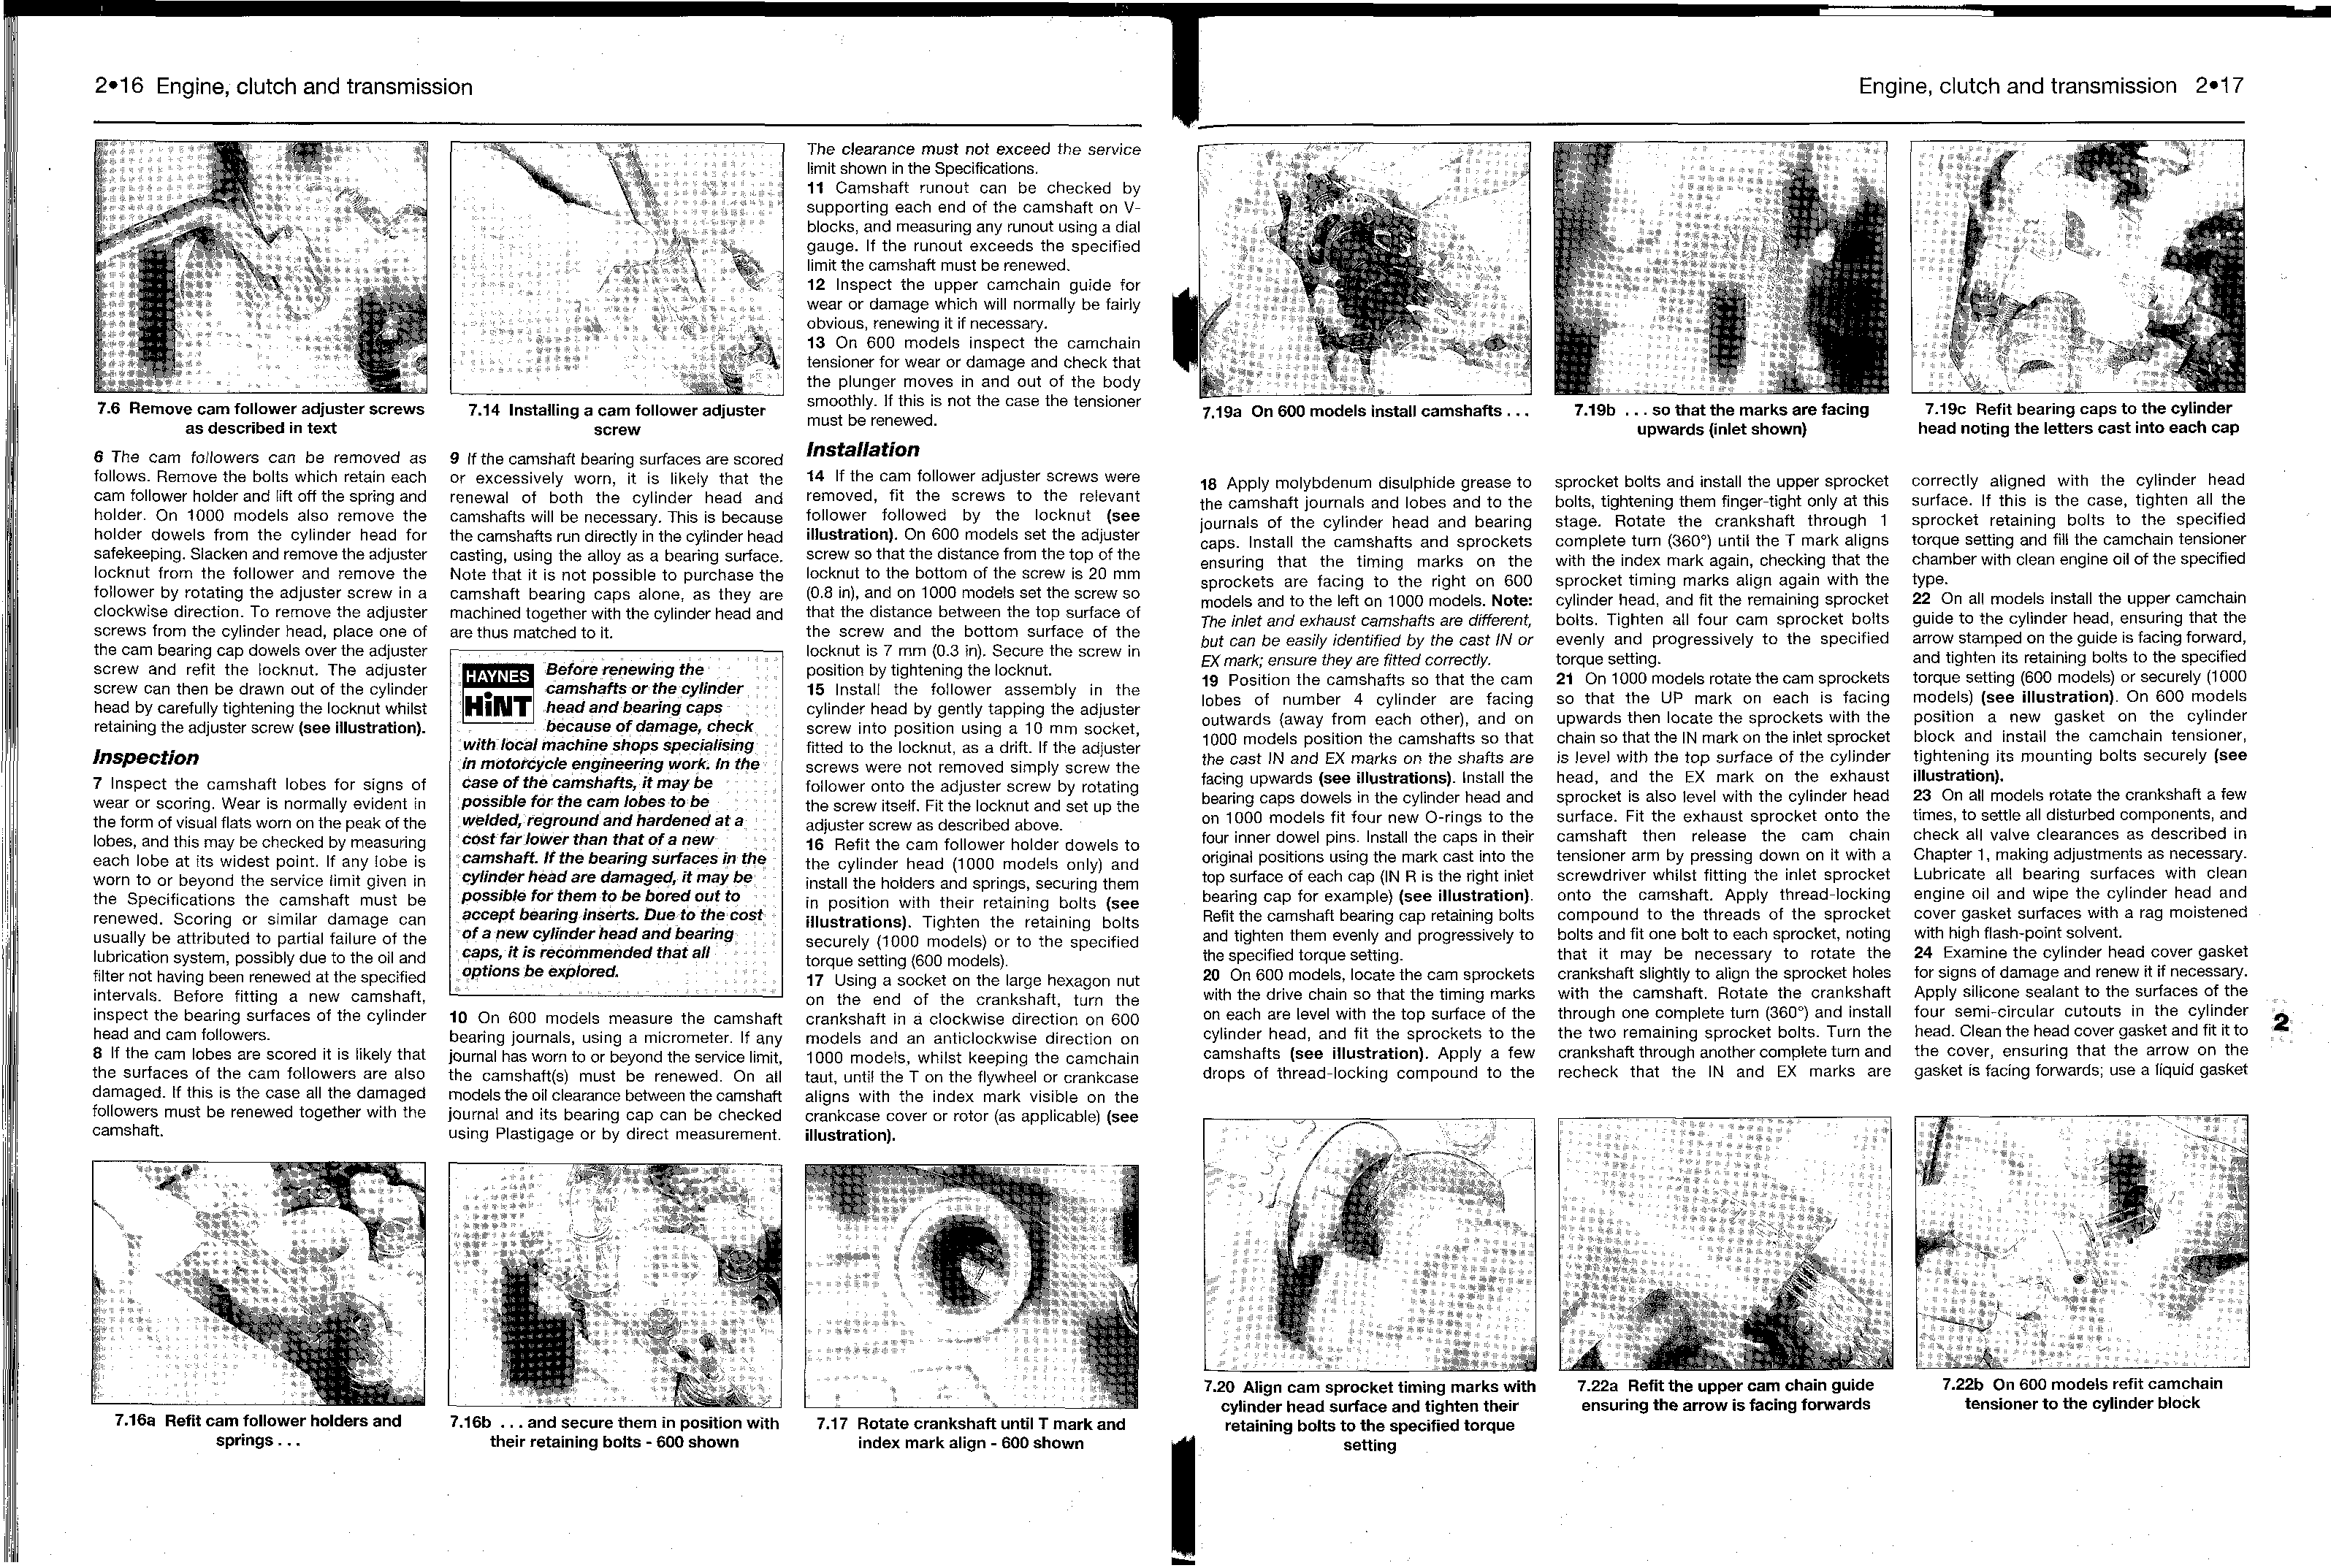
- CBR1000F (Hurricane). 998 cc. US March 1987 onwards
Refer to manual No. 2070 for the 599cc CBR600F2 model.
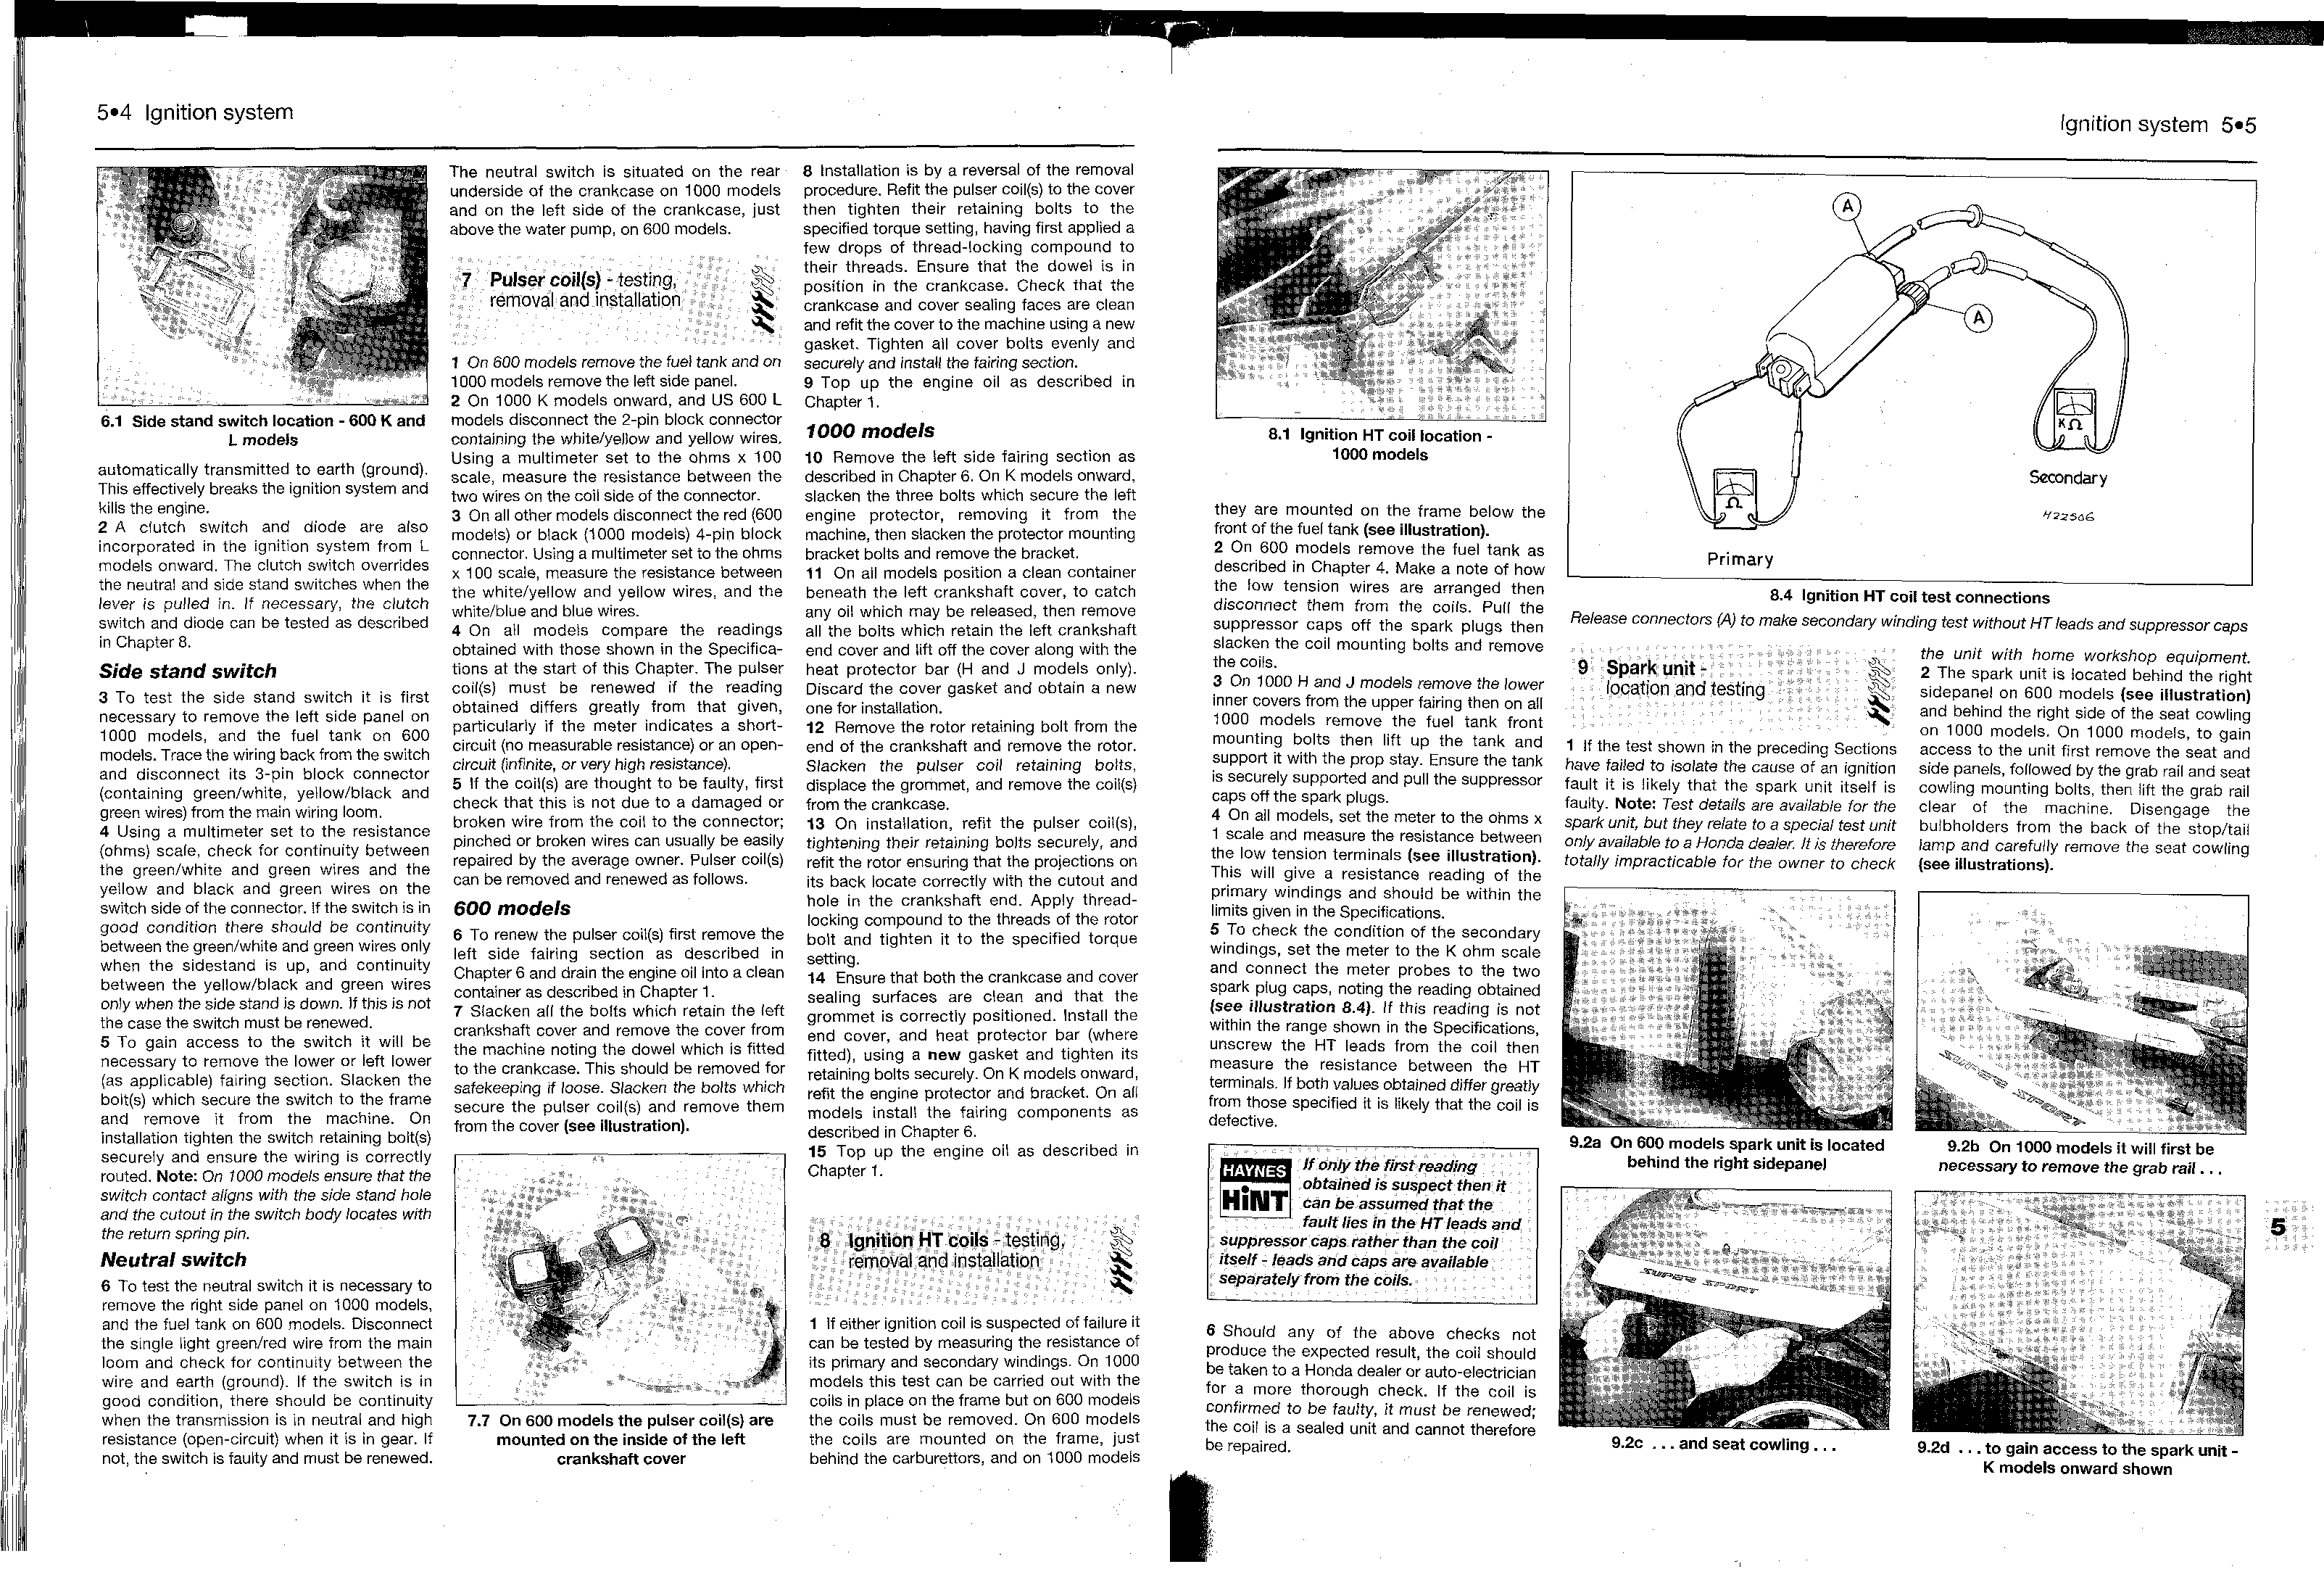
A book in the Haynes Service and Repair Manual Series
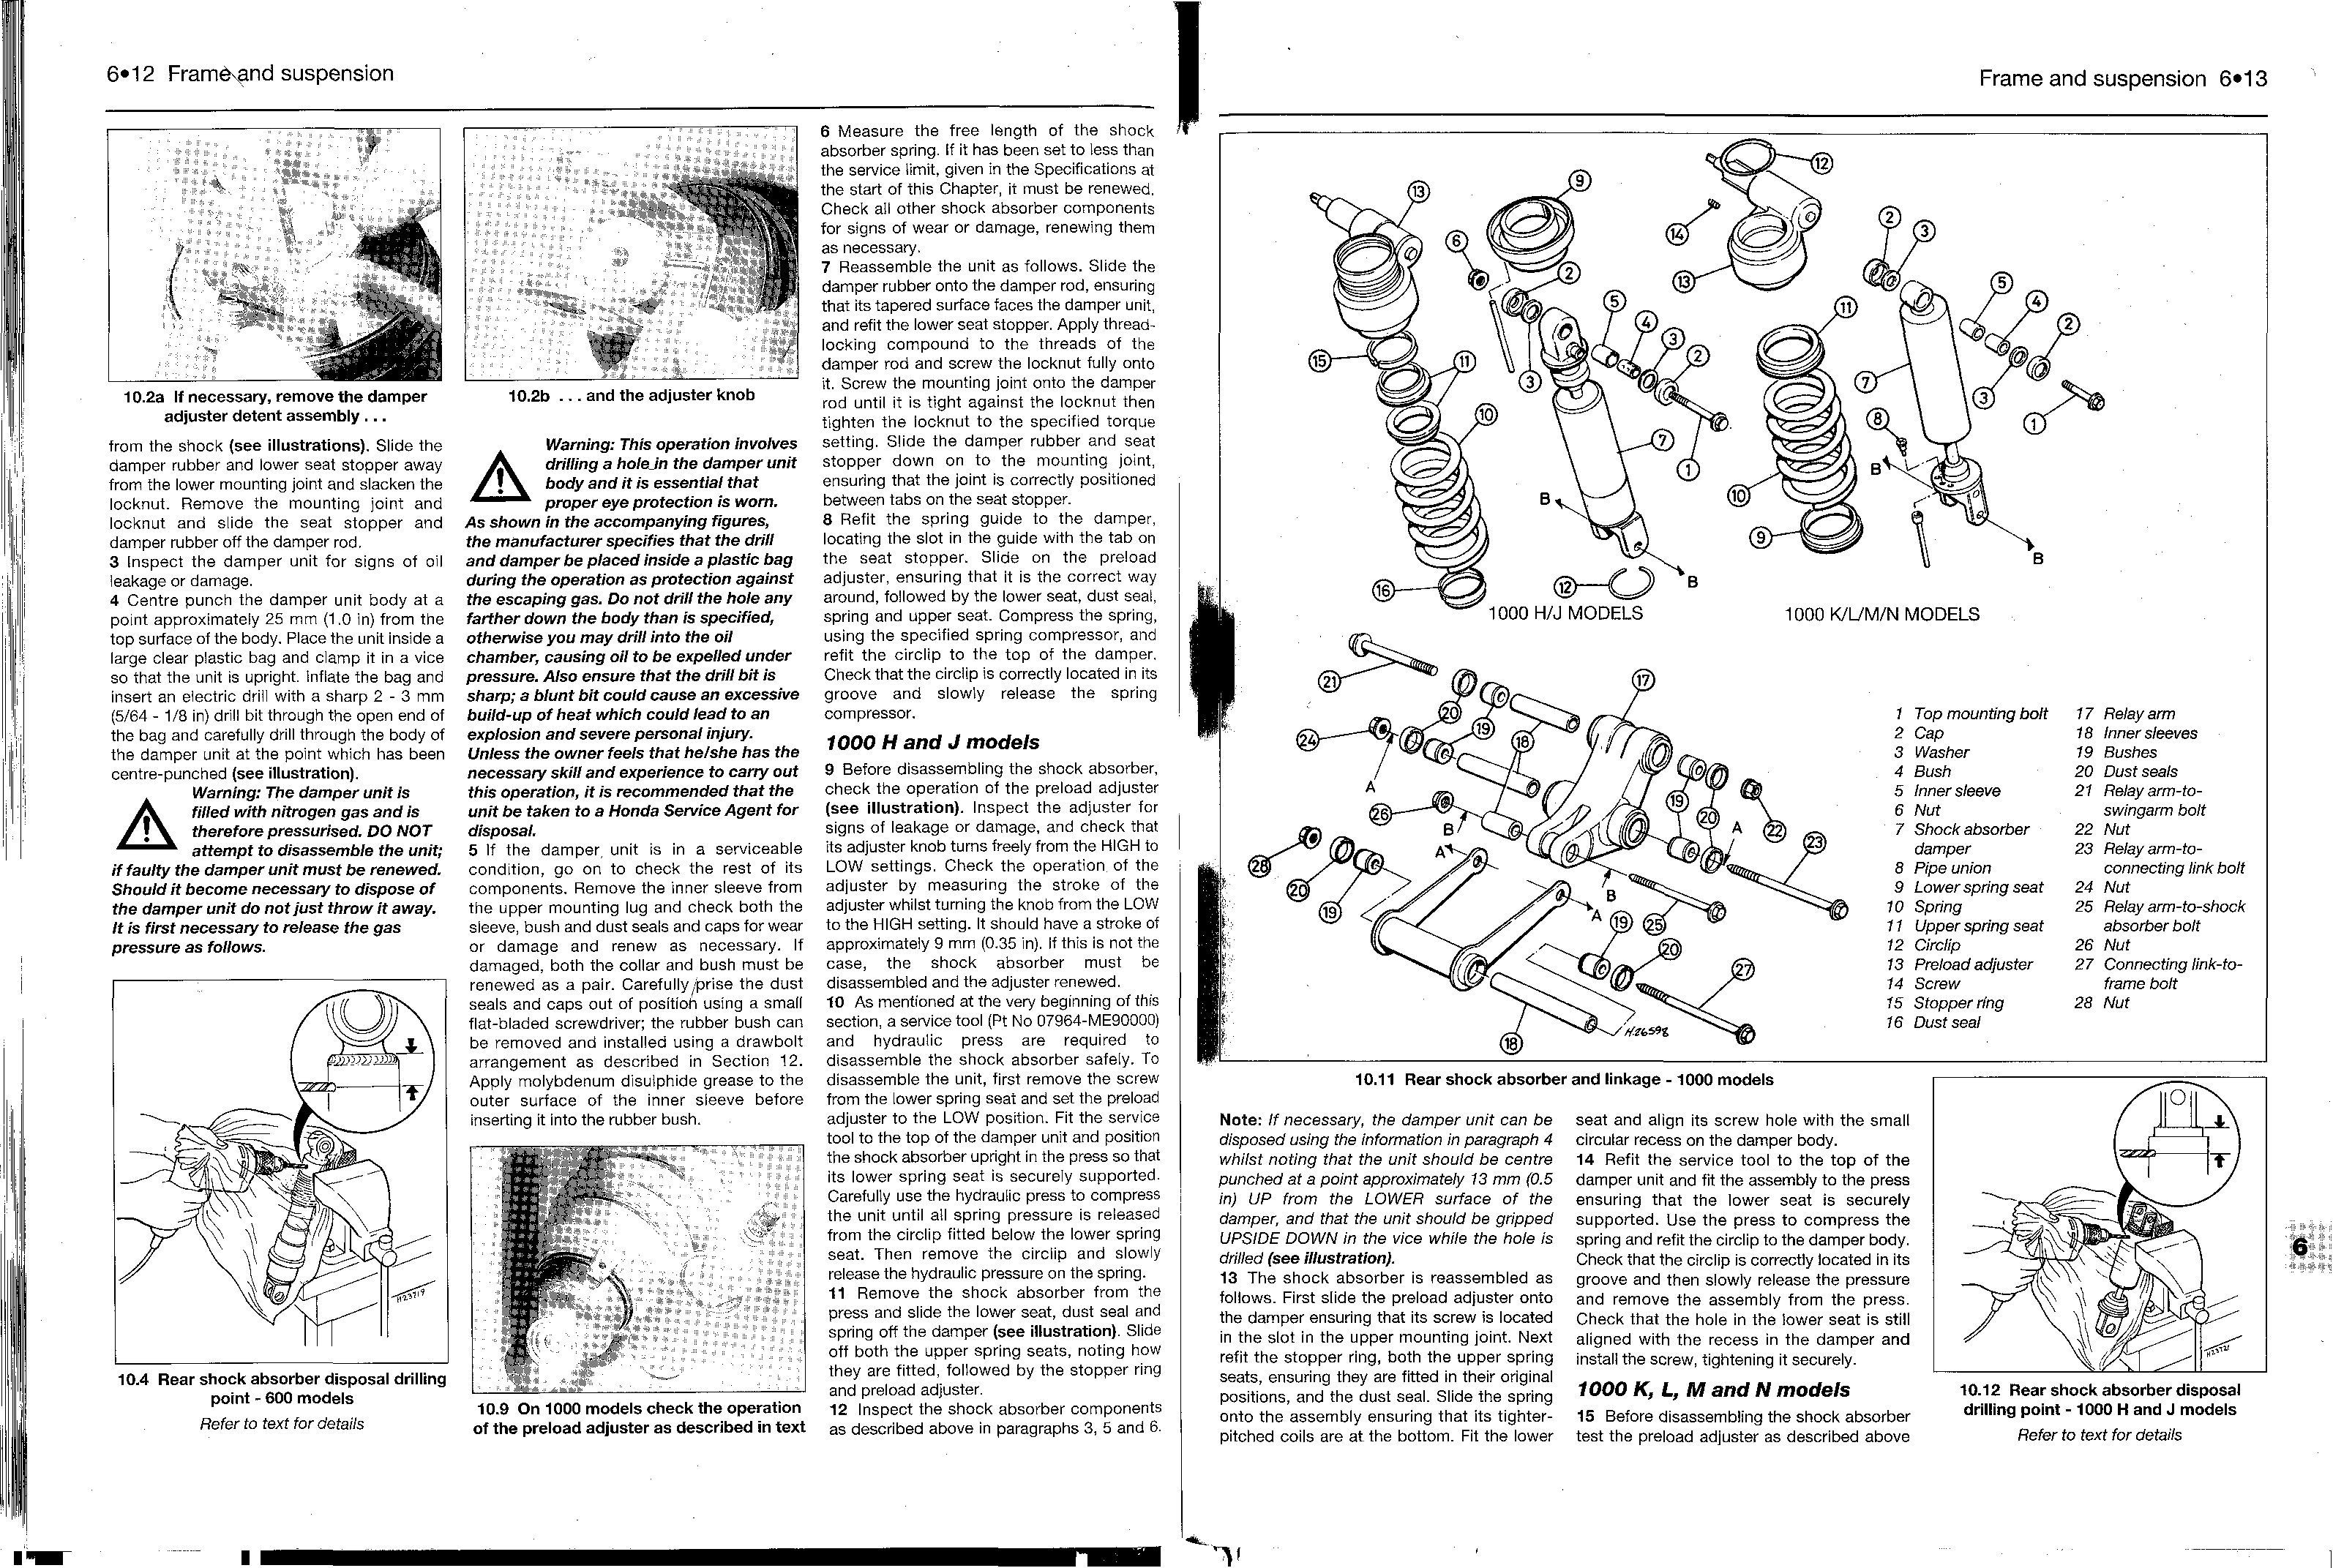
So, and here references on promised scanned a picture of a manual:
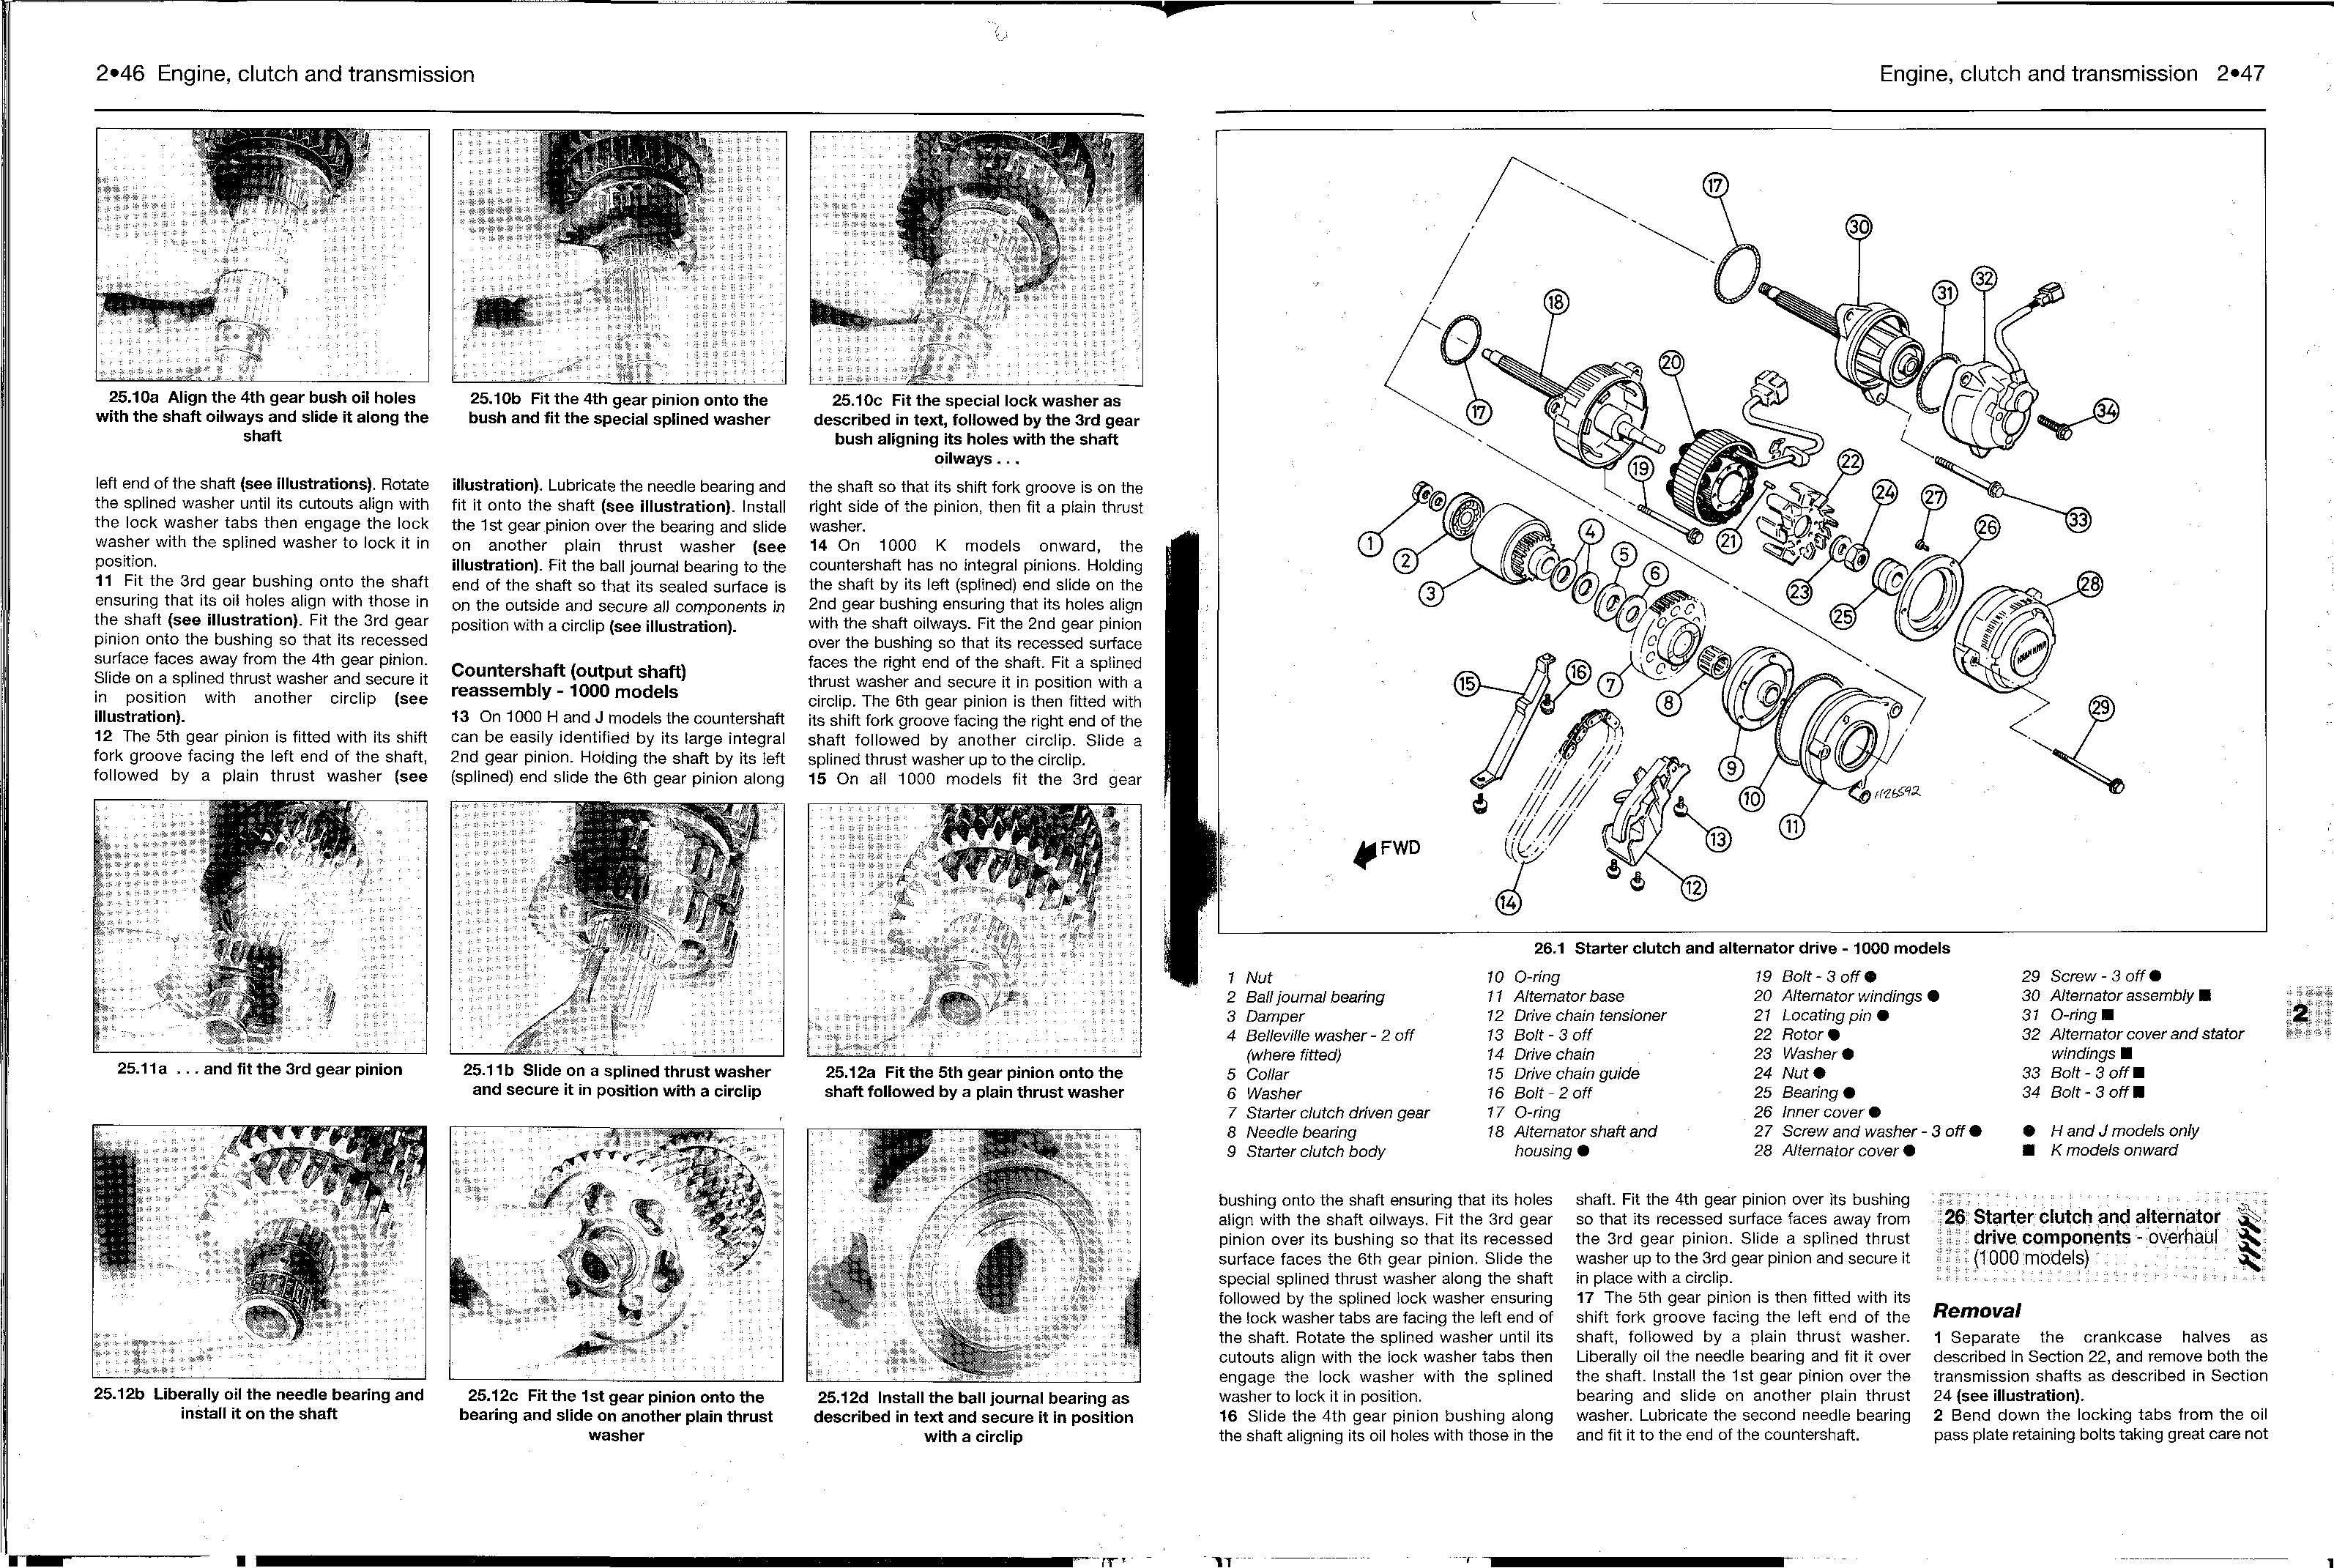
Contents
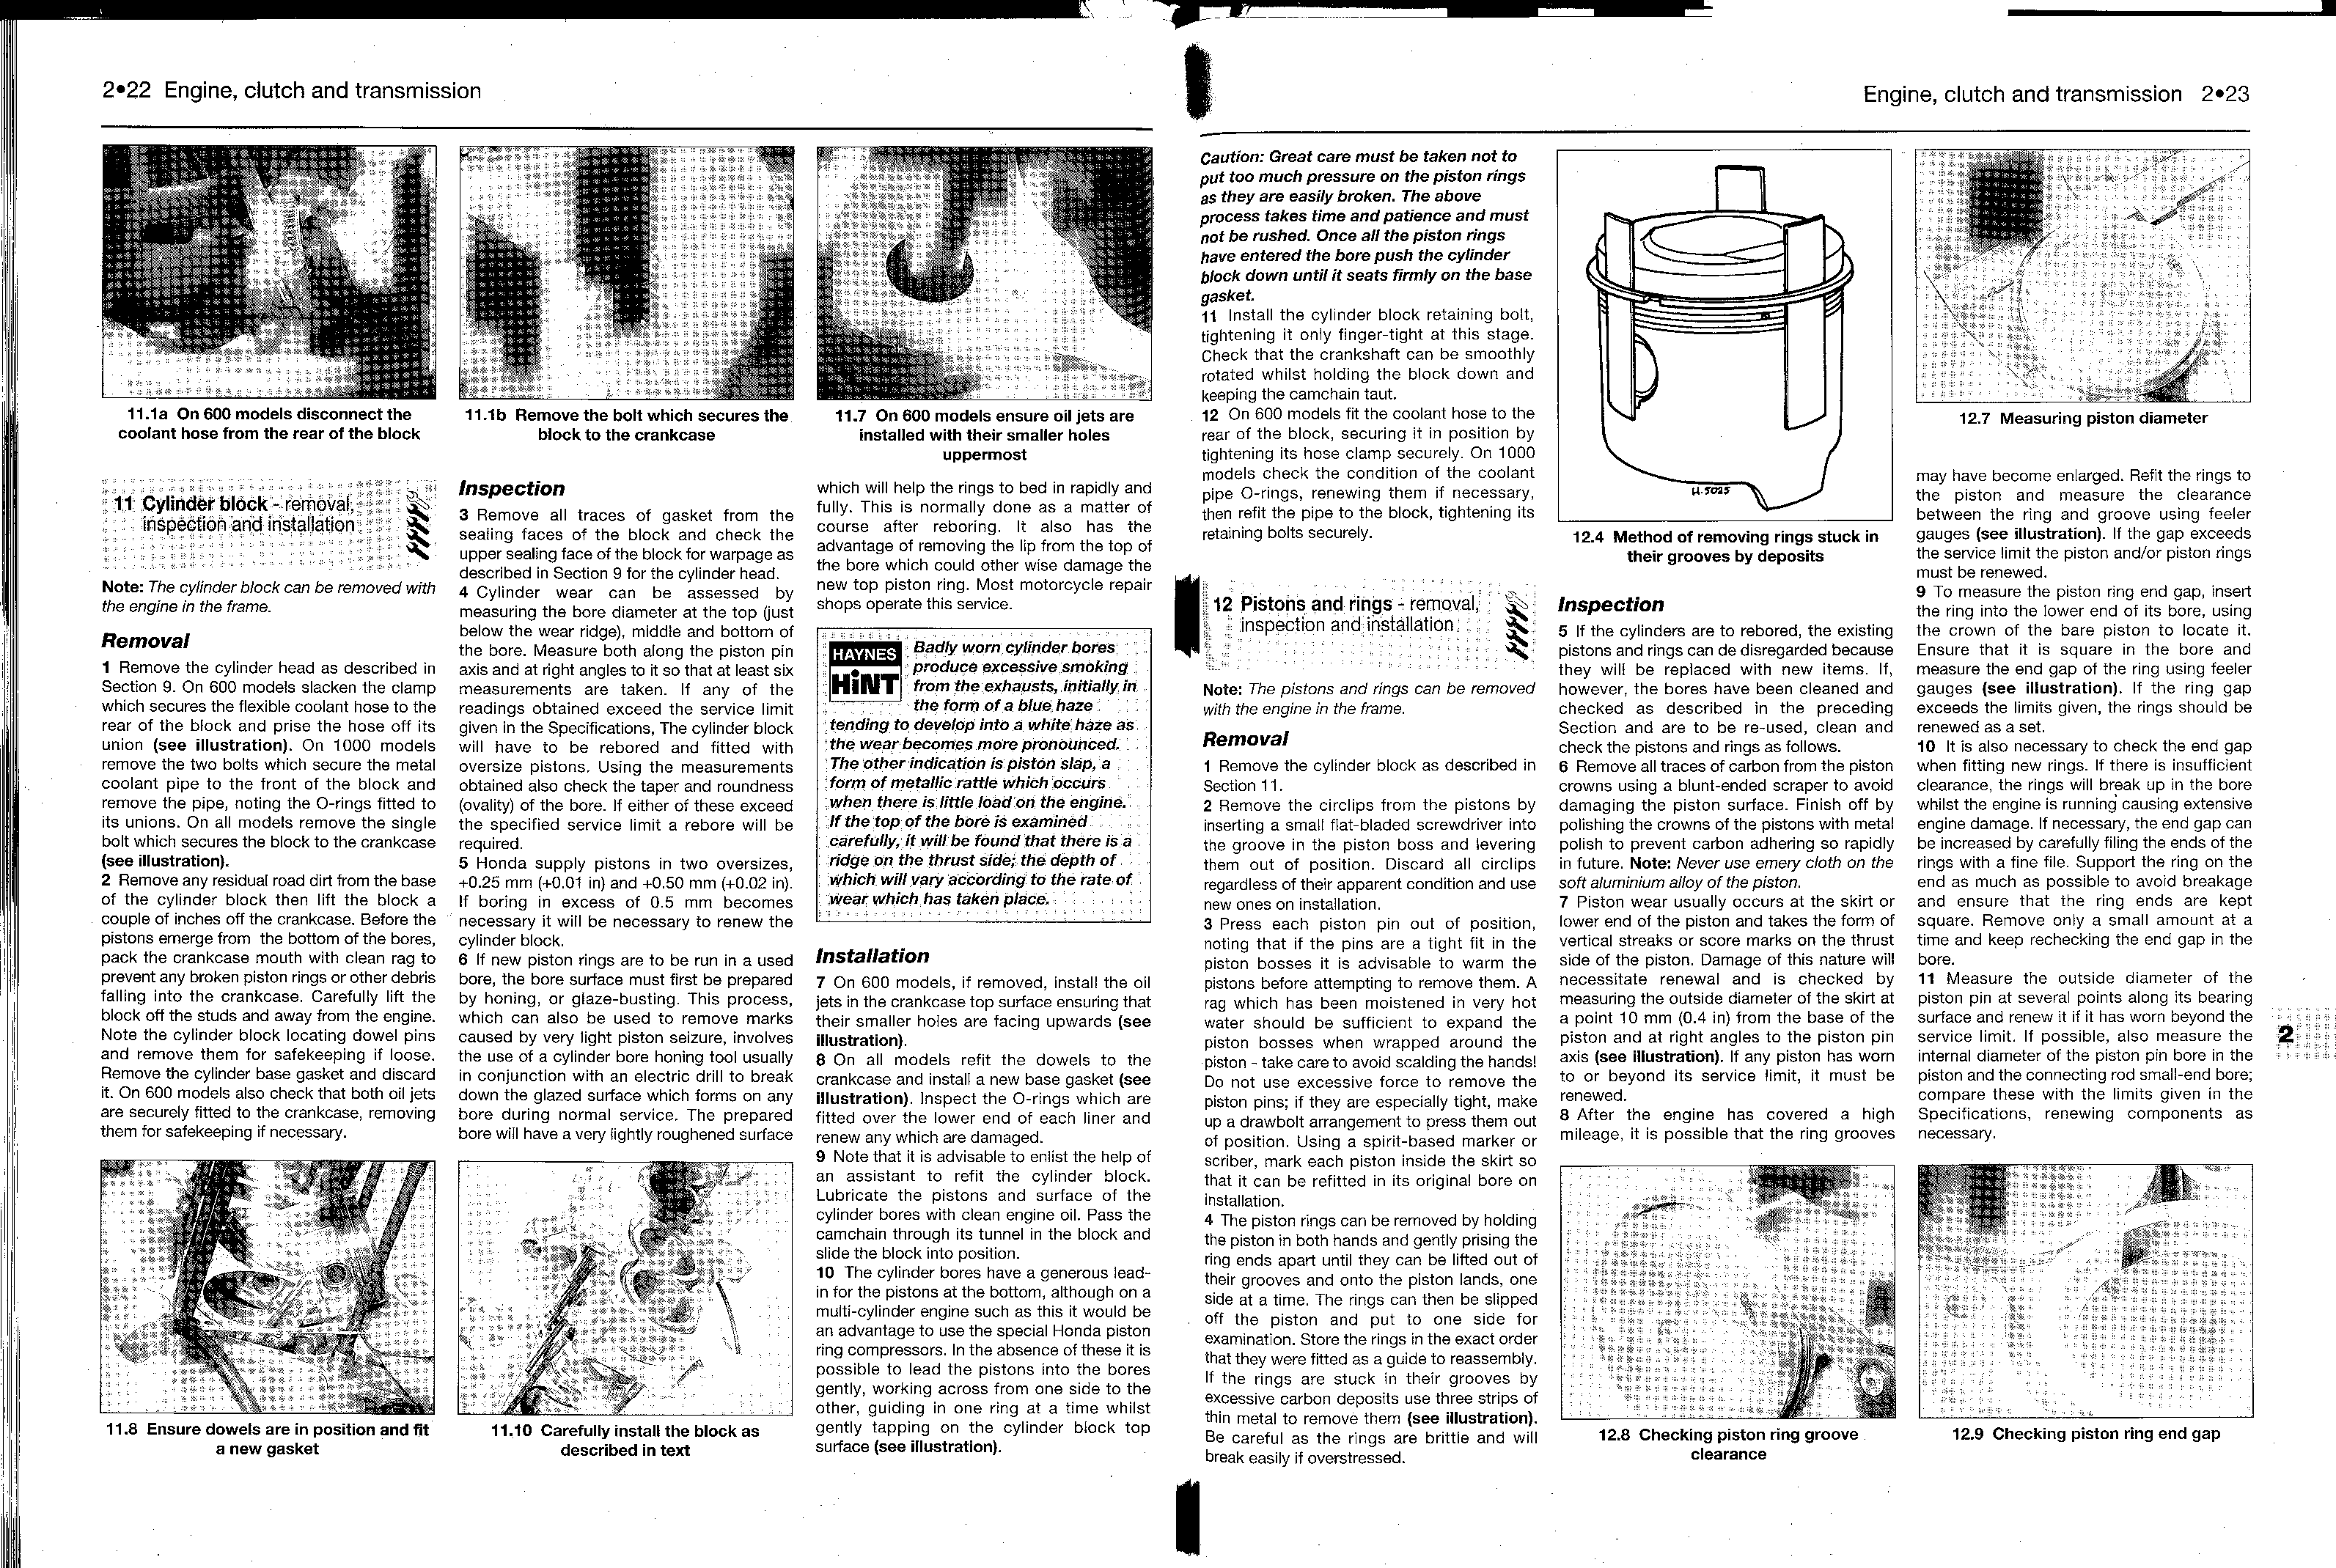
Introduction
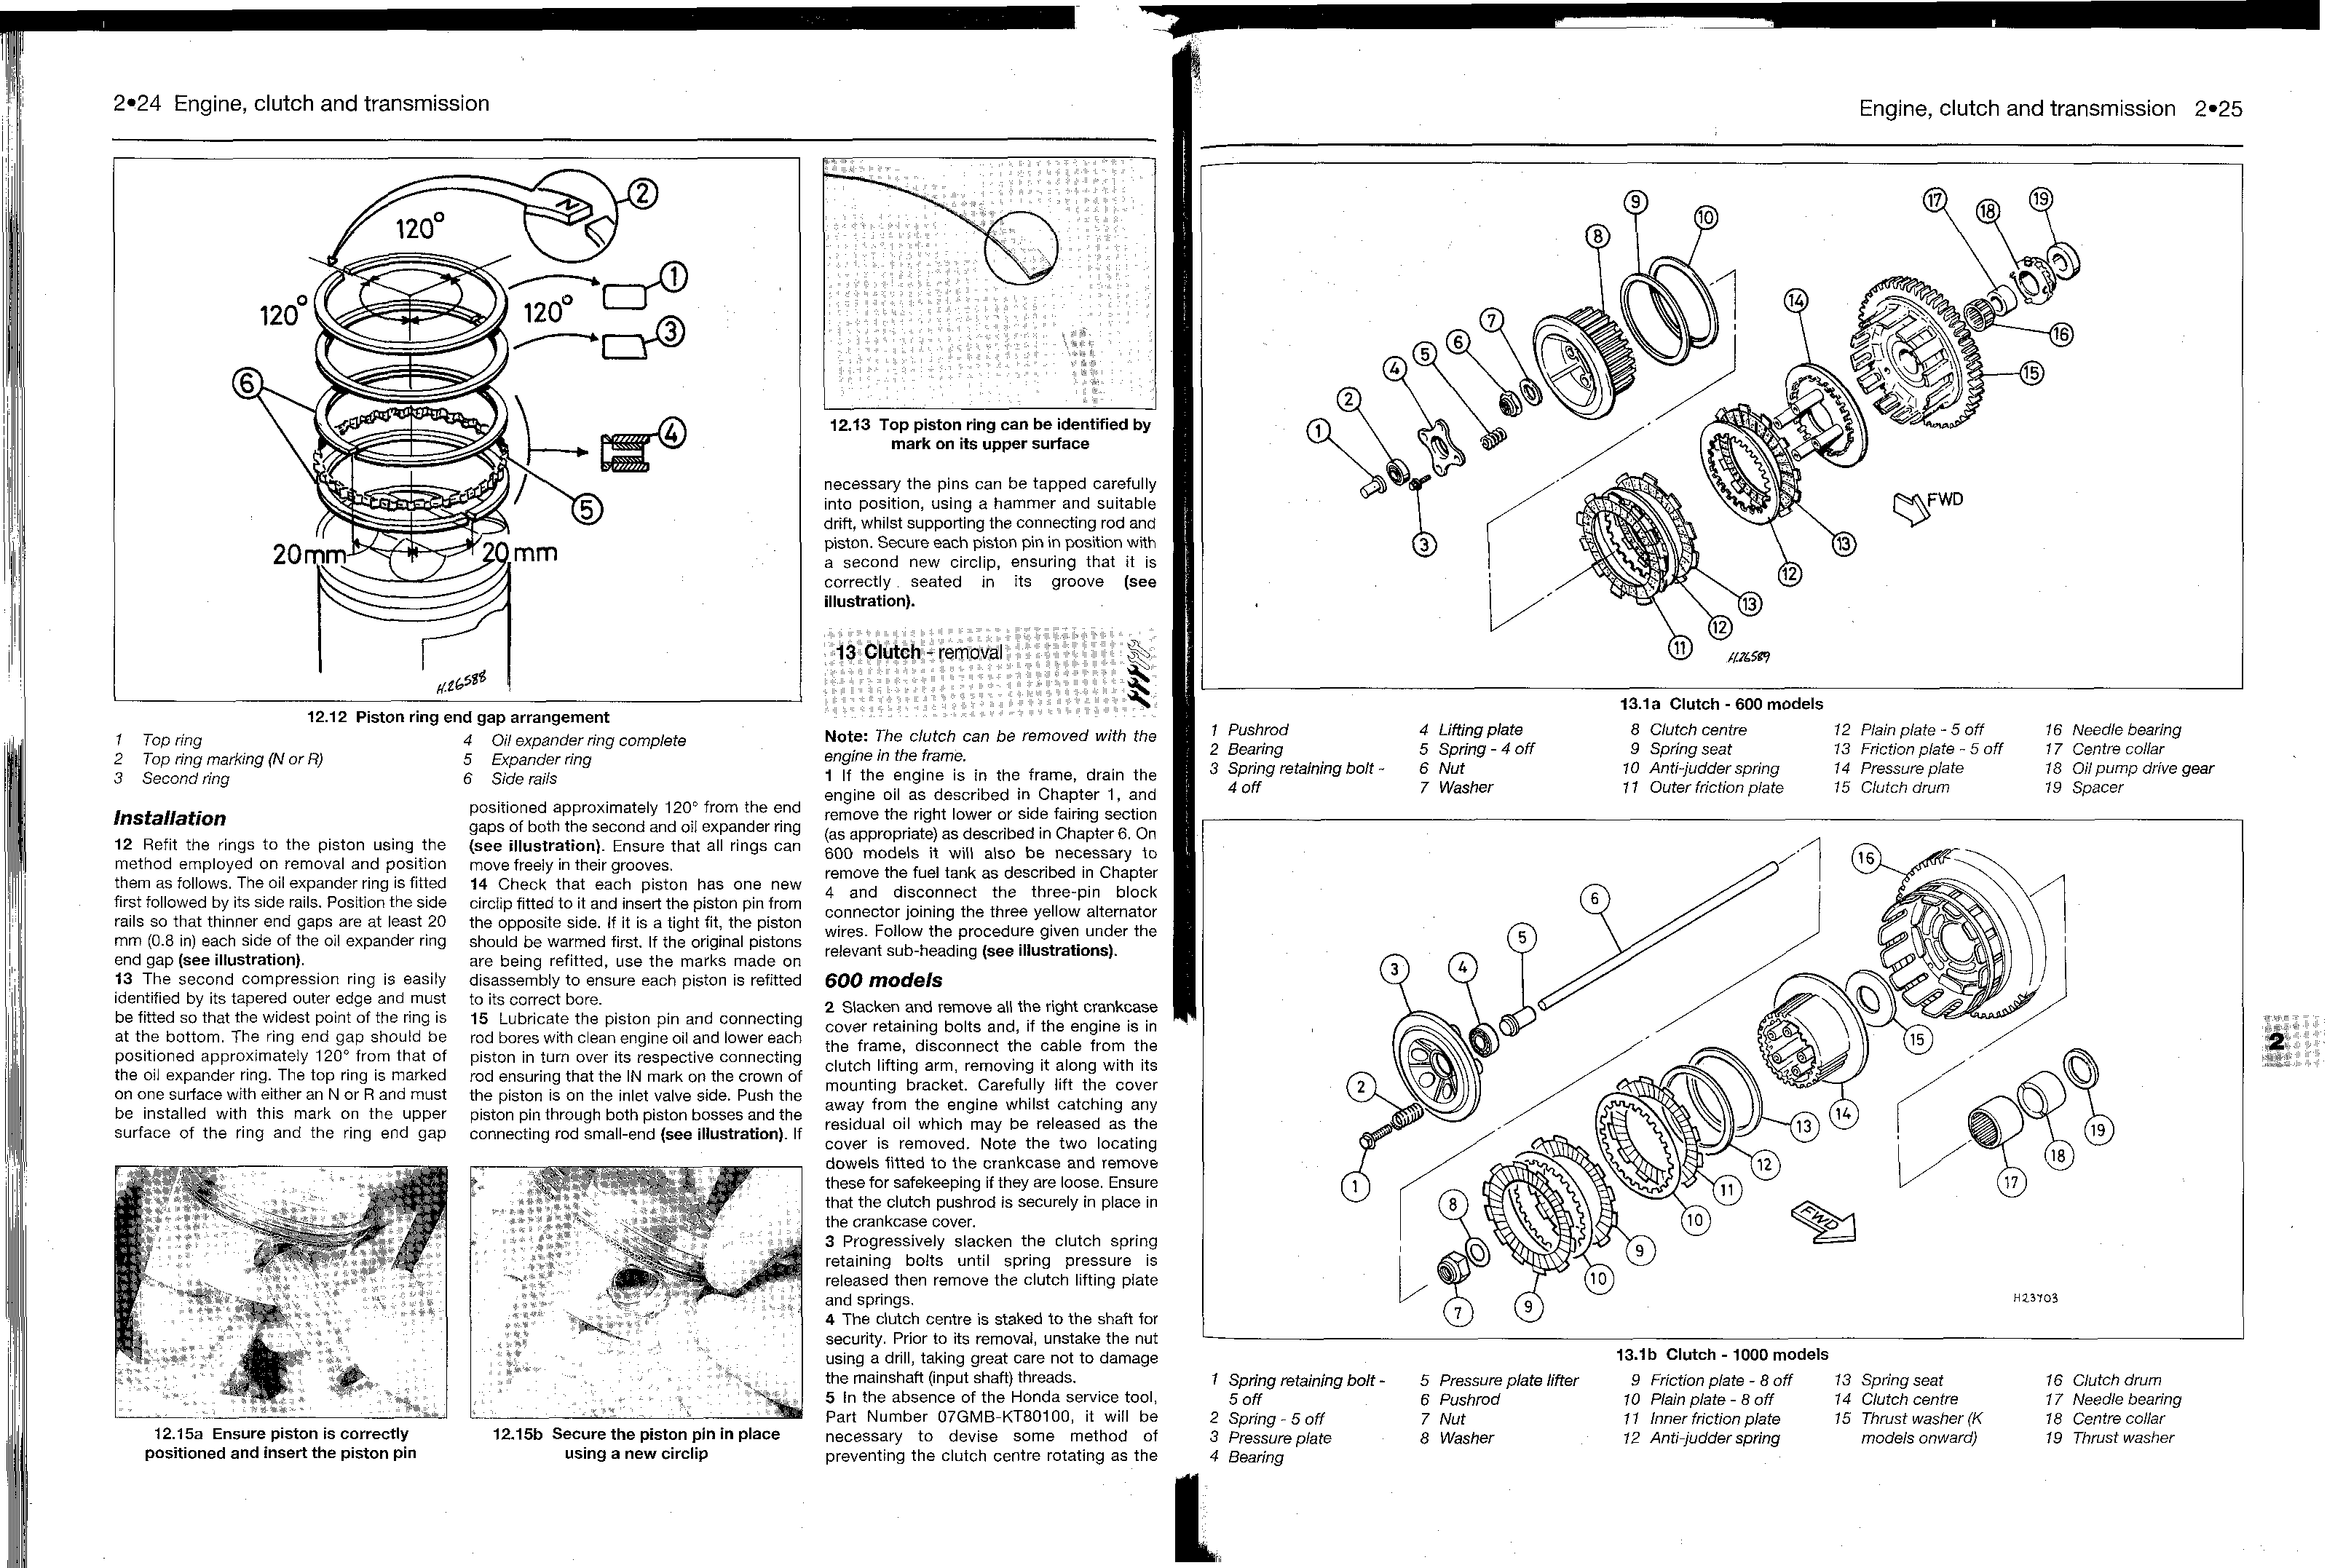
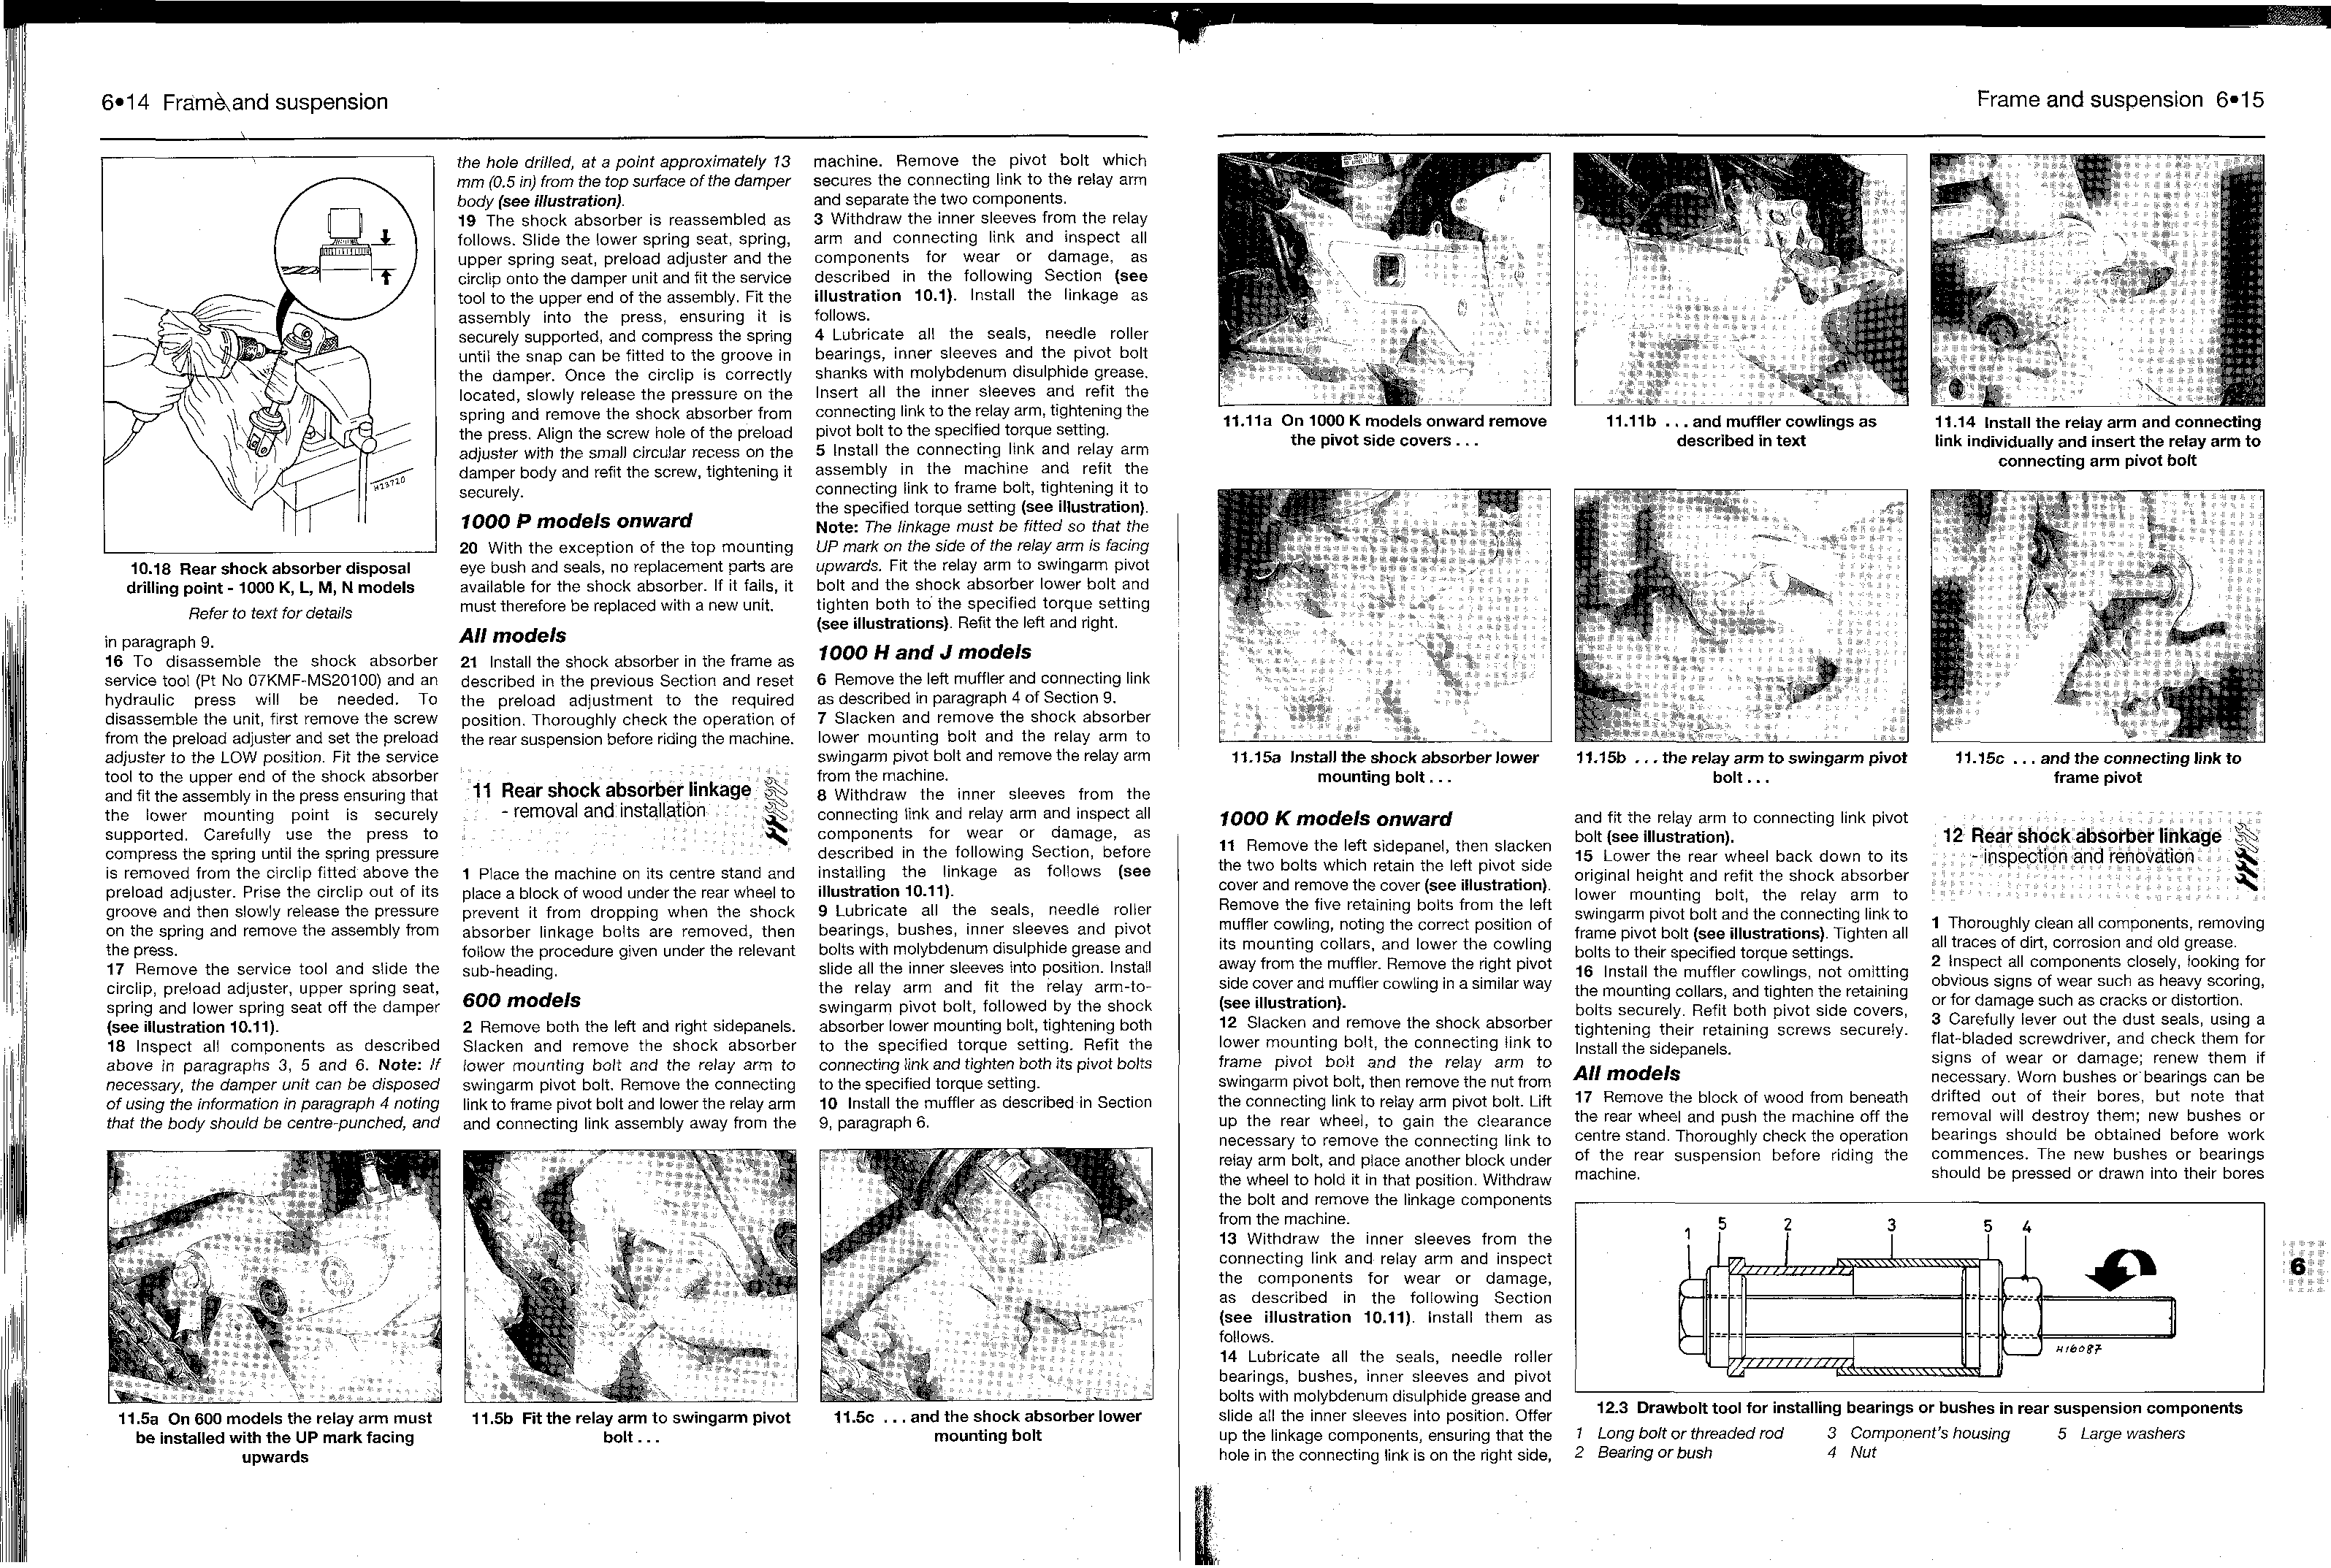
Chapter 1. Routine maintenance and Servicing
- Specifications
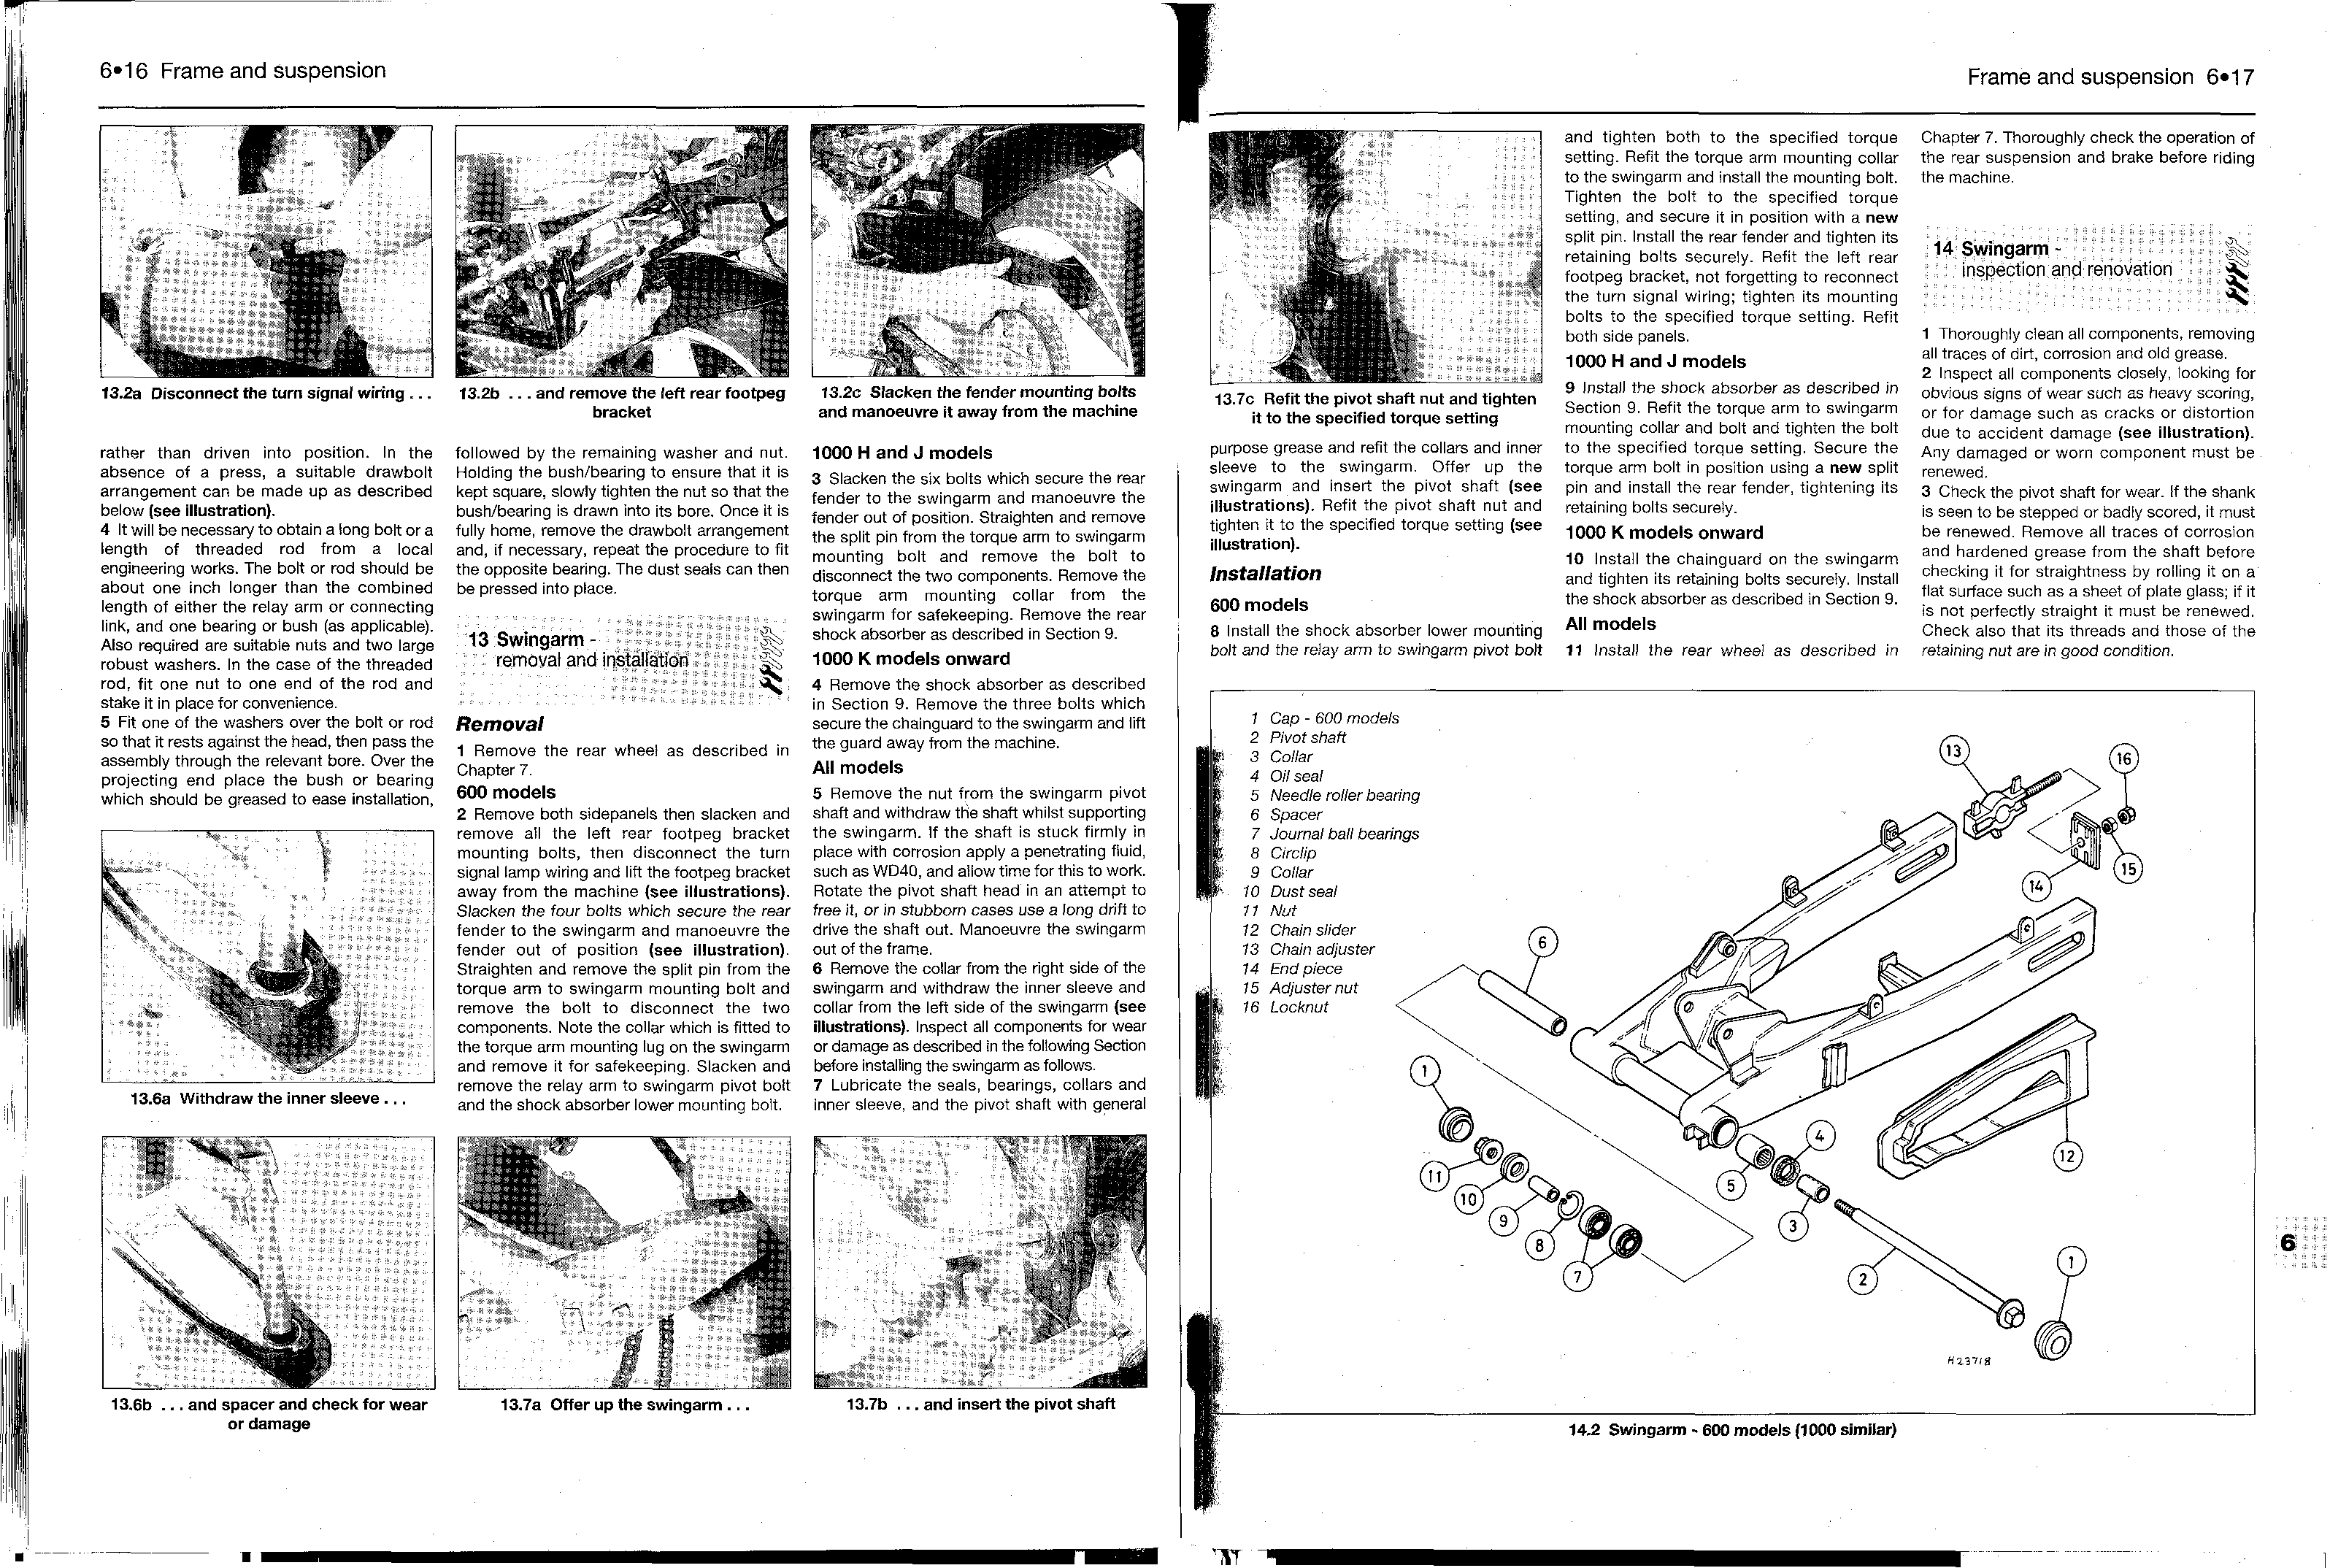
- Introduction
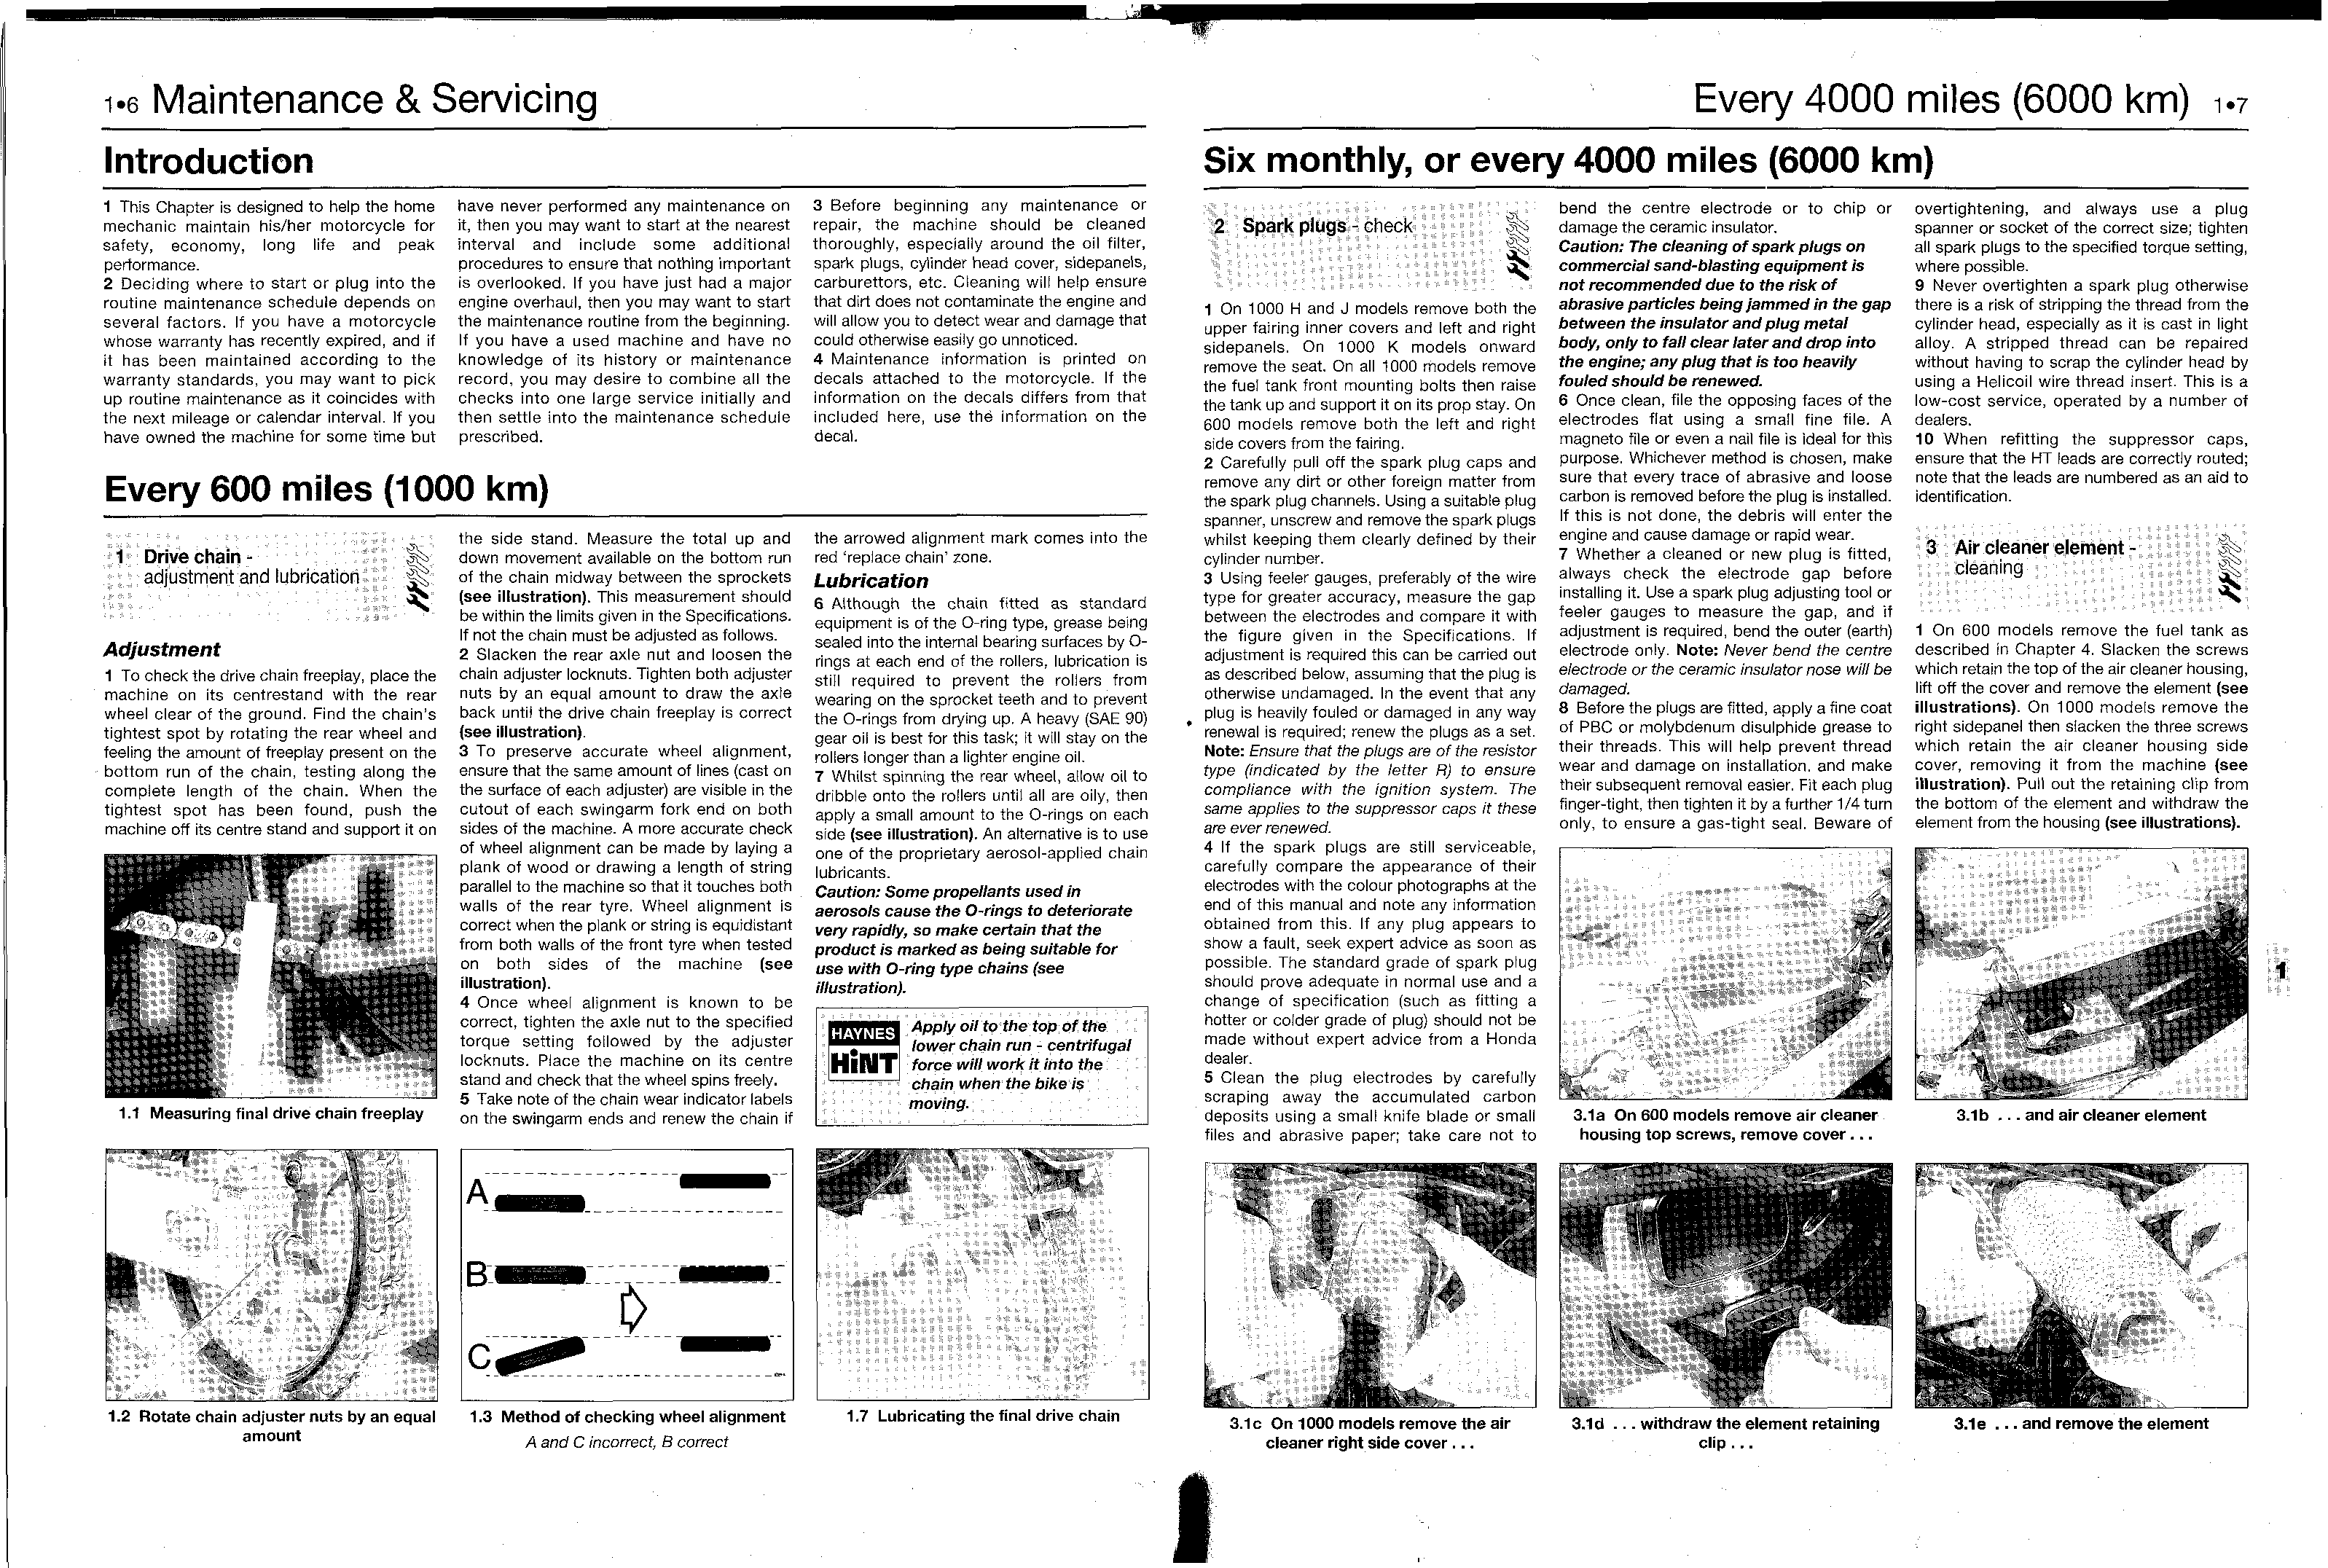
- Every 600 miles (1000 km)
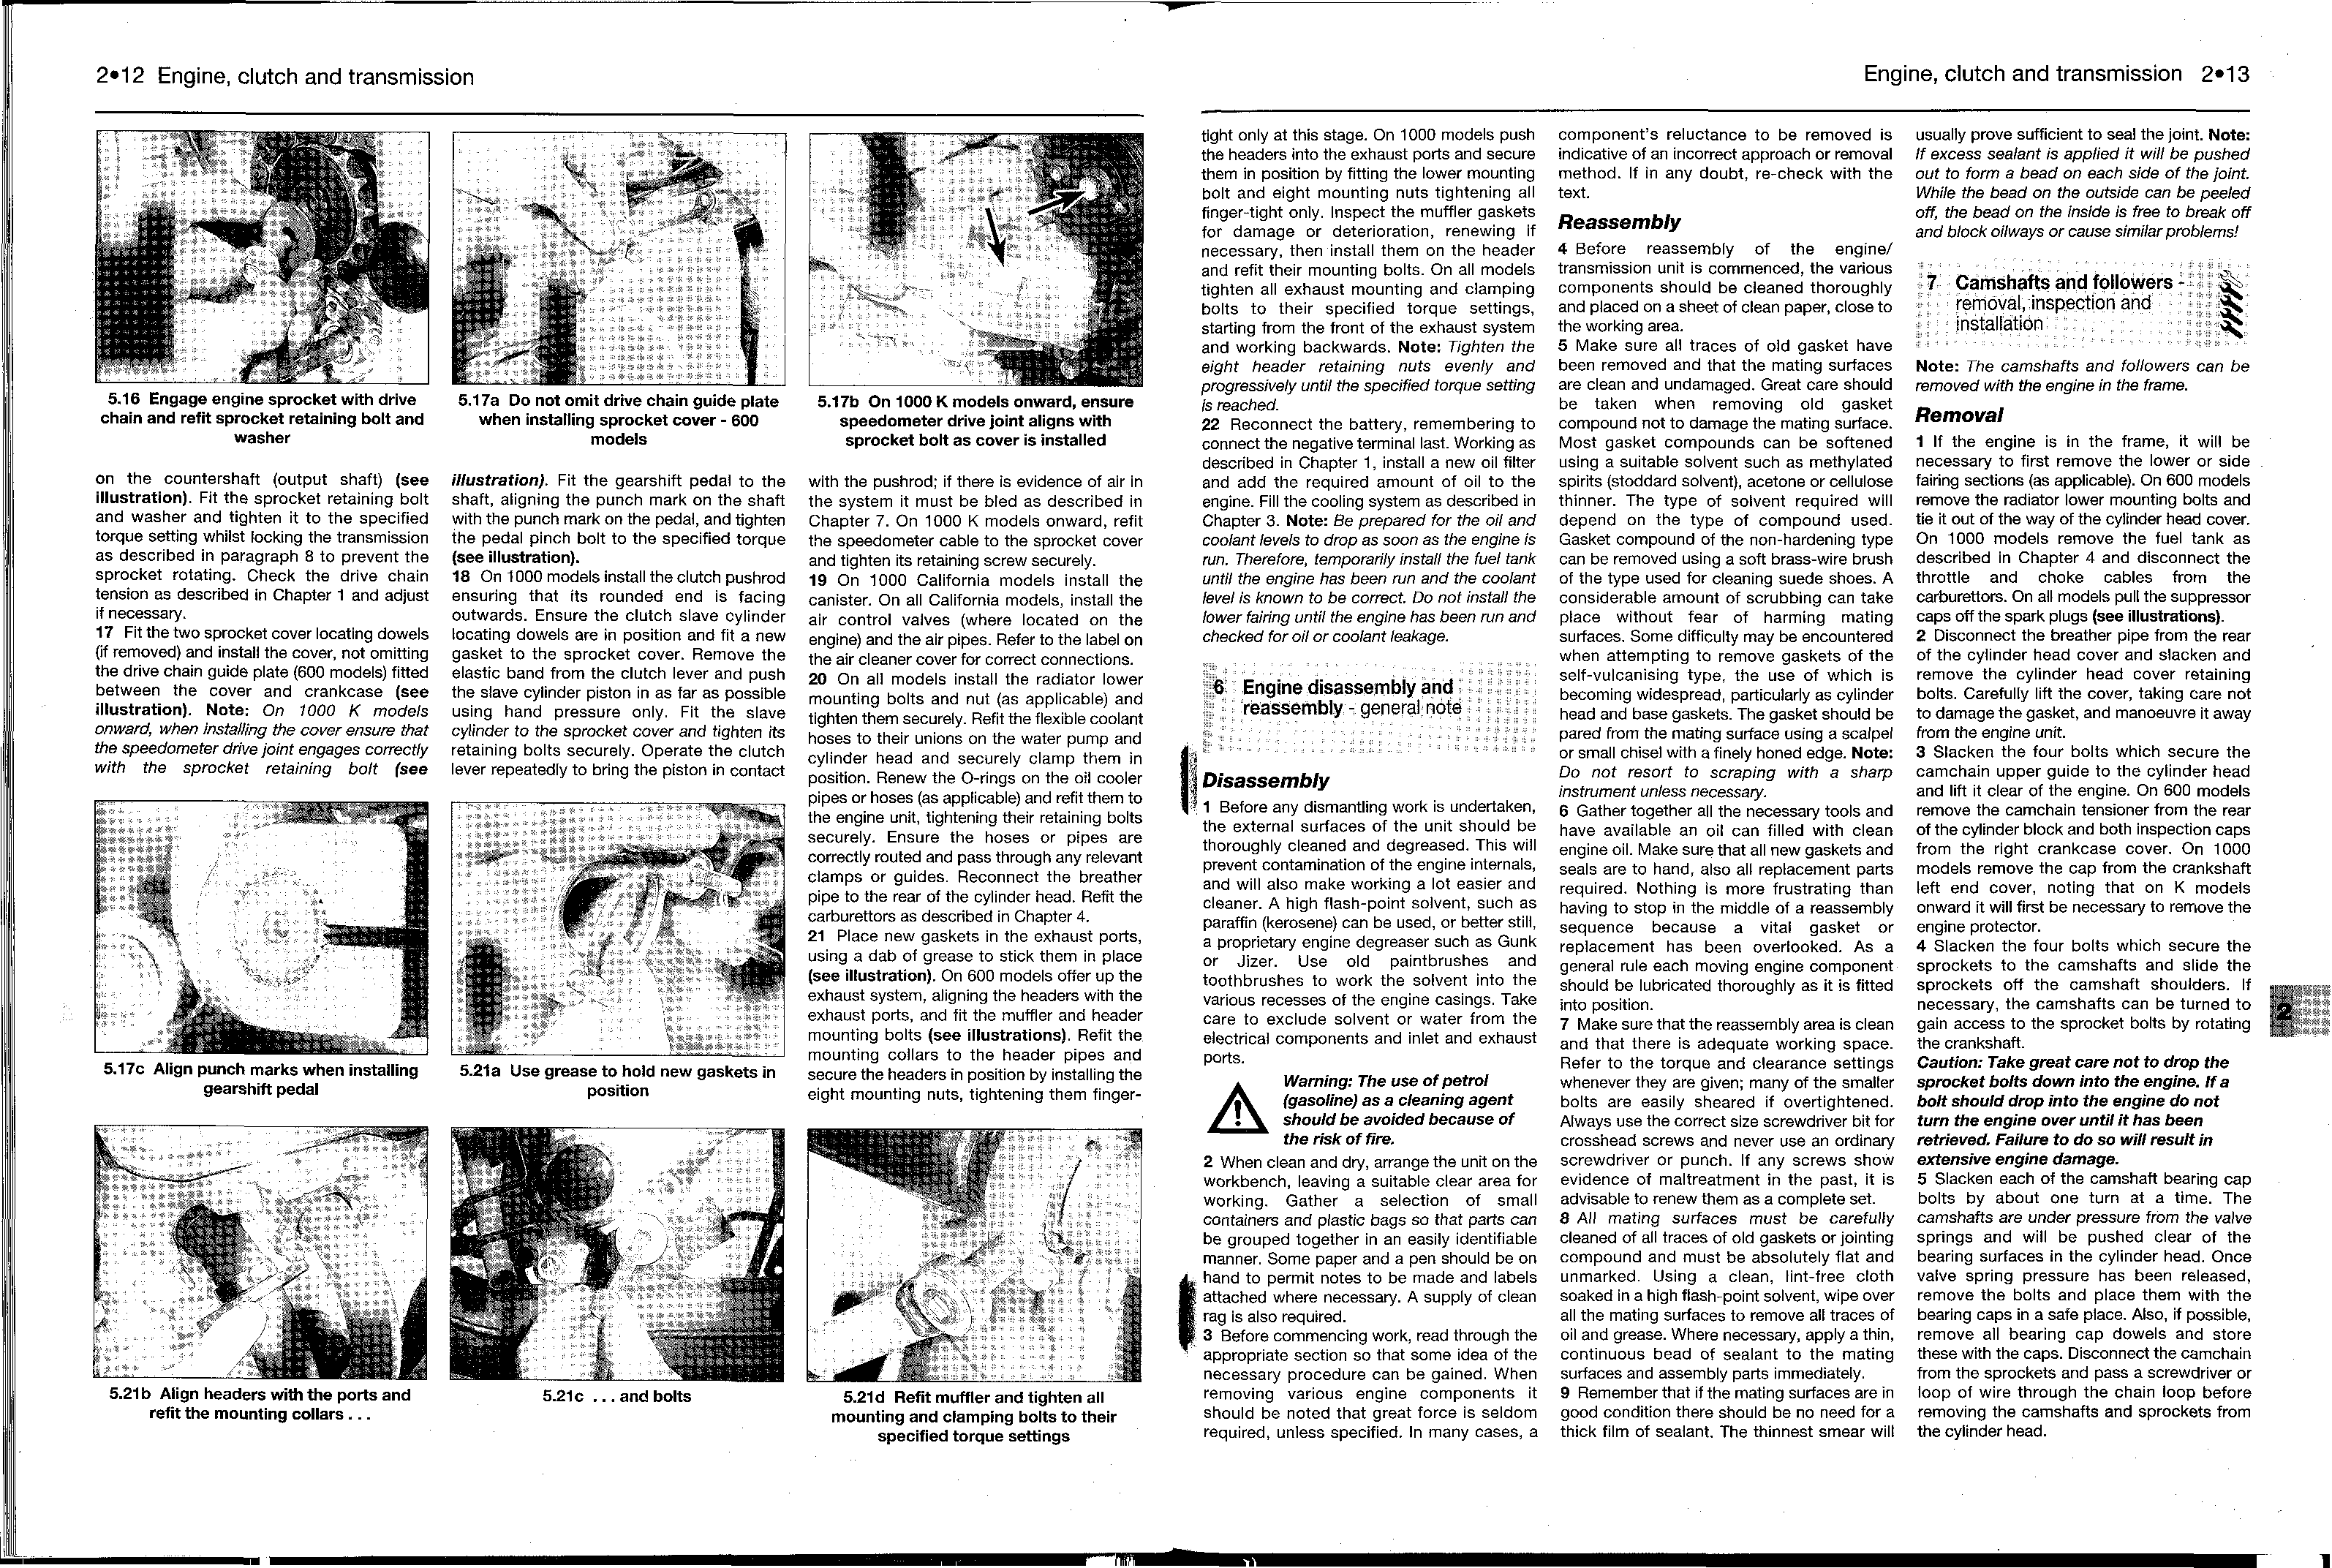
- Six monthly, or every 4000 miles (6000 km)
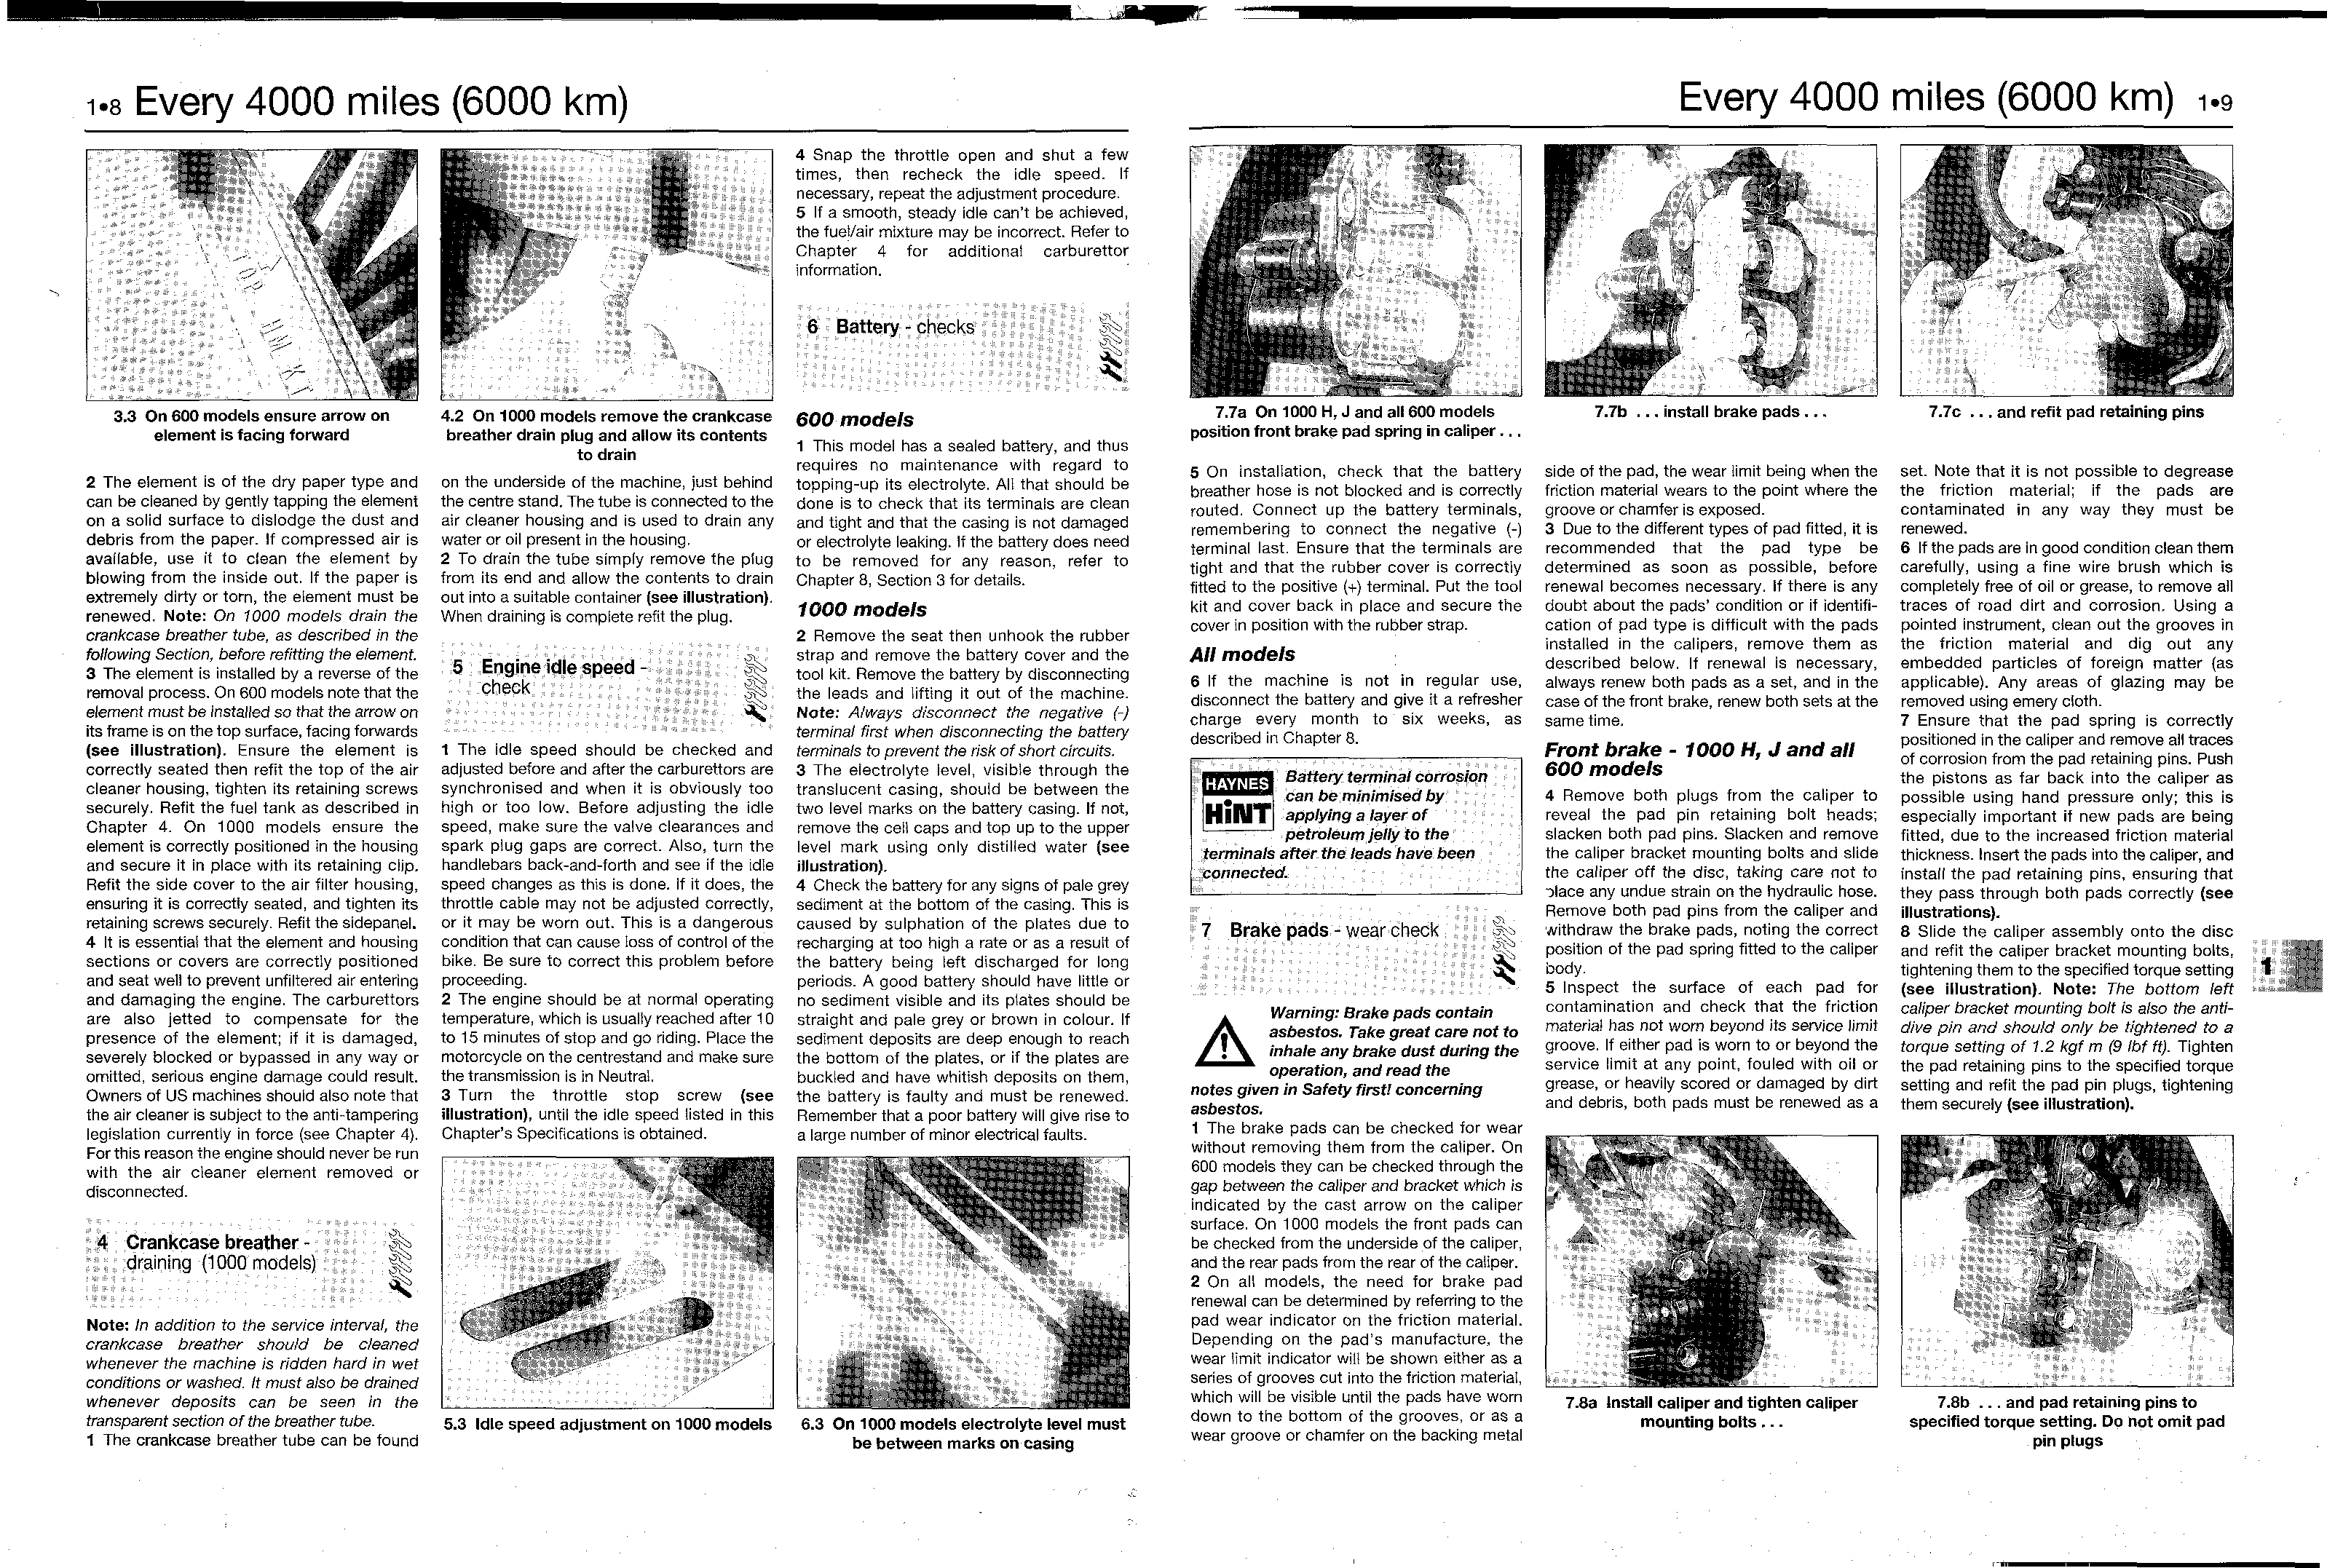
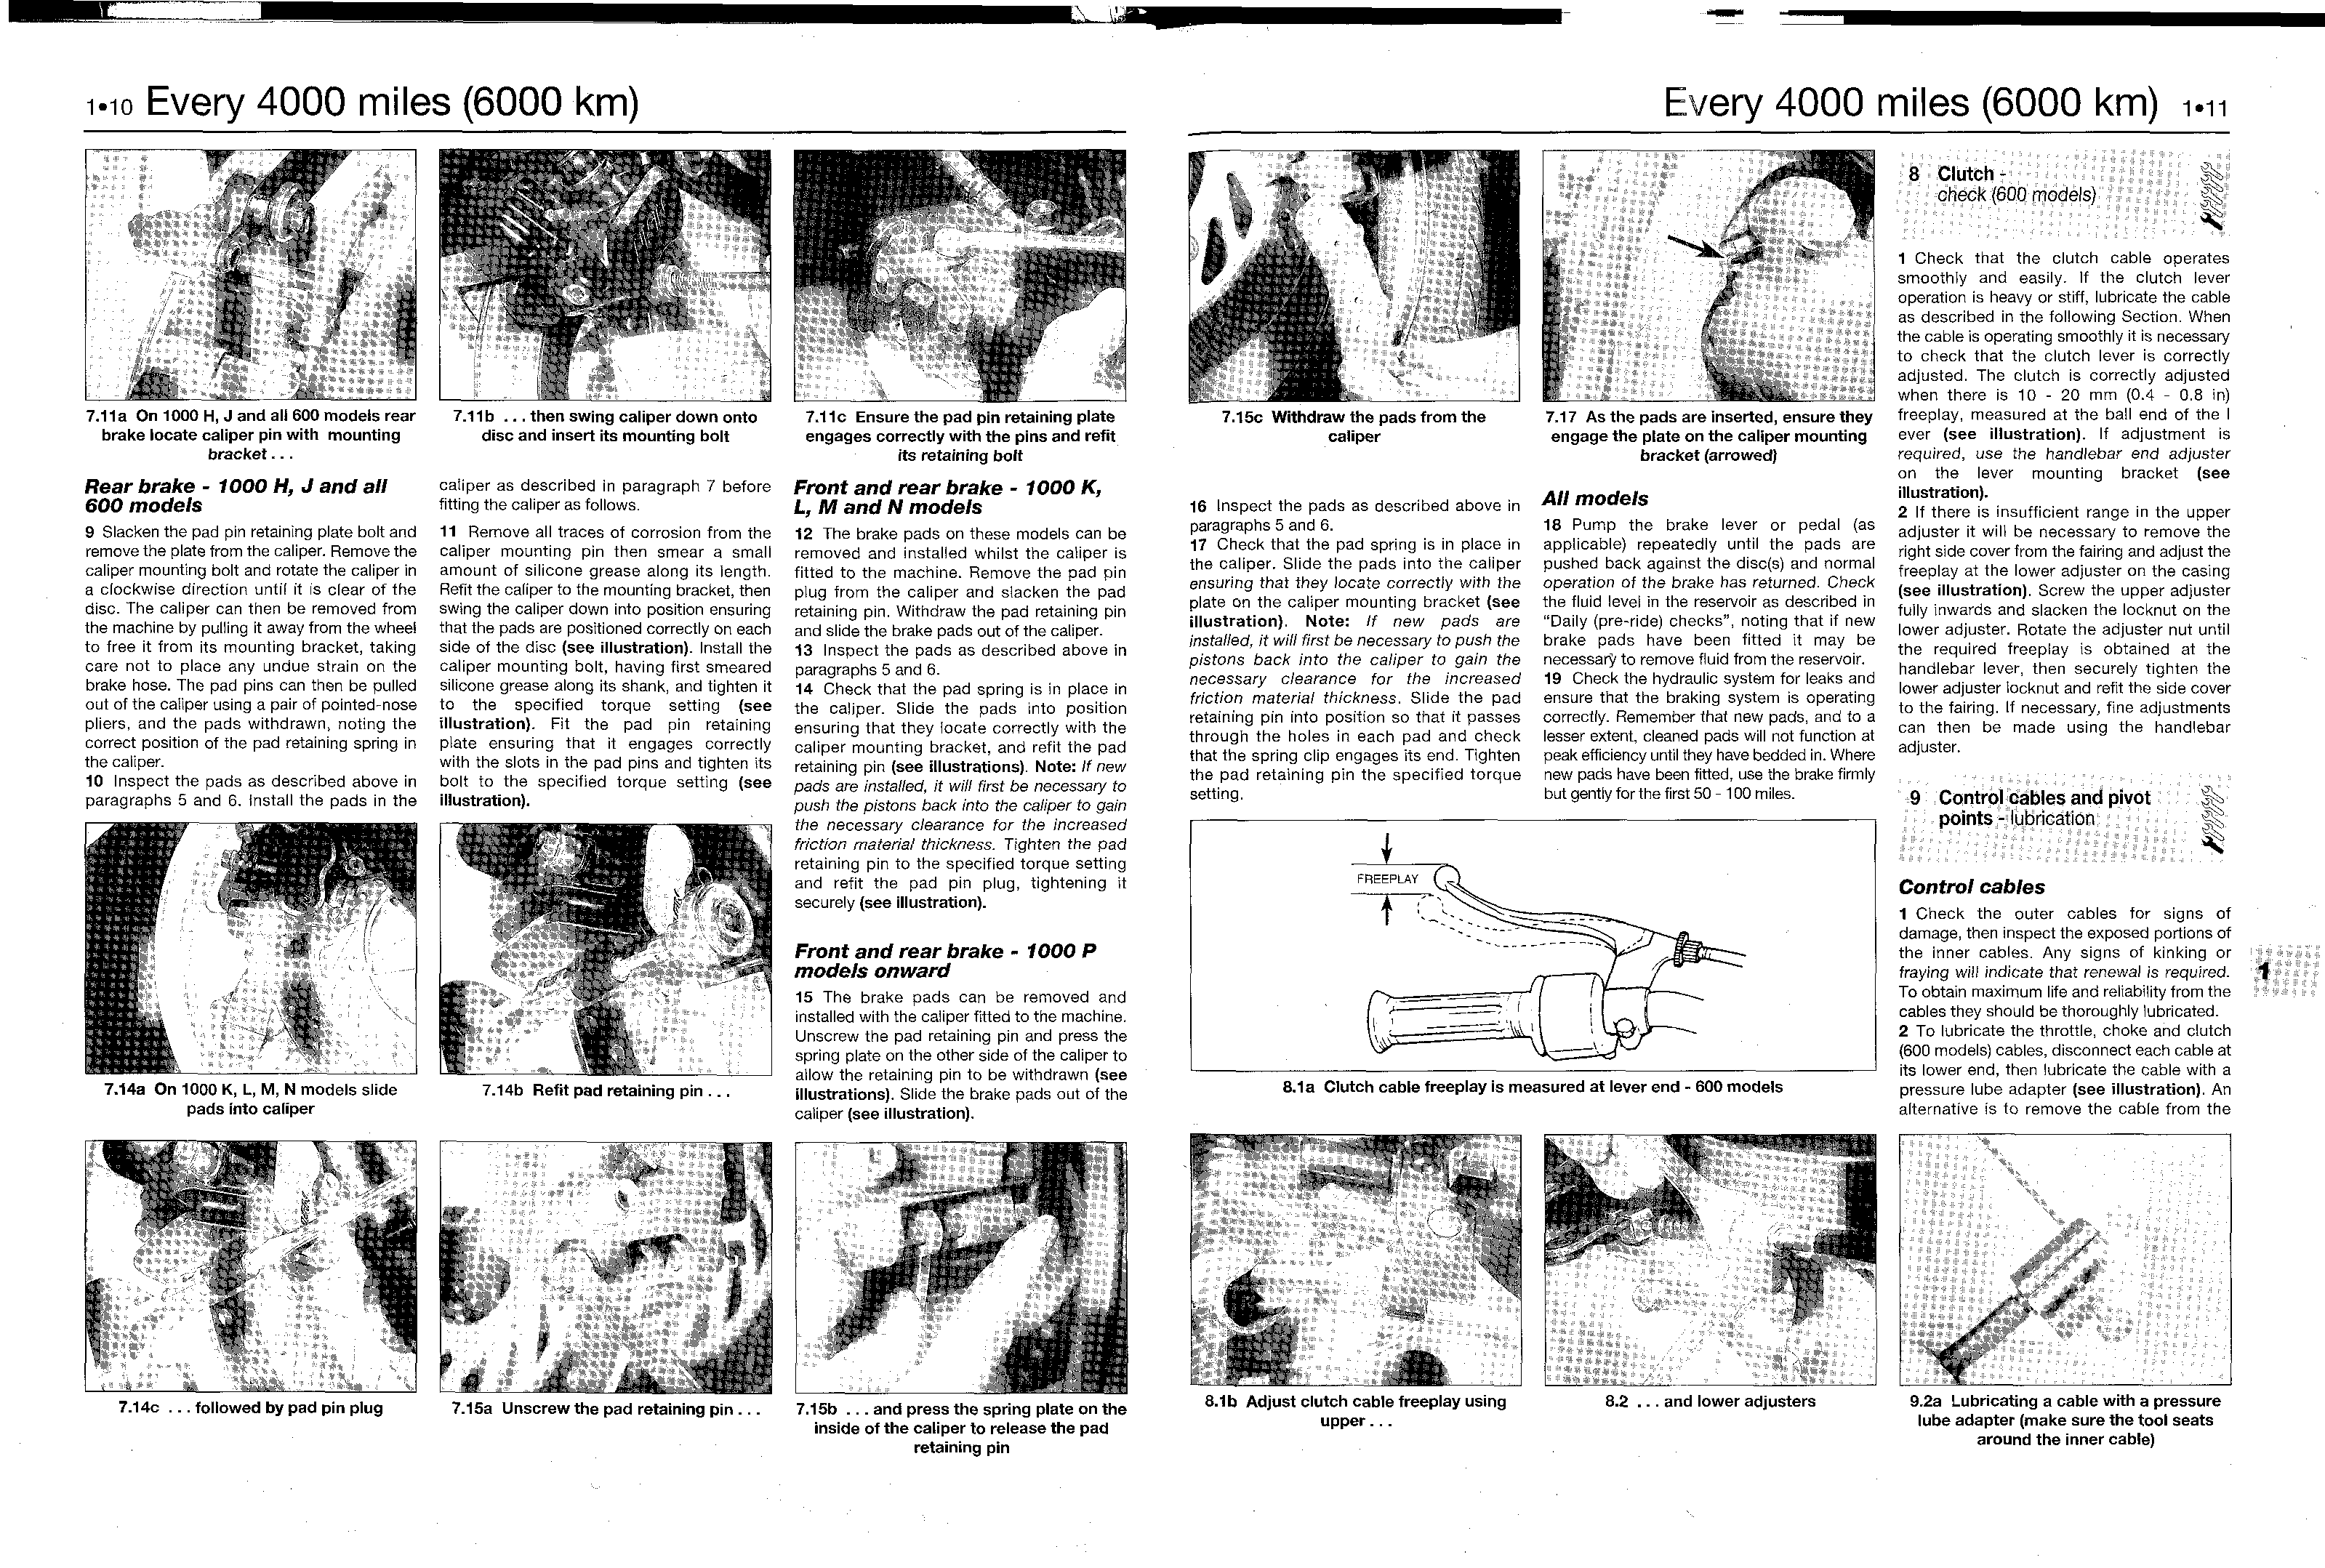
- Every 4000 miles (6000 km)
- Annually, or every 8000 miles (12,000 km)
- Every 18 months, or every 12,000 miles (18,000 km)
- Two yearly, or every 12,000
miles (18,000 km)
- Two yearly, or every 24,000 miles (36,000 km)
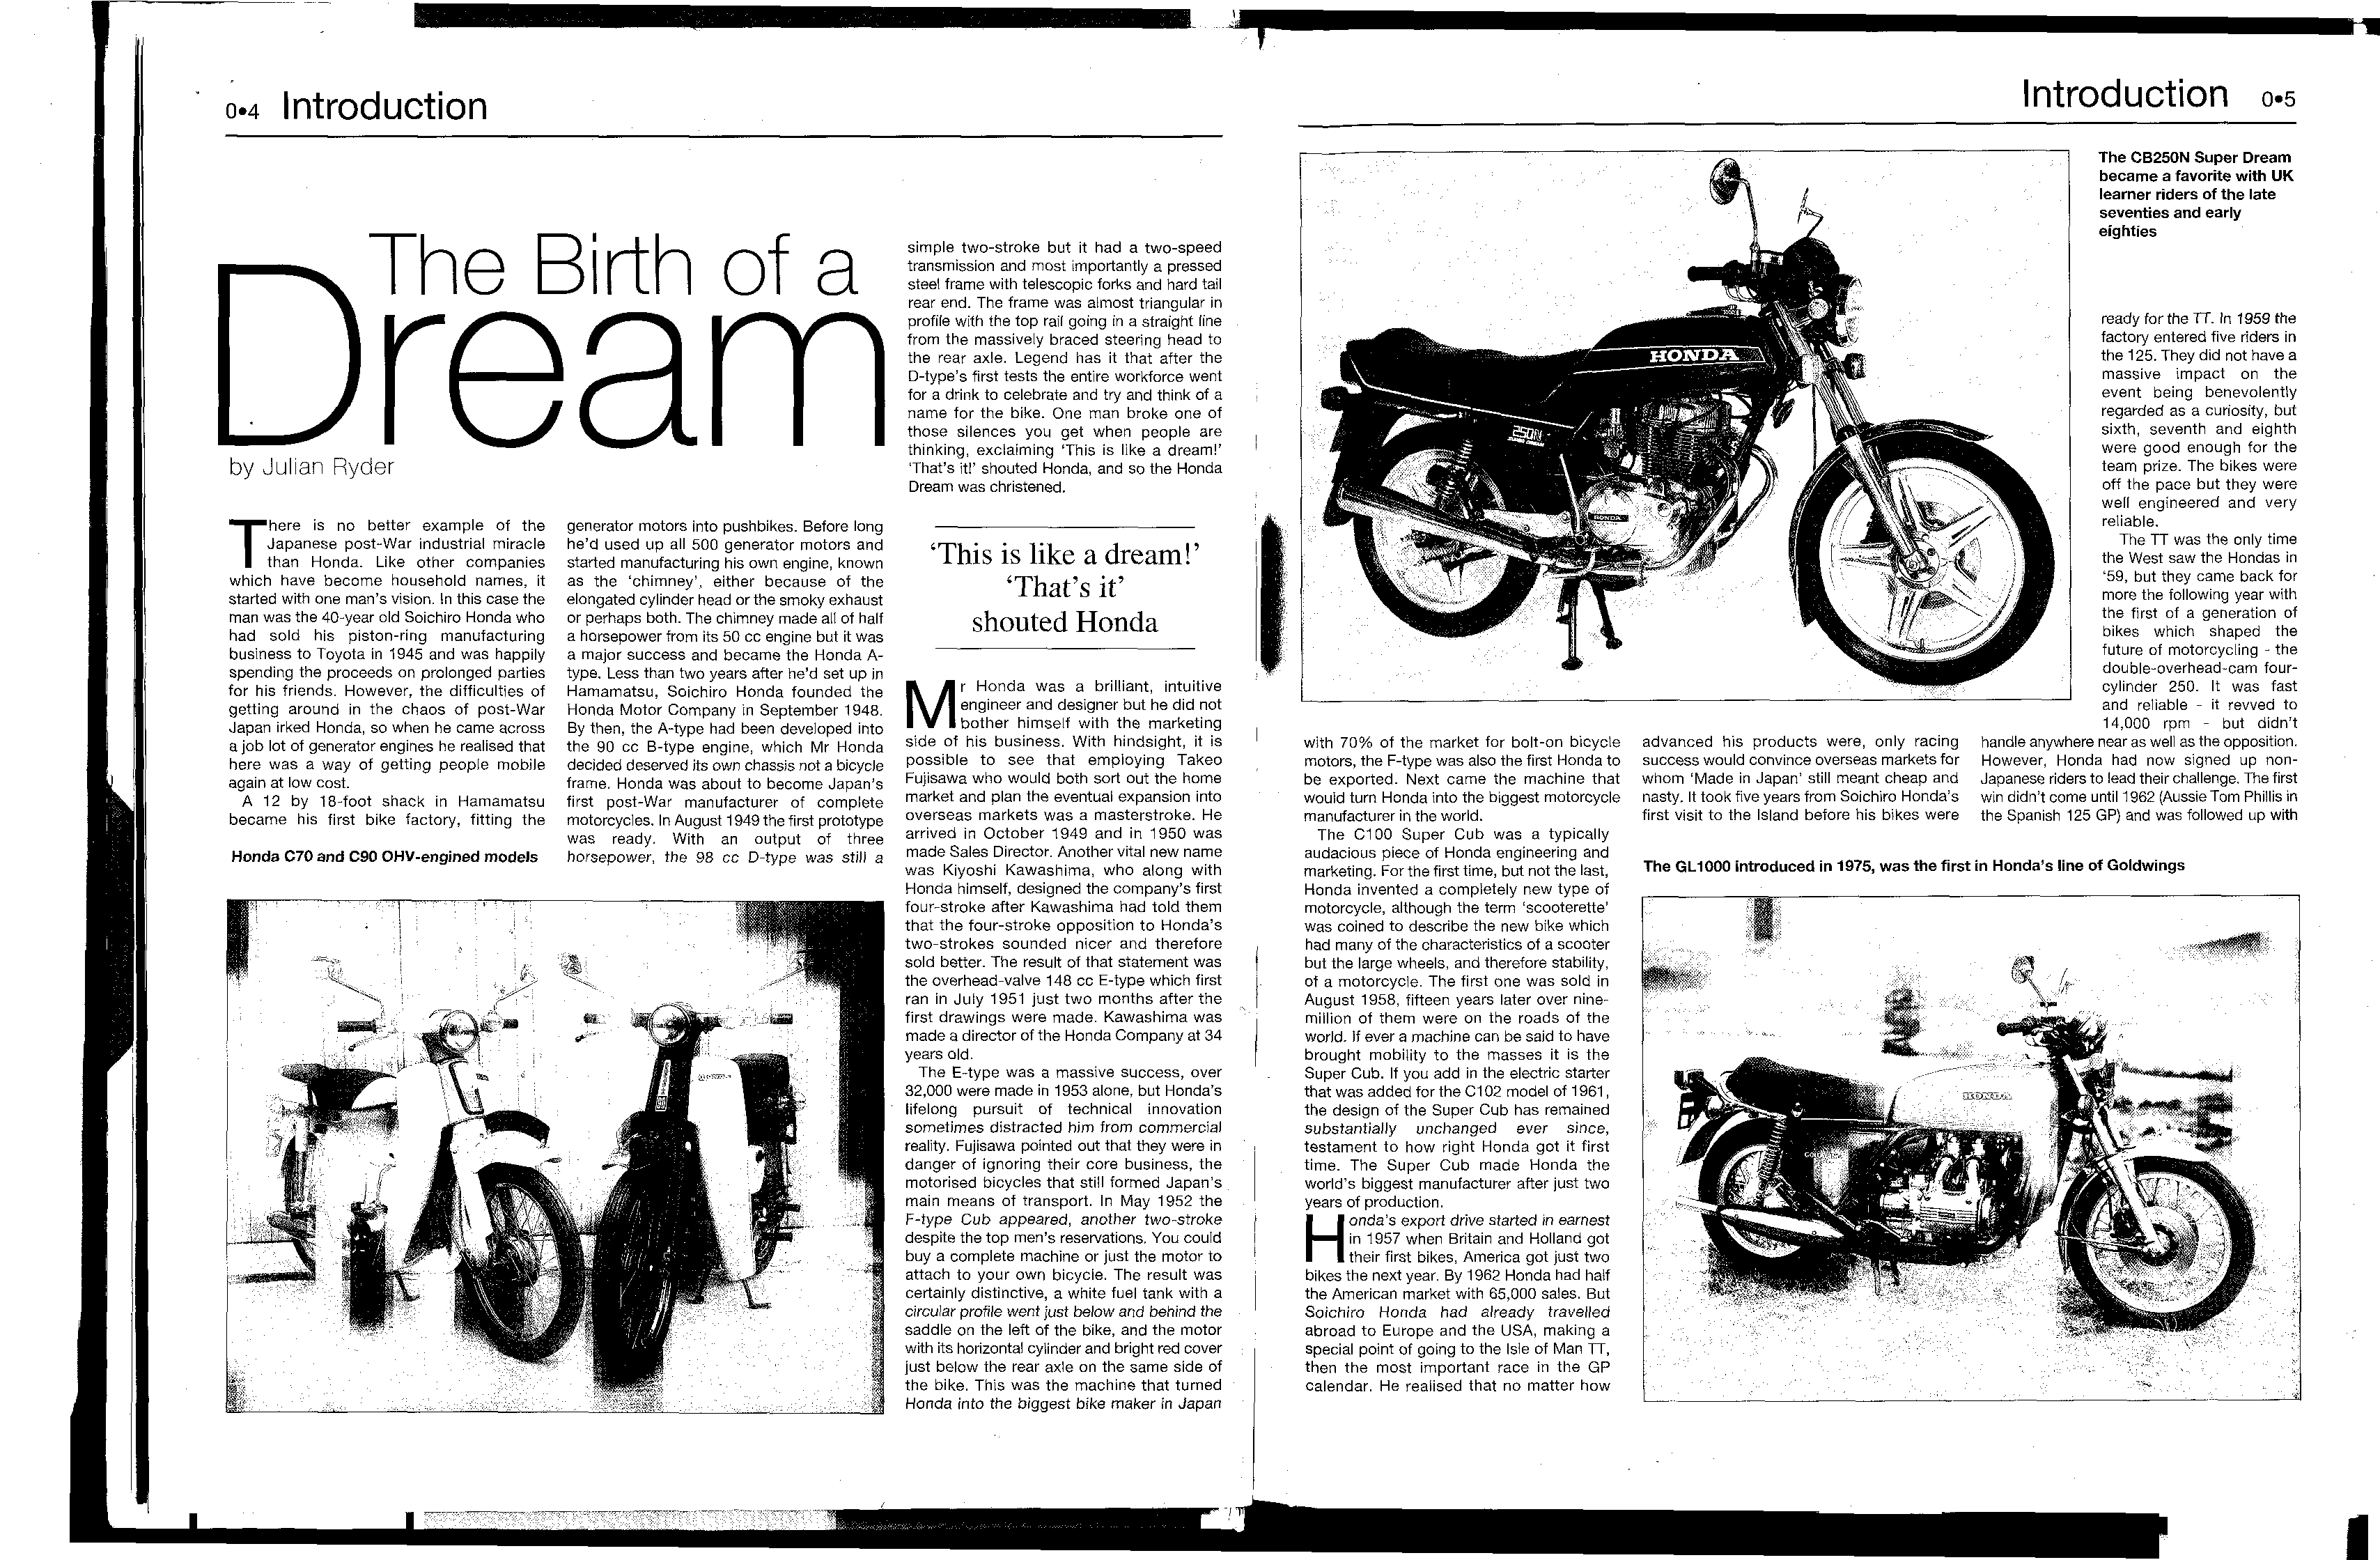
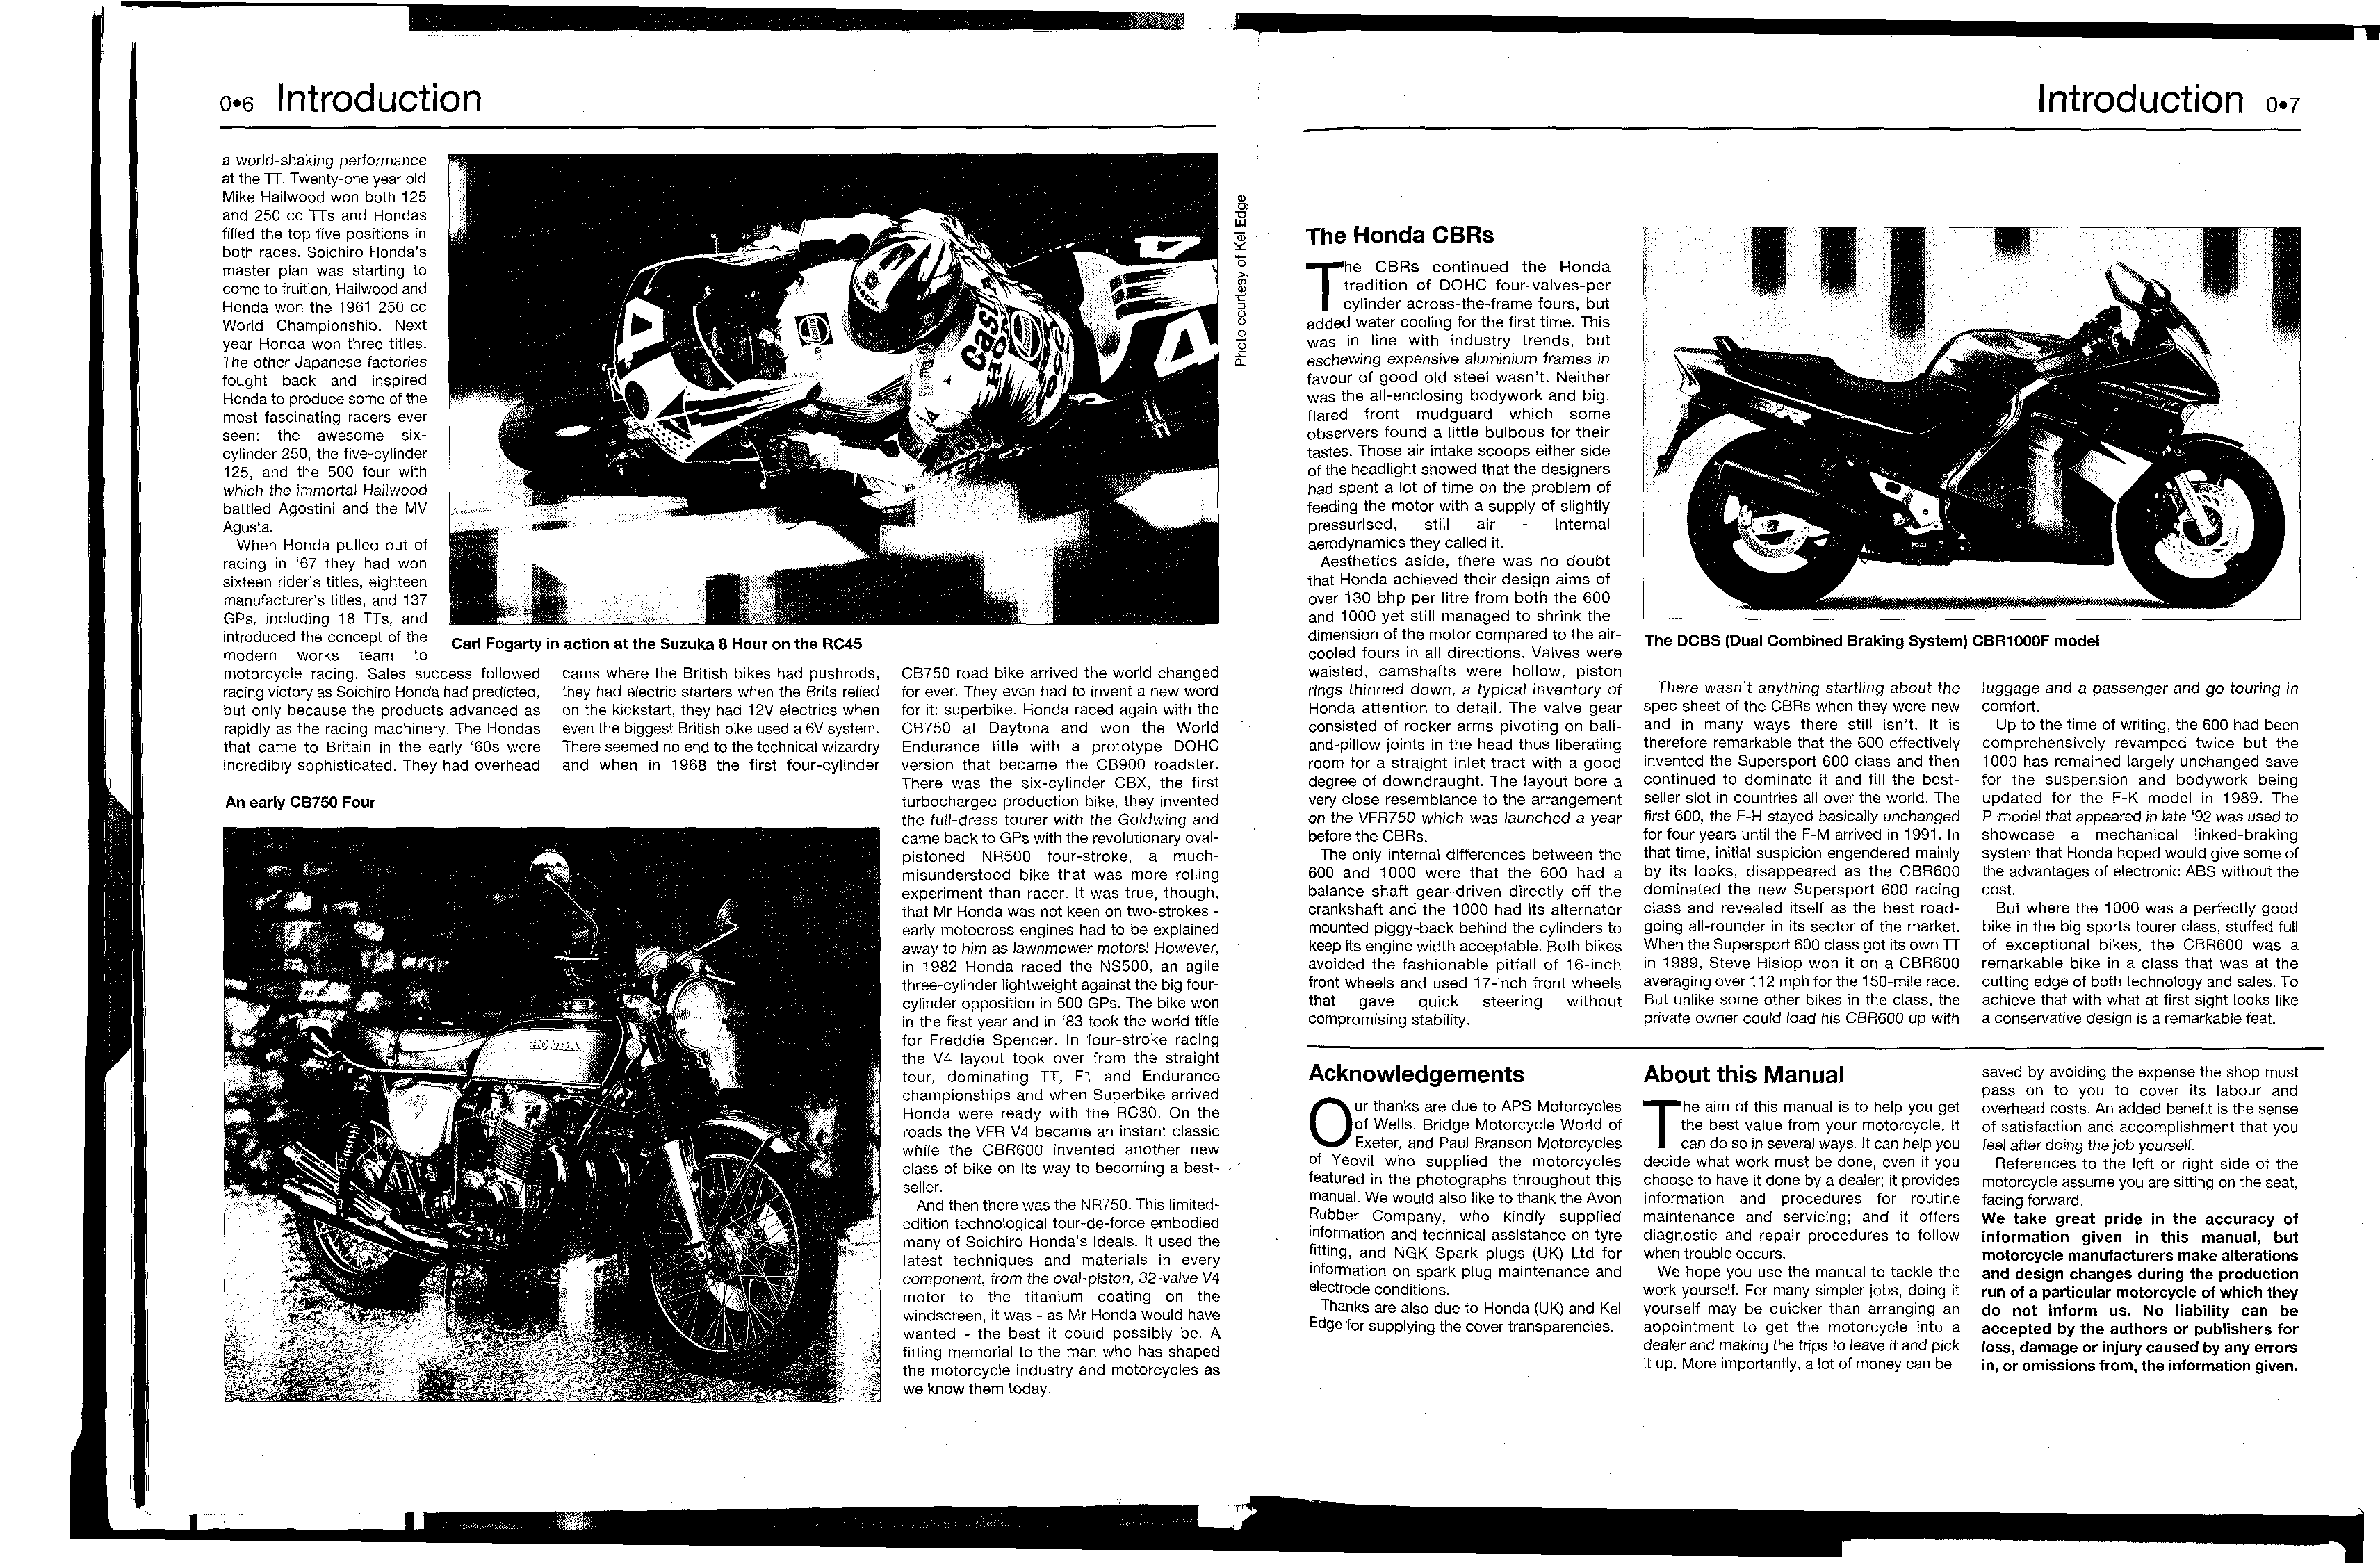
Introduction
Safety First!
Professional mechanics are trained in safe working procedures. However enthusiastic you may be about getting on with the job at hand, take the time to ensure that your safety is not put at risk. A moment's lack of attention can result in an accident, as can failure to observe simple precautions.
There will always be new ways of having accidents, and the following is not a comprehensive list of all dangers; it is intended rather to make you aware of the risks and to encourage a safe approach to all work you carry out on your bike.
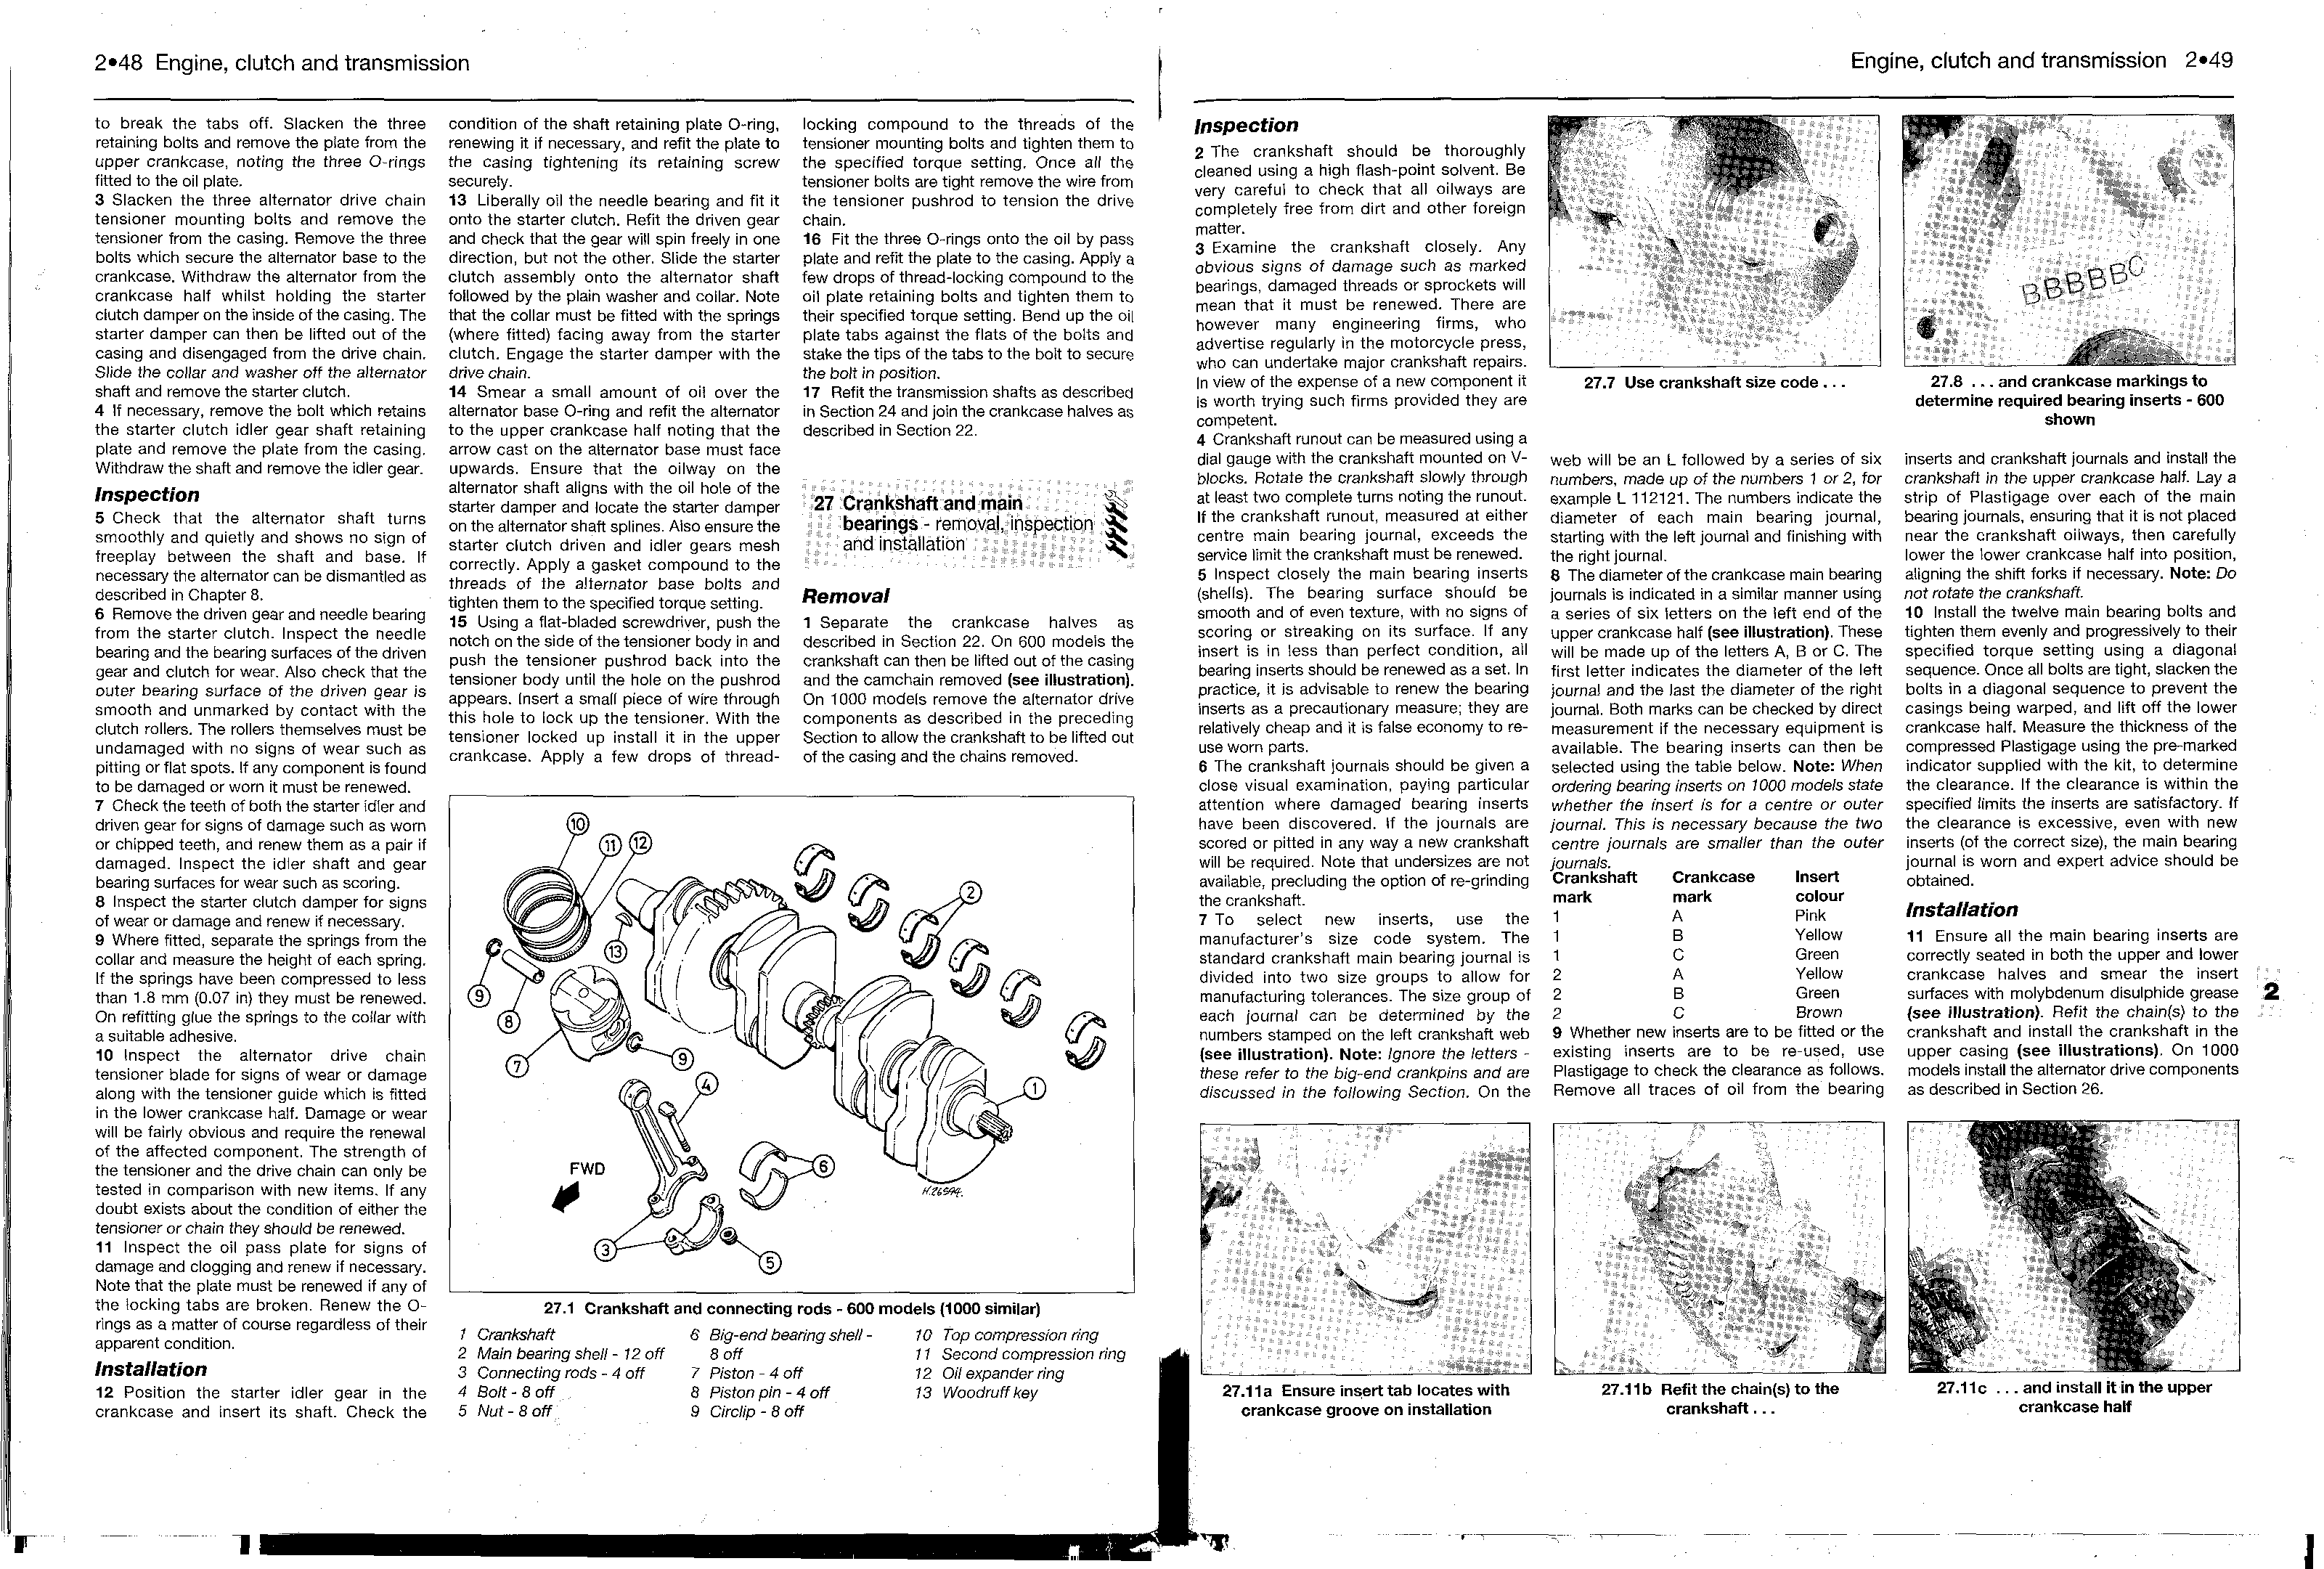
Asbestos
Certain friction, insulating, sealing and other products - such as brake pads, clutch linings, gaskets, etc. - contain asbestos. Extreme care must be taken to avoid inhalation of dust from such products since it is hazardous to health. If in doubt, assume that they do contain asbestos.
Fire
Remember at all times that petrol is highly flammable. Never smoke or have any kind of naked flame around, when working on the vehicle. But the risk does not end there - a spark caused by an electrical short-circuit, by two metal surfaces contacting each other, by careless use of tools, or even by static electricity built up in your body under certain conditions, can ignite petrol vapour, which in a confined space is highly explosive. Never use petrol as a cleaning solvent. Use an approved safety solvent.
Always disconnect the battery earth terminal before working on any part of the fuel or electrical system, and never risk spilling fuel on to a hot engine or exhaust.
It is recommended that a fire extinguisher of a type suitable for fuel and electrical fires is kept handy in the garage or workplace at all times. Never try to extinguish a fuel or electrical fire with water.
Fumes
Certain fumes are highly toxic and can quickly cause unconsciousness and even death if inhaled to any extent. Petrol vapour comes into this category, as do the vapours from certain solvents such as trichloro- ethylene. Any draining or pouring of such volatile fluids should be done in a well ventilated area.
When using cleaning fluids and solvents, read the instructions carefully. Never use materials from unmarked containers - they may give off poisonous vapours.
Never run the engine of a motor vehicle in an enclosed space such as a garage. Exhaust fumes contain carbon monoxide which is extremely poisonous; if you need to run the engine, always do so in the open air or at least have the rear of the vehicle outside the workplace.
The battery
Never cause a spark, or allow a naked light near the vehicle's battery. It will normally be giving off a certain amount of hydrogen gas, which is highly explosive.
Always disconnect the battery ground (earth) terminal before working on the fuel or electrical systems (except where noted}.
If possible, loosen the filler plugs or cover when charging the battery from an external source. Do not charge at an excessive rate or the battery may burst.
Take care when topping up, cleaning or carrying the battery. The acid electrolyte, evenwhen diluted, is very corrosive and should not be allowed to contact the eyes or skin. Always wear rubber gloves and goggles or a face shield. If you ever need to prepare electrolyte yourself, always add the acid slowly to the water; never add the water to the acid.
Electricity
When using an electric power tool, inspection light etc., always ensure that the appliance is correctly connected to its plug and that, where necessary, it is properly grounded (earthed). Do not use such appliances in damp conditions and, again, beware of creating a spark or applying excessive heat in the vicinity of fuel or fuel vapour. Also ensure that the appliances meet national safety standards.
A severe electric shock can result from touching certain parts of the electrical system, such as the spark plug wires (HT leads), when the engine is running or being cranked, particularly if components are damp or the insulation is defective. Where an electronic ignition system is used, the secondary (HT) voltage is much higher and could prove fatal.
Remember...
- Don't start the engine without first ascertaining that the transmission is in neutral.
- Don't suddenly remove the pressure cap from a hot cooling system - cover it with a cloth and release the pressure gradually first, or you may get scalded by escaping coolant.
- Don't attempt to drain oil until you are sure it has cooled sufficiently to avoid scalding you.
- Don't grasp any part of the engine or exhaust system without first ascertaining that it is cool enough not to burn you.
- Don't allow brake fluid or antifreeze to contact the machine's paintwork or plastic components.
- Don't siphon toxic liquids such as fuel, hydraulic fluid or antifreeze by mouth, or allow them to remain on your skin.
- Don't inhale dust - it may be injurious to health (see Asbestos heading).
- Don't allow any spilled oil or grease to remain on the floor - wipe it up right away, before someone slips on it.
- Don't use ill-fitting spanners or other tools which may slip and cause injury.
- Don't lift a heavy component which may be beyond your capability - get assistance.
- Don't rush to finish a job or take unverified short cuts.
- Don't allow children or animals in or around an unattended vehicle.
- Don't inflate a tyre above the recommended pressure. Apart from overstressing the carcass, in extreme cases the tyre may blow off forcibly.
- Do ensure that the machine is supported securely at all times. This is especially important when the machine is blocked up to aid wheel or fork removal.
- Do take care when attempting to loosen a stubborn nut or bolt. It is generally better to pull on a spanner, rather than push, so that if you slip, you fall away from the machine rather than onto it.
- Do wear eye protection when using power tools such as drill, sander, bench grinder etc.
- Do use a barrier cream on your hands prior to undertaking dirty jobs - it will protect your skin from infection as well as making the dirt easier to remove afterwards; but make sure your hands aren't left slippery. Note that long-term contact with used engine oil can be a health hazard.
- Do keep loose clothing (cuffs, ties etc. and long hair) well out of the way of moving mechanical parts.
- Do remove rings, wristwatch etc., before working on the vehicle - especially the electrical system.
- Do keep your work area tidy - it is only too easy to fall over articles left lying around.
- Do exercise caution when compressing springs for removal or installation. Ensure that the tension is applied and released in a controlled manner, using suitable tools which preclude the possibility of the spring escaping violently.
- Do ensure that any lifting tackle used has a safe working load rating adequate for the job.
- Do get someone to check periodically that all is well, when working alone on the vehicle.
- Do carry out work in a logical sequence and check that everything is correctly assembled and tightened afterwards.
- Do remember that your vehicle's safety affects that of yourself and others. If in doubt on any point, get professional advice.
- If in spite of following these precautions, you are unfortunate enough to injure yourself, seek medical attention as soon as possible.
Identification Numbers
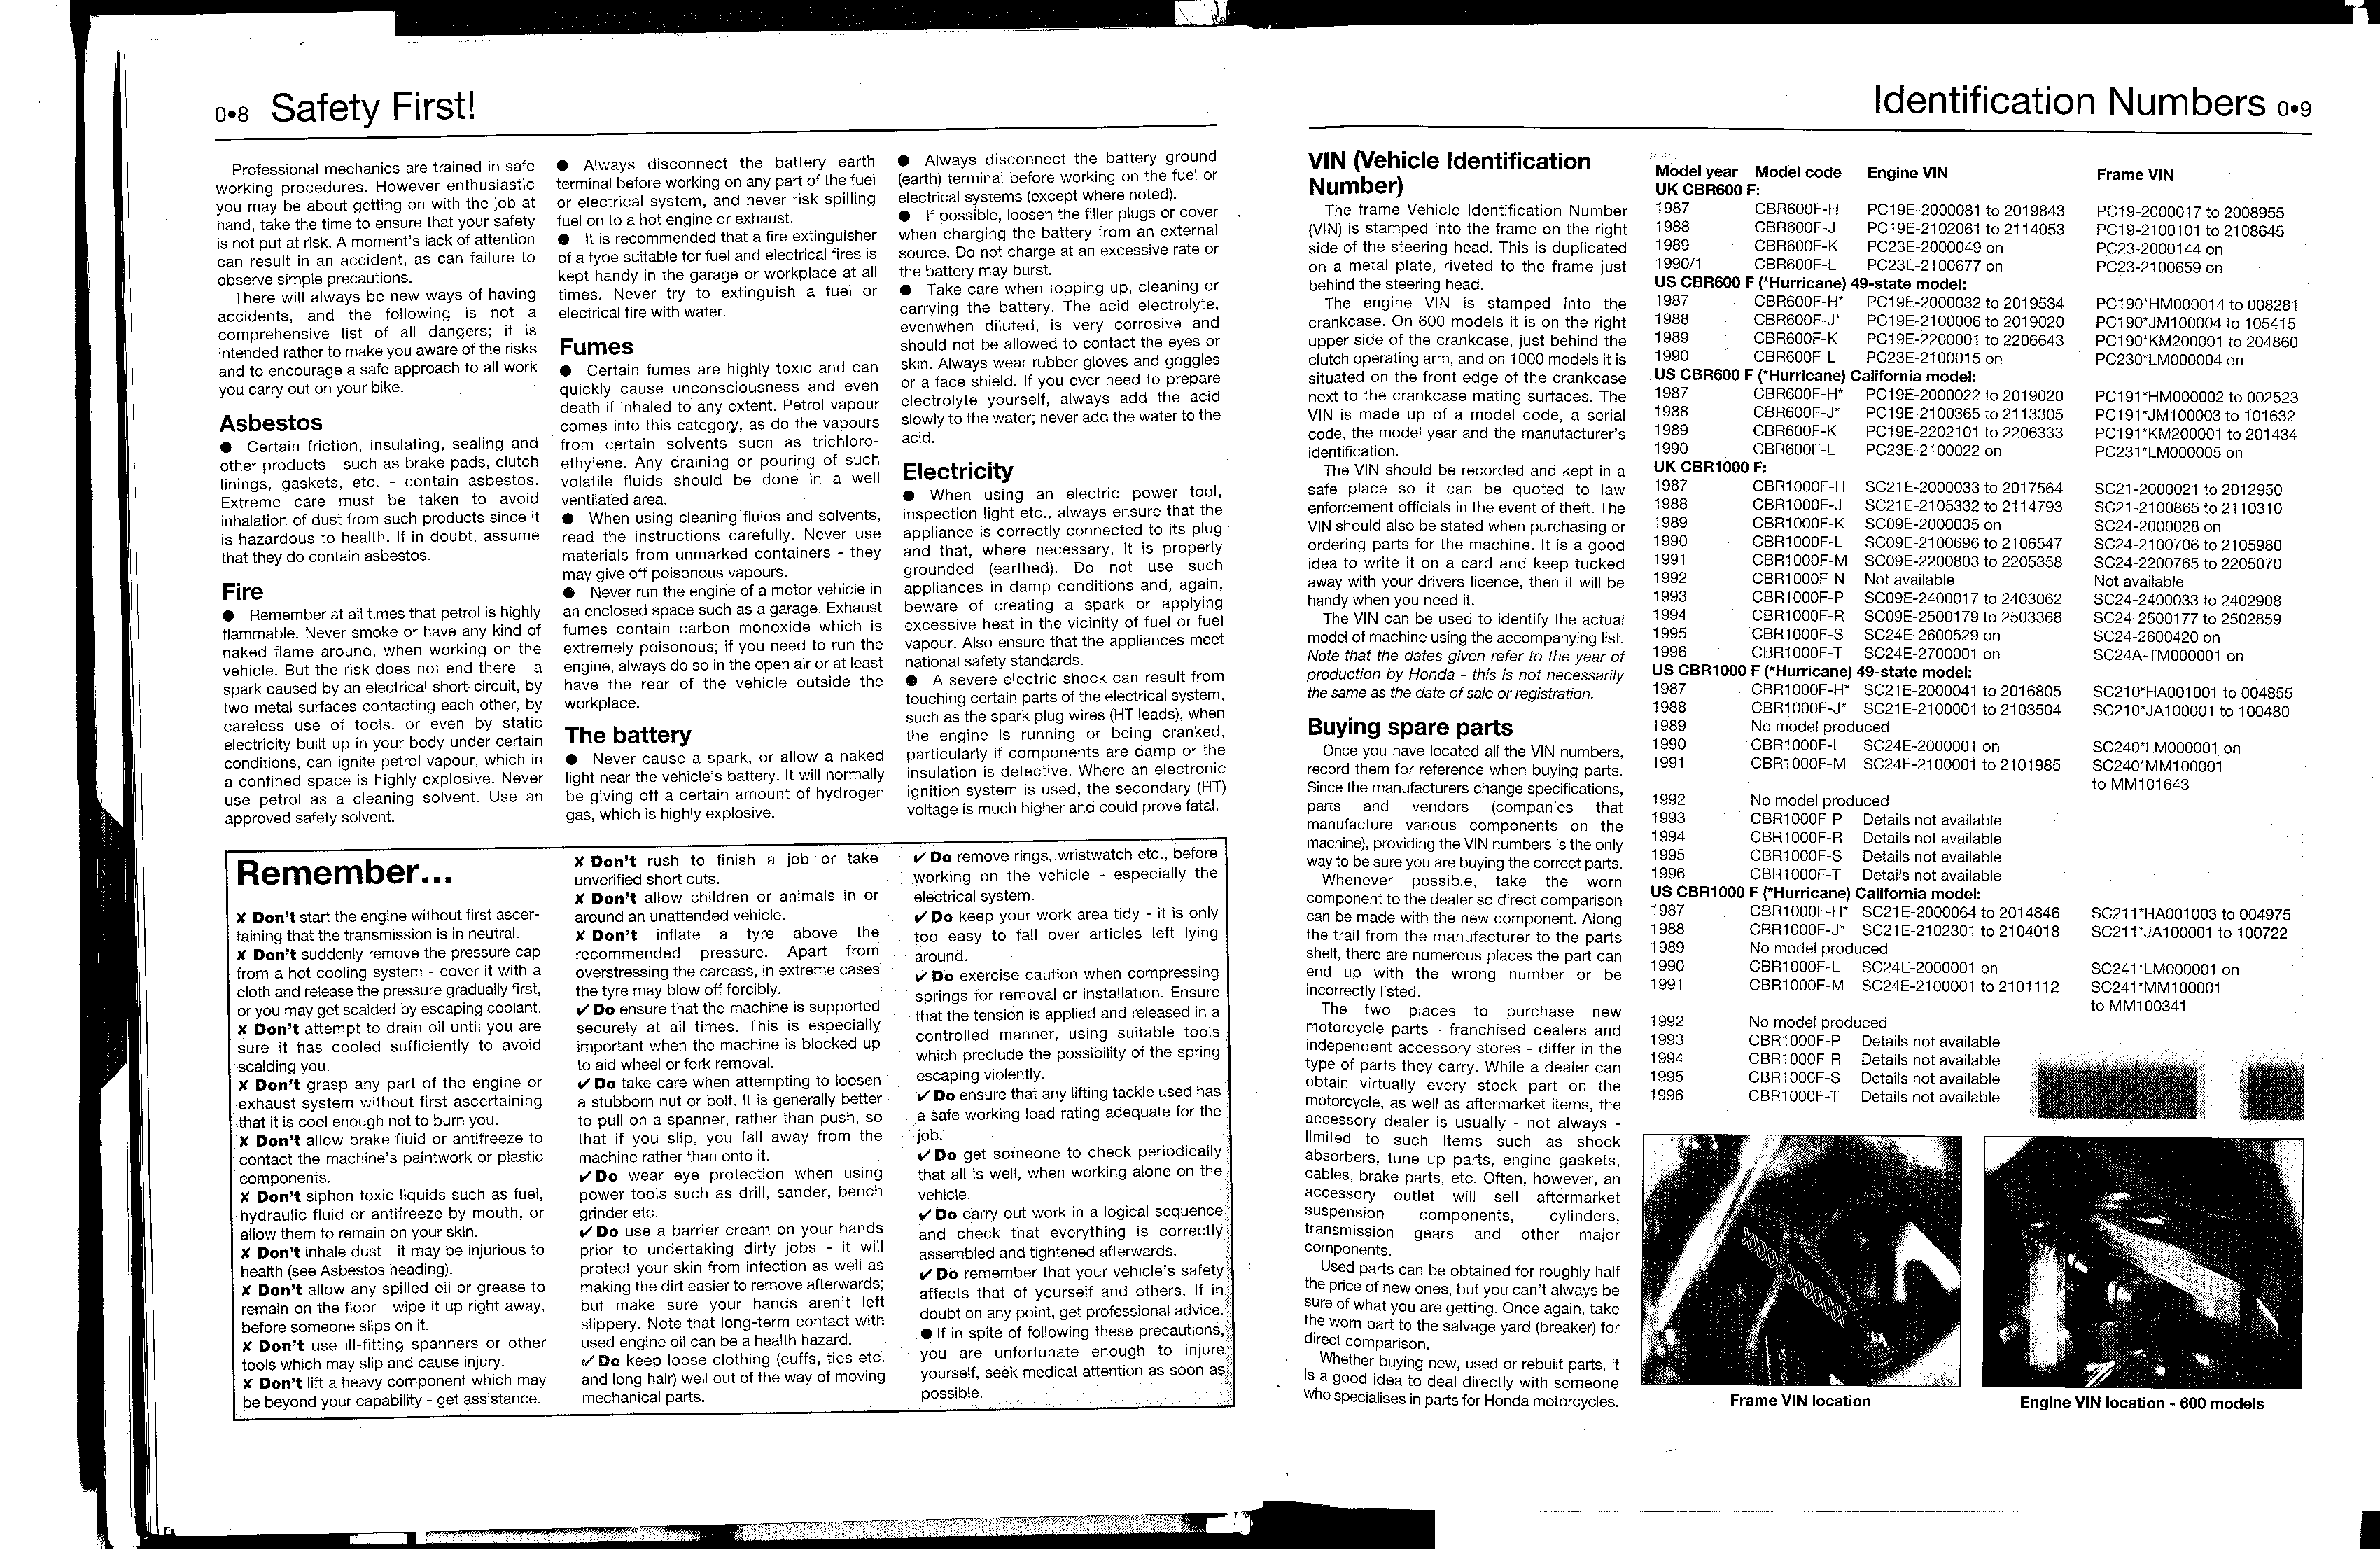
VIN (Vehicle Identification Number)
The frame Vehicle Identification Number (VIN) is stamped into the frame on the right side of the steering head. This is duplicated on a metal plate, riveted to the frame just behind the steering head.
The engine VIN is stamped into the crankcase. On 600 models it is on the right upper side of the crankcase, just behind the clutch operating arm, and on 1000 models it is situated on the front edge of the crankcase next to the crankcase mating surfaces. The VIN is made up of a model code, a serial code, the model year and the manufacturer's identification.
The VIN should be recorded and kept in a safe place so it can be quoted to law enforcement officials in the event of theft. The VIN should also be stated when purchasing or ordering parts for the machine. It is a good idea to write it on a card and keep tucked away with your drivers licence, then it will be handy when you need it.
The VIN can be used to identify the actual model of machine using the accompanying list. Note that the dates given refer to the year of production by Honda - this is not necessarily the same as the date of sale or registration.
Buying spare parts
Once you have located all the VIN numbers, record them for reference when buying parts. Since the manufacturers change specifications, parts and vendors (companies that manufacture various components on the machine), providing the VIN numbers is the only way to be sure you are buying the correct parts.
Whenever possible, take the worn component to the dealer so direct comparison can be made with the new component. Along the trail from the manufacturer to the parts shelf, there are numerous places the part can end up with the wrong number or be incorrectly listed.
The two places to purchase new motorcycle parts - franchised dealers and independent accessory stores - differ in the type of parts they carry. While a dealer can obtain virtually every stock part on the motorcycle, as well as aftermarket items, the accessory dealer is usually - not always -limited to such items such as shock absorbers, tune up parts, engine gaskets, cables, brake parts, etc. Often, however, an accessory outlet will sell aftermarket suspension components, cylinders, transmission gears and other major components.
Used parts can be obtained for roughly half the price of new ones, but you can't always be sure of what you are getting. Once again, take the worn part to the salvage yard (breaker) for direct comparison.
Whether buying new, used or rebuilt parts, it is a good idea to deal directly with someone who specialises in parts for Honda motorcycles.
|
Model
year |
Model
code |
Engine
VIN |
Frame
VIN |
|
UK
CBR600 F: |
|
1987 |
CBR600F-H |
PC19E-2000081 to 2019843 |
PC1
9-200001 7 to 2008955 |
|
1988 |
CBR600F-J |
PC19E-2102061 to 2114053 |
PC1
9-2100101 to 2108645 |
|
1989 |
CBR600F-K |
PC23E-2000049 on |
PC23-2000144on |
|
1990/1 |
CBR600F-L |
PC23E-2100677 on |
PC23-2100659 on |
|
US
CBR600F (*Hurricane) 49-state model: |
|
1987 |
CBR600F-H" |
PC19E-2000032 to 2019534 |
PC1
90*HM000014 to 008281 |
|
1988 |
CBR600F-J* |
PC19E-2100006 to 201 9020 |
PC190*JM100004 to 105415 |
|
1989 |
CBR600F-K |
PC19E-2200001 to 2206643 |
PC190*KM200001 to 204860 |
|
1990 |
CBR600F-L |
PC23E-2100015 on |
PC230*LM000004 on |
|
US
CBR600 F(*Hurricane) California model: |
|
1987 |
CBR600F-H" |
PC19E-2000022 to 2019020 |
PC191*HM000002 to 002523 |
|
1988 |
CBR600F-J* |
PC19E-21
00365 to 2113305 |
PC191*JM100003 to 101632 |
|
1989 |
CBR600F-K |
PC19E-2202101 to 2206333 |
PC191*KM200001 to 201434 |
|
1990 |
CBR600F-L |
PC23E-2100022 on |
PC231*LM000005 on |
|
UK
CBR1000 F: |
|
1987 |
CBR1000F-H |
SC21
Ј-2000033 to 2017564 |
SC21
-2000021 to 2012950 |
|
1988 |
CBR1000F-J |
SC21
E-2105332 to 2114793 |
SC21
-2100865 to 2110310 |
|
1989 |
CBR1000F-K |
SC09E-2000035 on |
SC24-2000028 on |
|
1990 |
CBR1000F-L |
SC09E-2100696 to 2106547 |
SC24-2100706 to 2105980 |
|
1991 |
CBR1000F-M |
SC09E-2200803 to 2205358 |
SC24-2200765 to 2205070 |
|
1992 |
CBR1000F-N |
Not
available |
Not
available |
|
1993 |
CBR1000F-P |
SC09E-2400017 to 2403062 |
SC24-2400033 to 2402908 |
|
1994 |
CBR1000F-R |
SC09E-2500179 to 2503368 |
SC24-2500177 to 2502859 |
|
1995 |
CBR1000F-S |
SC24E-2600529 on |
SC24-2600420 on |
|
1996 |
CBR1000F-T |
SC24E-2700001 on |
SC24A-TM
000001 on |
|
US
CBR 1000 F (*Hurricane) 49-state model: |
|
1987 |
CBR1000F-H* |
SC21
E-2000041 to 2016805 |
SC210*HA001001 to 004855 |
|
1988 |
CBR1000F-J* |
SC21
E-2100001 to 2103504 |
SC210*JA100001 to 100480 |
|
1989 |
No model
produced |
|
1990 |
CBR1000F-L |
SC24E-2000001 on |
SC240-LM000001 on |
|
1991 |
CBR1000F-M |
SC24E-2100001 to 2101985 |
SC240*MM100001 to MM101643 |
|
1992 |
No model
produced |
|
1993 |
CBR1000F-P |
Details
not available |
|
|
1994 |
CBR1000F-R |
Details
not available |
|
|
1995 |
CBR1000F-S |
Details
not available |
|
|
1996 |
CBR1000F-T |
Details
not available |
|
|
US
CBR1000 F (*Hurricane) California model: |
|
1987 |
CBR1000F-H* |
SC21E-2000064 to 2014846 |
SC211
*HA001003 to 004975 |
|
1988 |
CBR1000F-J* |
SC21E-2102301 to 2104018 |
SC211*JA100001 to 100722 |
|
1989 |
No model
produced |
|
1990 |
CBR1000F-L |
SC24E-2000001 on |
SC241*LM000001 up |
|
1991 |
CBR1000F-M |
SC24E-2100001 to 2101112 |
SC241*MM100001 to MM1 00341 |
|
1992 |
No model
produced |
|
|
|
1993 |
CBR1000F-P |
Details
not available |
|
|
1994 |
CBR1000F-R |
Details
not available |
. |
|
1995 |
CBR1000F-S |
Details
not available |
|
|
1996 |
CBR1000F-T |
Details
not available |
|
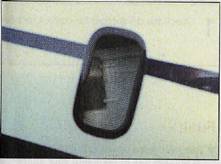
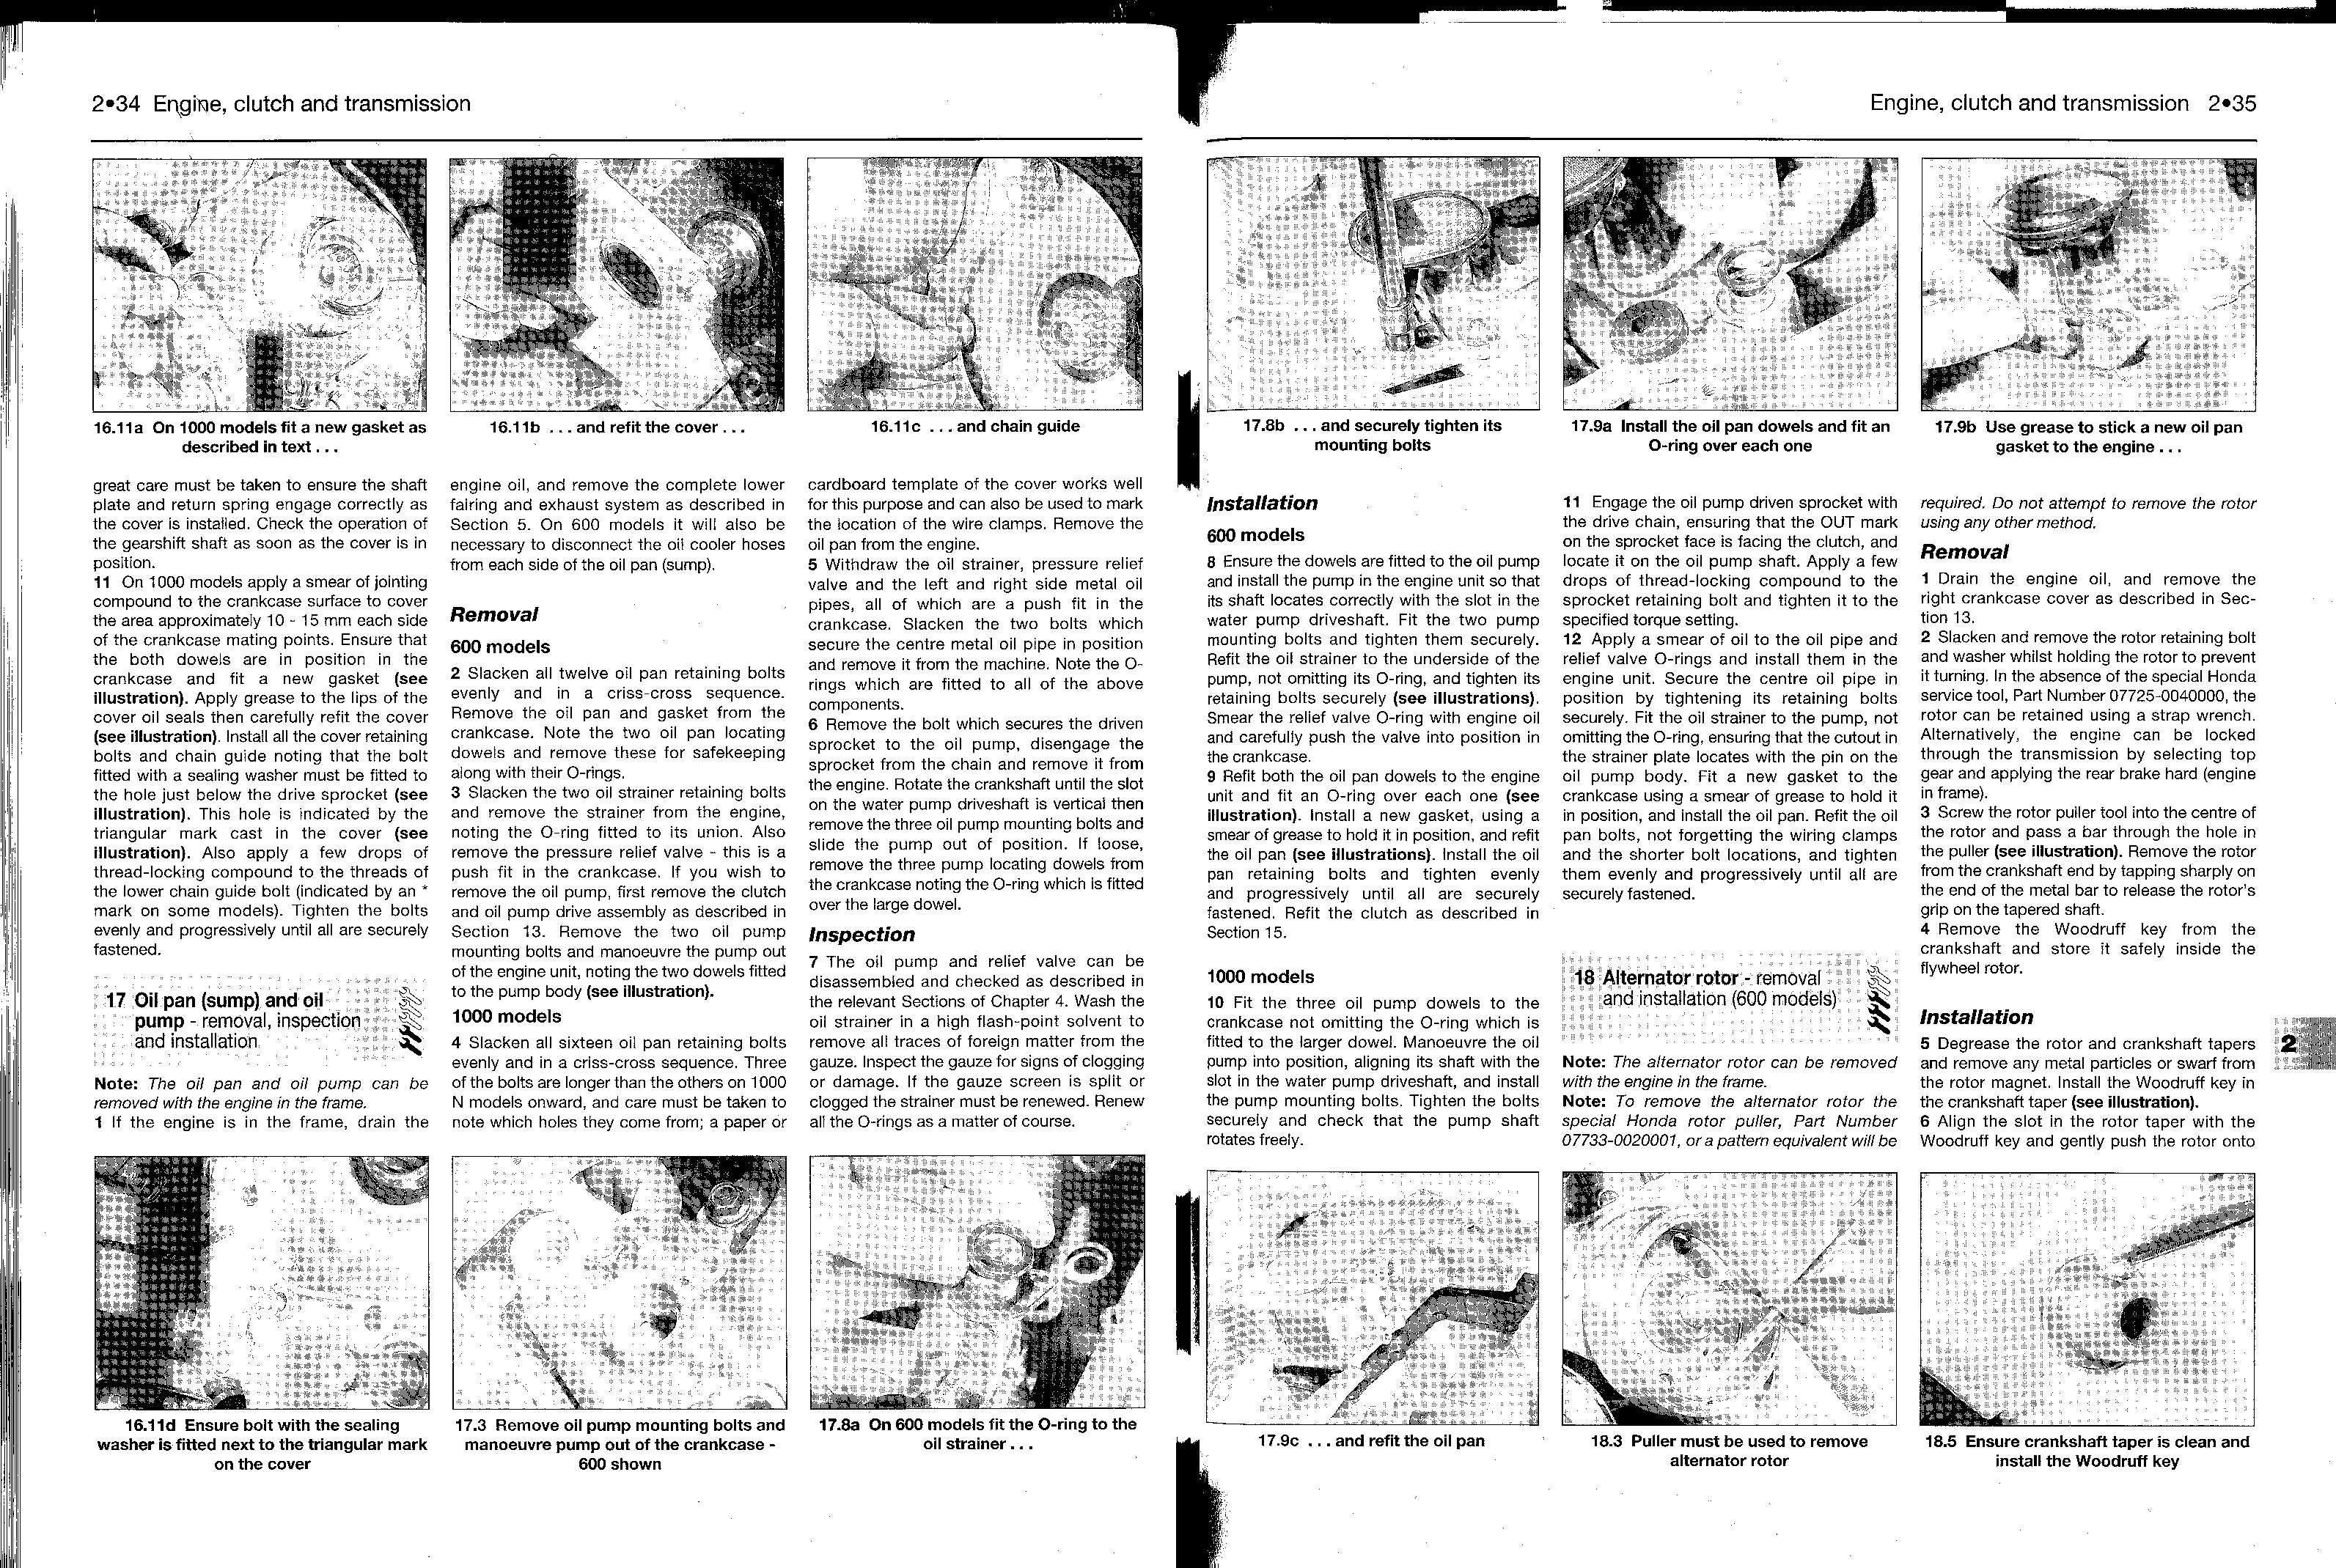
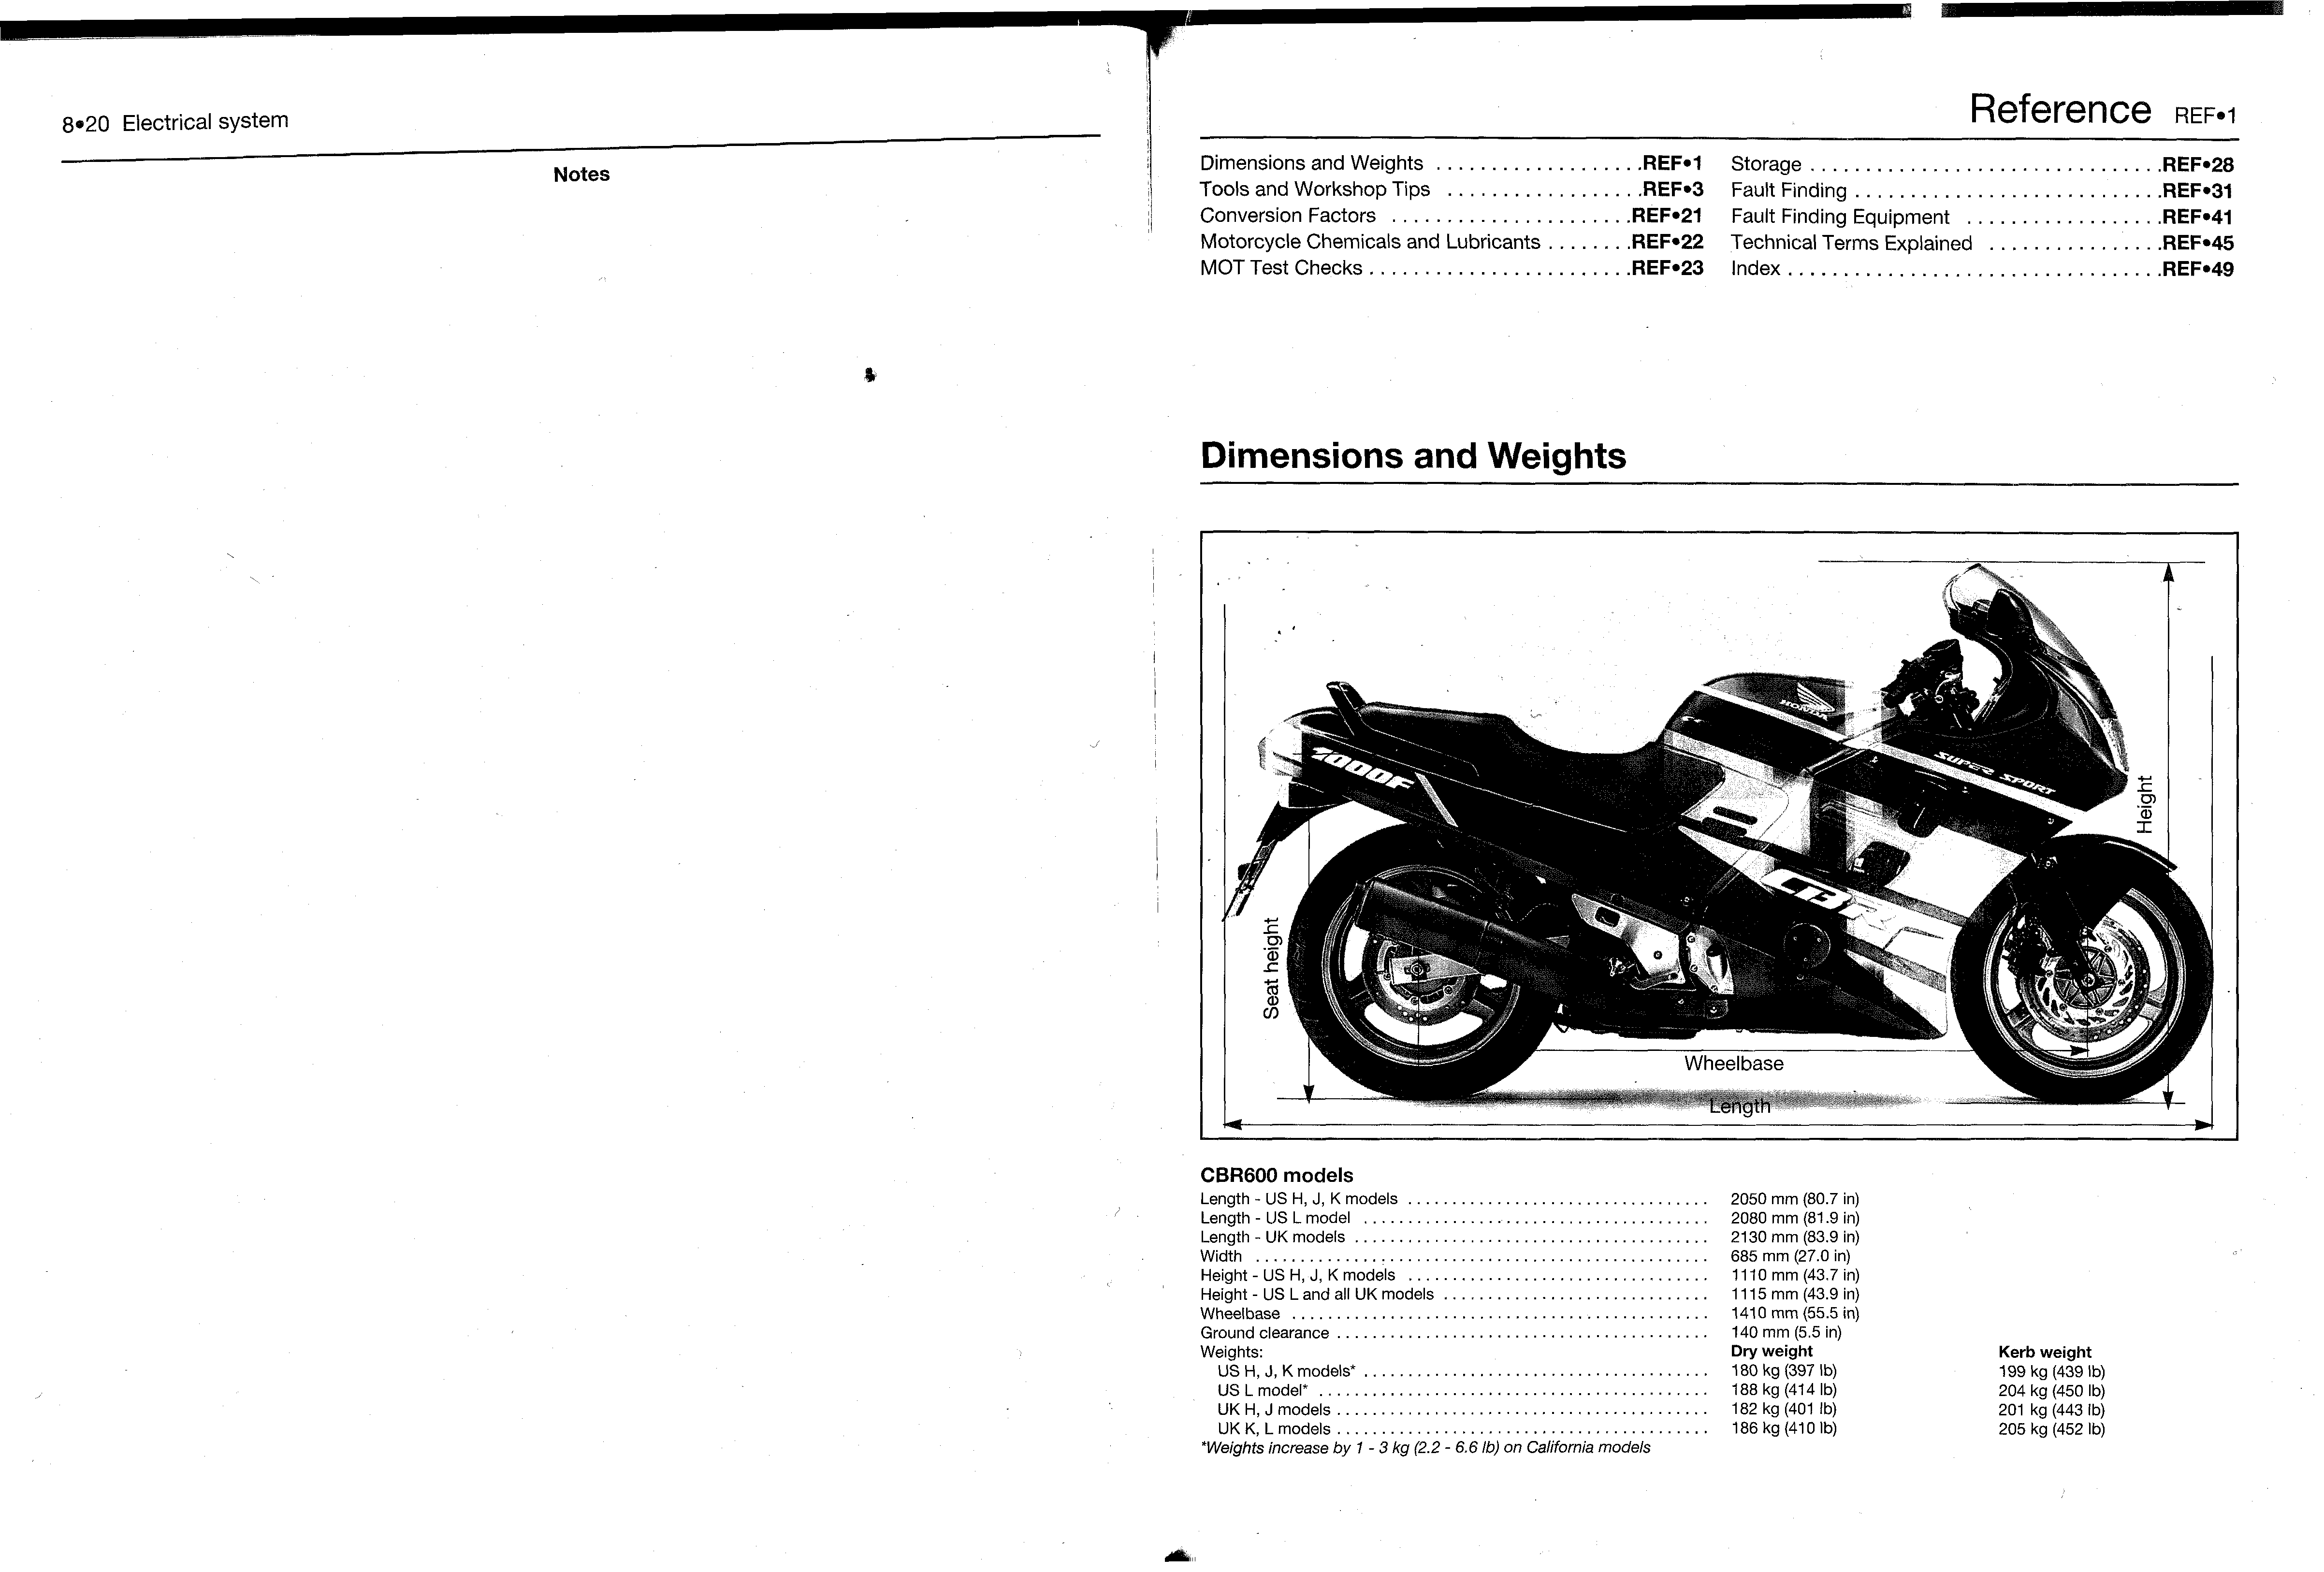
Frame VIN location
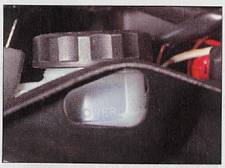
Engine VIN location - 600 models
Daily (pre-ride) checks
Note: The daily (pre-ride) checks outlined in the owner's manual covers those items which should be inspected on a daily basis.
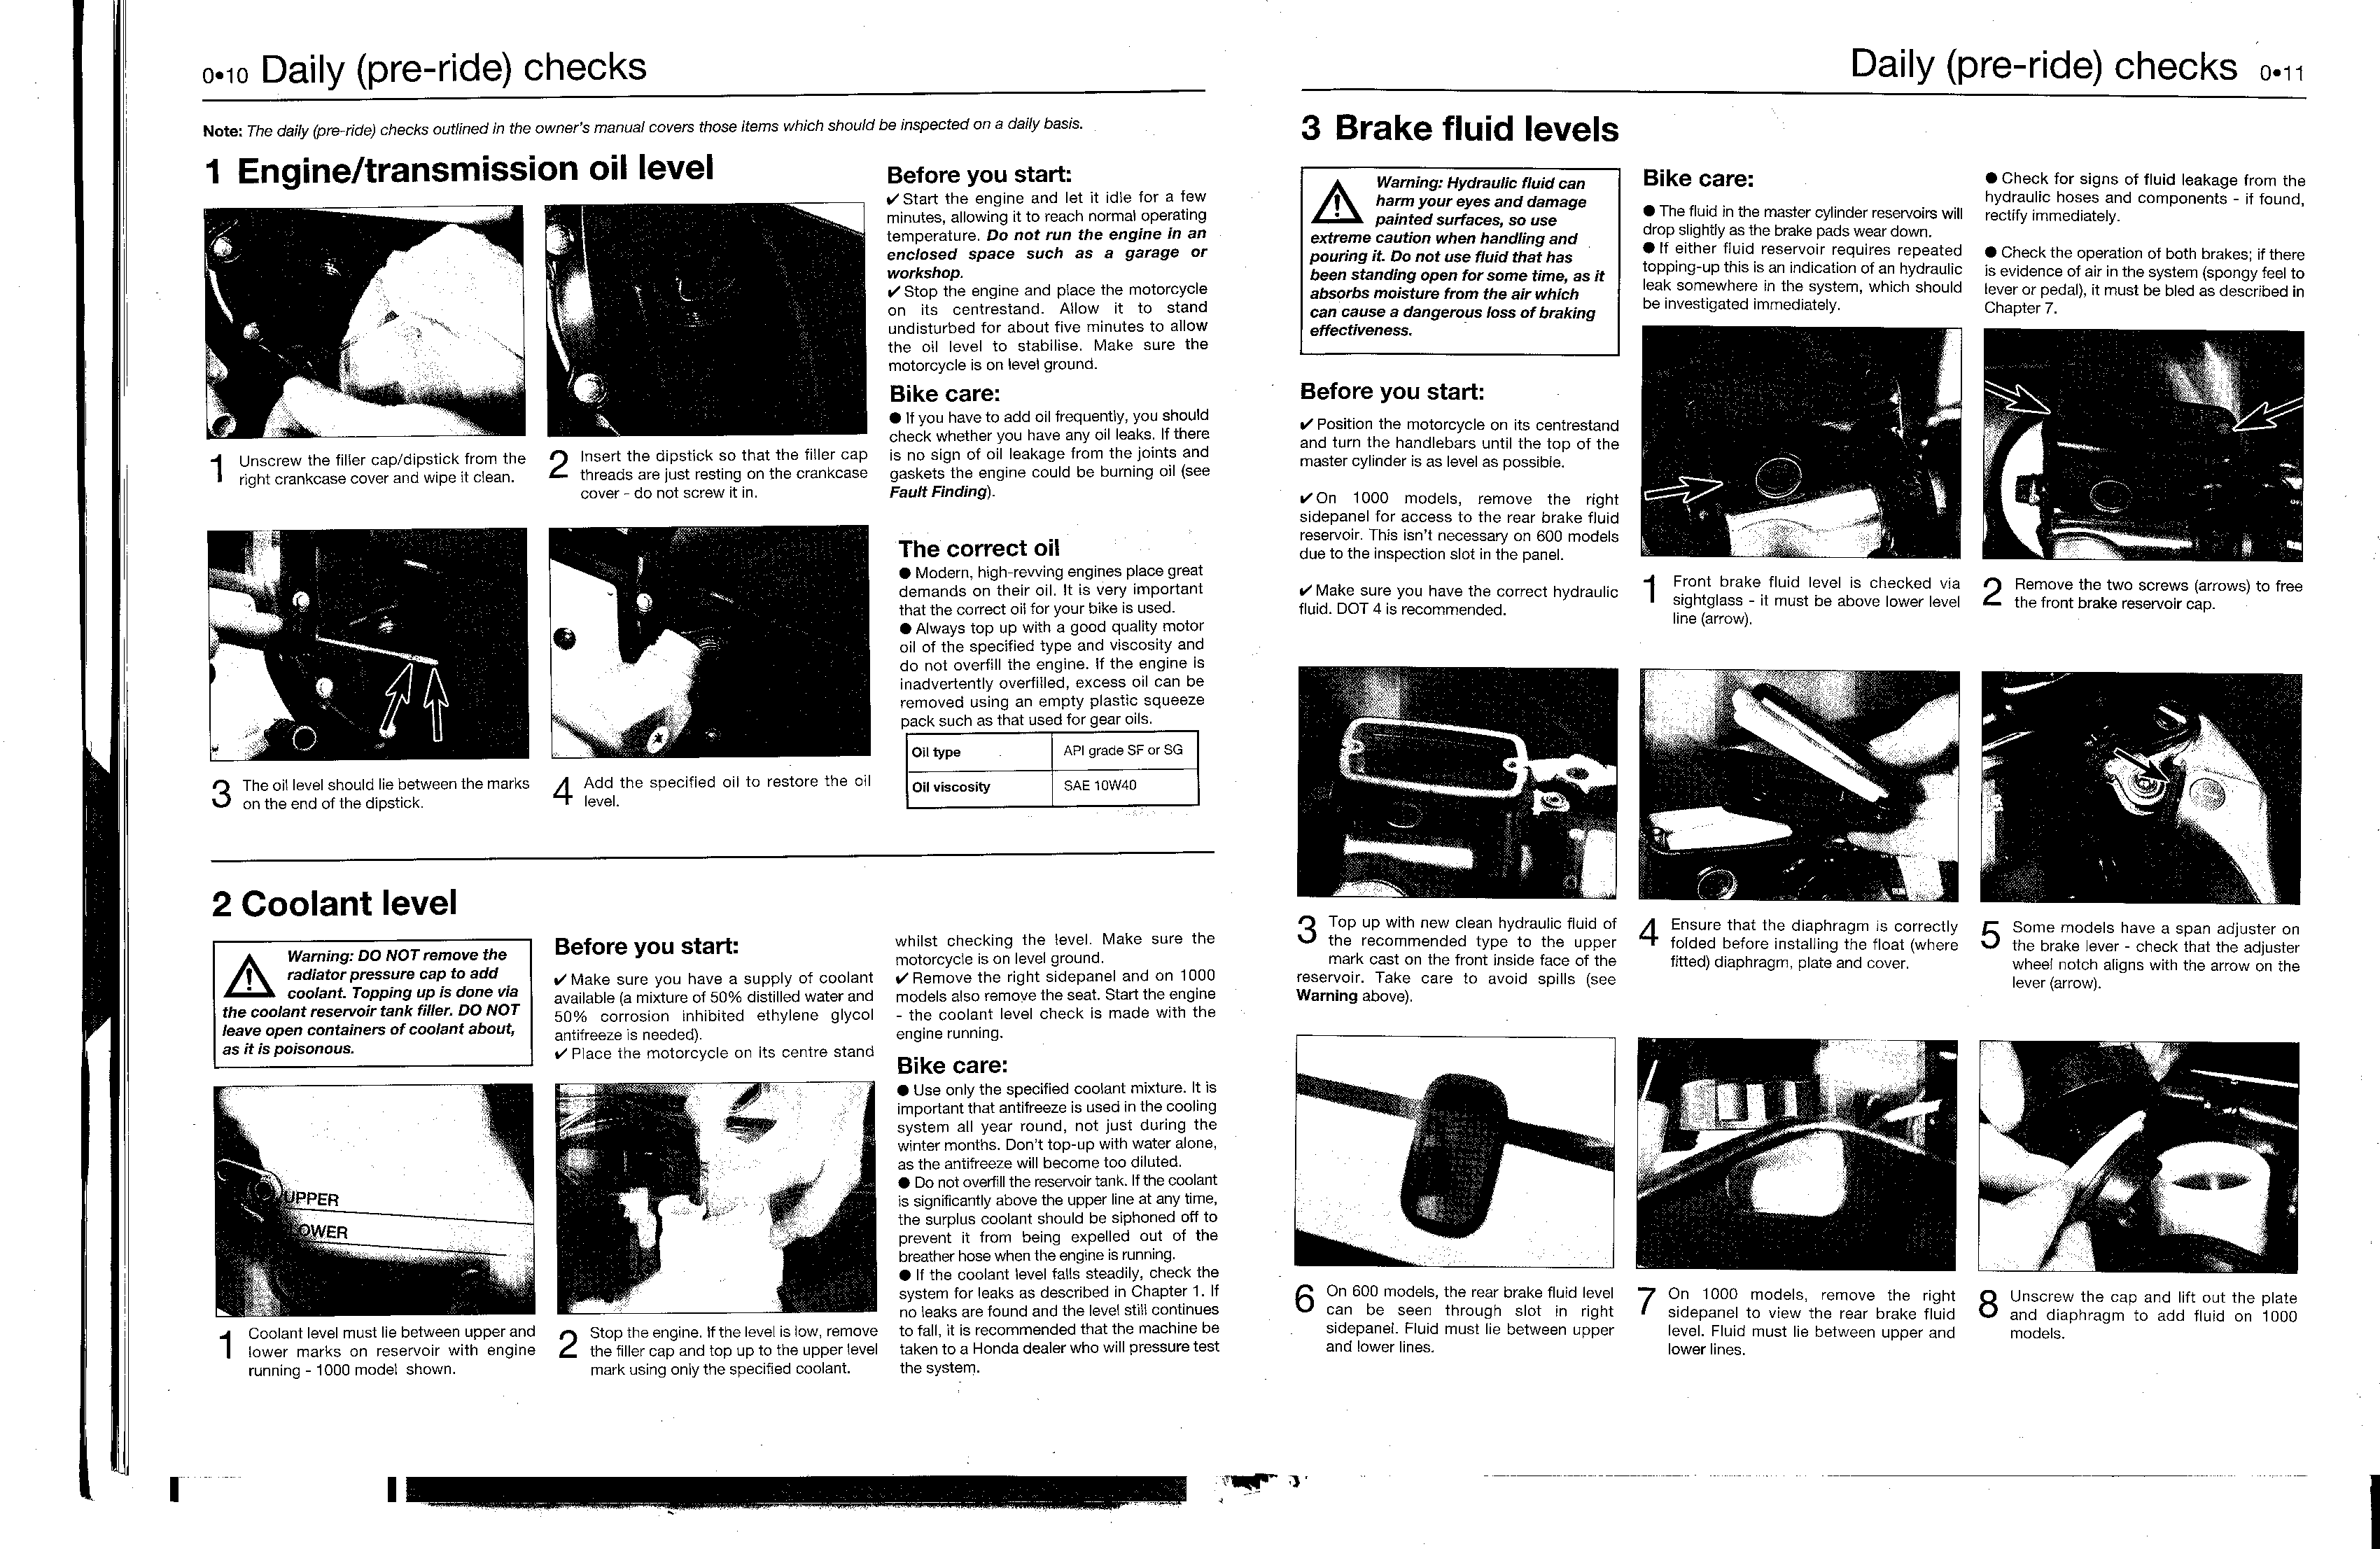
1. Engine/transmission oil level
Before you start:
- Start the engine and let it idle for a few minutes, allowing it to reach normal operating temperature. Do not run the engine in an enclosed space such as a garage or workshop.
- Stop the engine and place the motorcycle on its centrestand. Allow it to stand undisturbed for about five minutes to allow the oil level to stabilise. Make sure the motorcycle is on level ground.
Bike care:
If you have to add oil frequently, you should check whether you have any oil leaks. If there is no sign of oil leakage from the joints and gaskets the engine could be burning oil (see Fault Finding).
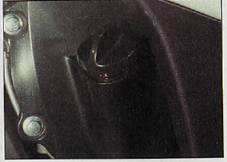
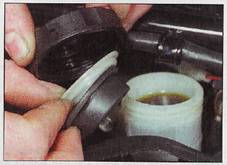
1. Unscrew the filler cap/dipstick from the right crankcase cover and wipe it clean.
2. Insert the dipstick so that the filler cap threads are just resting on the crankcase cover - do not screw it in.
The correct oil
Modern, htgh-rewing engines place great demands on their oil. It is very important that the correct oil for your bike is used.
Always top up with a good quality motor oil of the specified type and viscosity and do not overfill the engine, if the engine is inadvertently overfilled, excess oil can be removed using an empty plastic squeeze pack such as that used for gear oils.
Oil type |
API grade SF or SG |
Oil viscosity |
SAE10W40 |
3. The oil level should lie between the marks on the end of the dipstick.
4. Add the specified oil to restore the oil level.
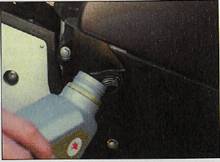
2. Coolant level
 Warning: DO NOT remove the radiator pressure cap to add coolant. Topping up is done via the coolant reservoir tank filler. DO NOT leave open containers of coolant about, as it is poisonous. Warning: DO NOT remove the radiator pressure cap to add coolant. Topping up is done via the coolant reservoir tank filler. DO NOT leave open containers of coolant about, as it is poisonous.
Before you start:
- Make sure you have a supply of coolant available (a mixture of 50% distilled water and 50% corrosion inhibited ethylene glycol antifreeze is needed).
- Place the motorcycle on its centre stand whilst checking the level. Make sure the motorcycle is on level ground.
- Remove the right sidepanel and on 1000 models also remove the seat. Start the engine
- the coolant level check is made with the engine running.
Bike care:
- Use only the specified coolant mixture. It is important that antifreeze is used in the cooling system all year round, not just during the winter months. Don't top-up with water alone, as the antifreeze will become too diluted.
- Do not overfill the reservoir tank. If the coolant is significantly above the upper line at any time, the surplus coolant should be siphoned off to prevent it from being expelled out of the breather hose when the engine is running.
- If the coolant level falls steadily, check the system for leaks as described in Chapter 1. If no leaks are found and the level still continues to fall, it is recommended that the machine be taken to a Honda dealer who will pressure test the system.
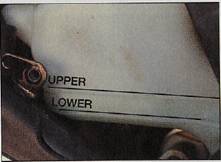
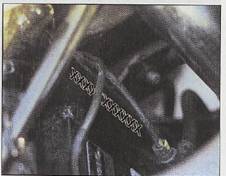
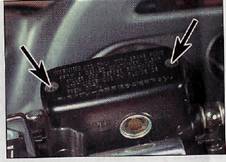
1. Coolant level must lie between upper and lower marks on reservoir with engine running -1000 model shown.
2. Stop the engine. If the level is low, remove the filler cap and top up to the upper level mark using only the specified coolant.
3. Brake fluid levels
 Warning: Hydraulic fluid can harm your eyes and damage painted surfaces, so use extreme caution when handling and pouring it. Do not use fluid that has been standing open for some time, as it absorbs moisture from the air which can cause a dangerous loss of braking effectiveness. Warning: Hydraulic fluid can harm your eyes and damage painted surfaces, so use extreme caution when handling and pouring it. Do not use fluid that has been standing open for some time, as it absorbs moisture from the air which can cause a dangerous loss of braking effectiveness.
Before you start:
- Position the motorcycle on its centrestand and turn the handlebars until the top of the master cylinder is as level as possible.
- On 1000 models, remove the right sidepanel for access to the rear brake fluid reservoir. This isn't necessary on 600 models due to the inspection slot in the panel.
- Make sure you have the correct hydraulic fluid. DOT 4 is recommended.
Bike care:
- The fluid in the master cylinder reservoirs will drop slightly as the brake pads wear down.
- If either fluid reservoir requires repeated topping-up this is an indication of an hydraulic leak somewhere in the system, which should be investigated immediately.
- Check for signs of fluid leakage from the hydraulic hoses and components - if found, rectify immediately.
- Check the operation of both brakes; if there is evidence of air in the system (spongy feel to lever or pedal), it must be bled as described in Chapter 7.
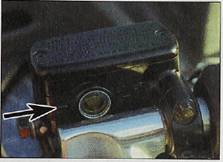
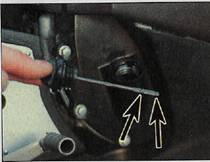
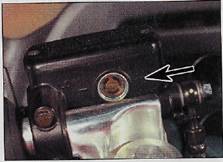
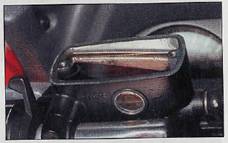
1. Front brake fluid level is checked via sightglass - it must be above lower level line (arrow).

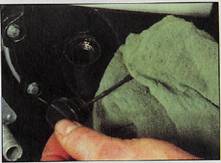
2. Remove the two screws (arrows) to free the front brake reservoir cap.
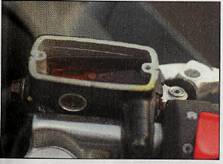
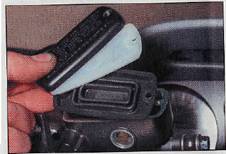
З. Тор up with new clean hydraulic fluid of the recommended type to the upper mark cast on the front inside face of the reservoir. Take care to avoid spills (see Warning above).
4. Ensure that the diaphragm is correctly folded before installing the float (where fitted) diaphragm, plate and cover.
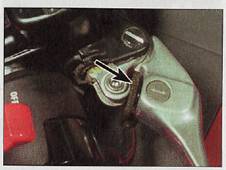
5 Some models have a span adjuster on the brake lever - check that the adjuster wheel notch aligns with the arrow on the lever (arrow).
6. On 600 models, the rear brake fluid level can be seen through slot in right sidepanel. Fluid must lie between upper and lower lines.
7. On 1000 models, remove the right sidepanel to view the rear brake fluid level. Fluid must lie between upper and lower lines.
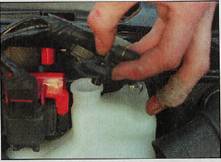
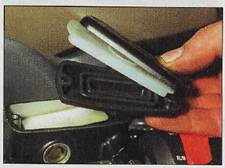
8. Unscrew the cap and lift out the plate and diaphragm to add fluid on 1000 models.
4. Clutch fluid level (1000 models)
 Warning: Hydraulic fluid can harm your eyes and damage painted surfaces, so use extreme caution when handling and pouring it. Do not use fluid that has been standing open for some time, as it absorbs moisture from the air which can cause a loss of clutch effectiveness. Warning: Hydraulic fluid can harm your eyes and damage painted surfaces, so use extreme caution when handling and pouring it. Do not use fluid that has been standing open for some time, as it absorbs moisture from the air which can cause a loss of clutch effectiveness.
Before you start:
- Position the motorcycle on its centrestand and turn the handlebars until the top of the master cylinder is as level as possible.
- Make sure you have the correct hydraulic fluid. DOT 4 is recommended.
Bike care:
- If the fluid reservoir requires repeated topping-up this is an indication of an hydraulic leak somewhere in the system, which should be investigated immediately.
- Check for signs of fluid leakage from the hydraulic hoses and components - if found, rectify immediately.
- Check the operation of the clutch; if there is evidence of air in the system (spongy feel to lever), it must be bled as described in Chapter 7.
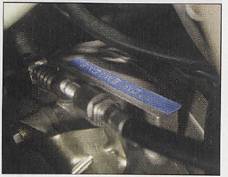
1. Clutch fluid level is checked via sightglass - it must be above lower level
2. Remove the two screws (arrows) to free the reservoir cap.
3. Top up with new clean hydraulic fluid of the recommended type to the upper mark cast on the front inside face of the reservoir.
4. Ensure that the diaphragm is correctly folded before installing the plate and cover.
5. Suspension, steering and final drive
Suspension and Steering:
- Check that the front and rear suspension operates smoothly without binding.
- Check that the suspension adjustment settings are as required.
- Check that the steering moves smoothly from lock-to-lock.
Drive chain:
- Check that drive chain slack isn't excessive.
- If the chain looks dry, lubricate it - See Chapter 1.
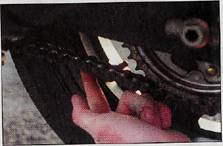
1. Check the drive chain for correct tension.
6. Legal and safety checks
Lighting and signalling:
- Take a minute to check that the headlamp, taillamp, brake stop lamp and turn signals all work correctly.
- Check that the horn sounds when the switch is operated.
- A working speedometer is a statutory requirement in the UK.
Safety:
- Check that the throttle grip rotates smoothly and snaps shut when released.
- Check that the engine shuts off when the kill switch is operated.
- Check that sidestand return spring holds the stand securely up when retracted. The same applies to the centrestand.
Fuel:
- This may seem obvious, but check that you have enough fuel to complete your journey. If you notice signs of fuel leakage - rectify the cause immediately.
- Ensure you use the correct grade unleaded fuel - see Chapter 1 Specifications.
7. Tyres
The correct pressures:
- The tyre pressures must be checked when cold, not immediately after riding. If the motorcycle has just been ridden the tyres will be warm and their pressures will have increased. Note that extremely low tyre pressures may cause the tyre to slip on the rim or come off. High tyre pressures will cause abnormal tread wear and unsafe handling.
- Use an accurate pressure gauge.
- Proper air pressure will increase tyre life and provide maximum stability and ride comfort.
Tyre care:
- Check the tyres carefully for cuts, tears, embedded nails or other sharp objects and excessive wear. Operation of the motorcycle with excessively worn tyres is extremely hazardous, as traction and handling are directly affected.
- Check the condition of the tyre valve and ensure the dust cap is in place.
- Pick out any stones or nails which may have become embedded in the tyre tread. If left, they will eventually penetrate through the casing and cause a puncture.
- If tyre damage is apparent, or unexplained loss of pressure is experienced, seek the advice of a tyre fitting specialist without delay.
Tyre tread depth:
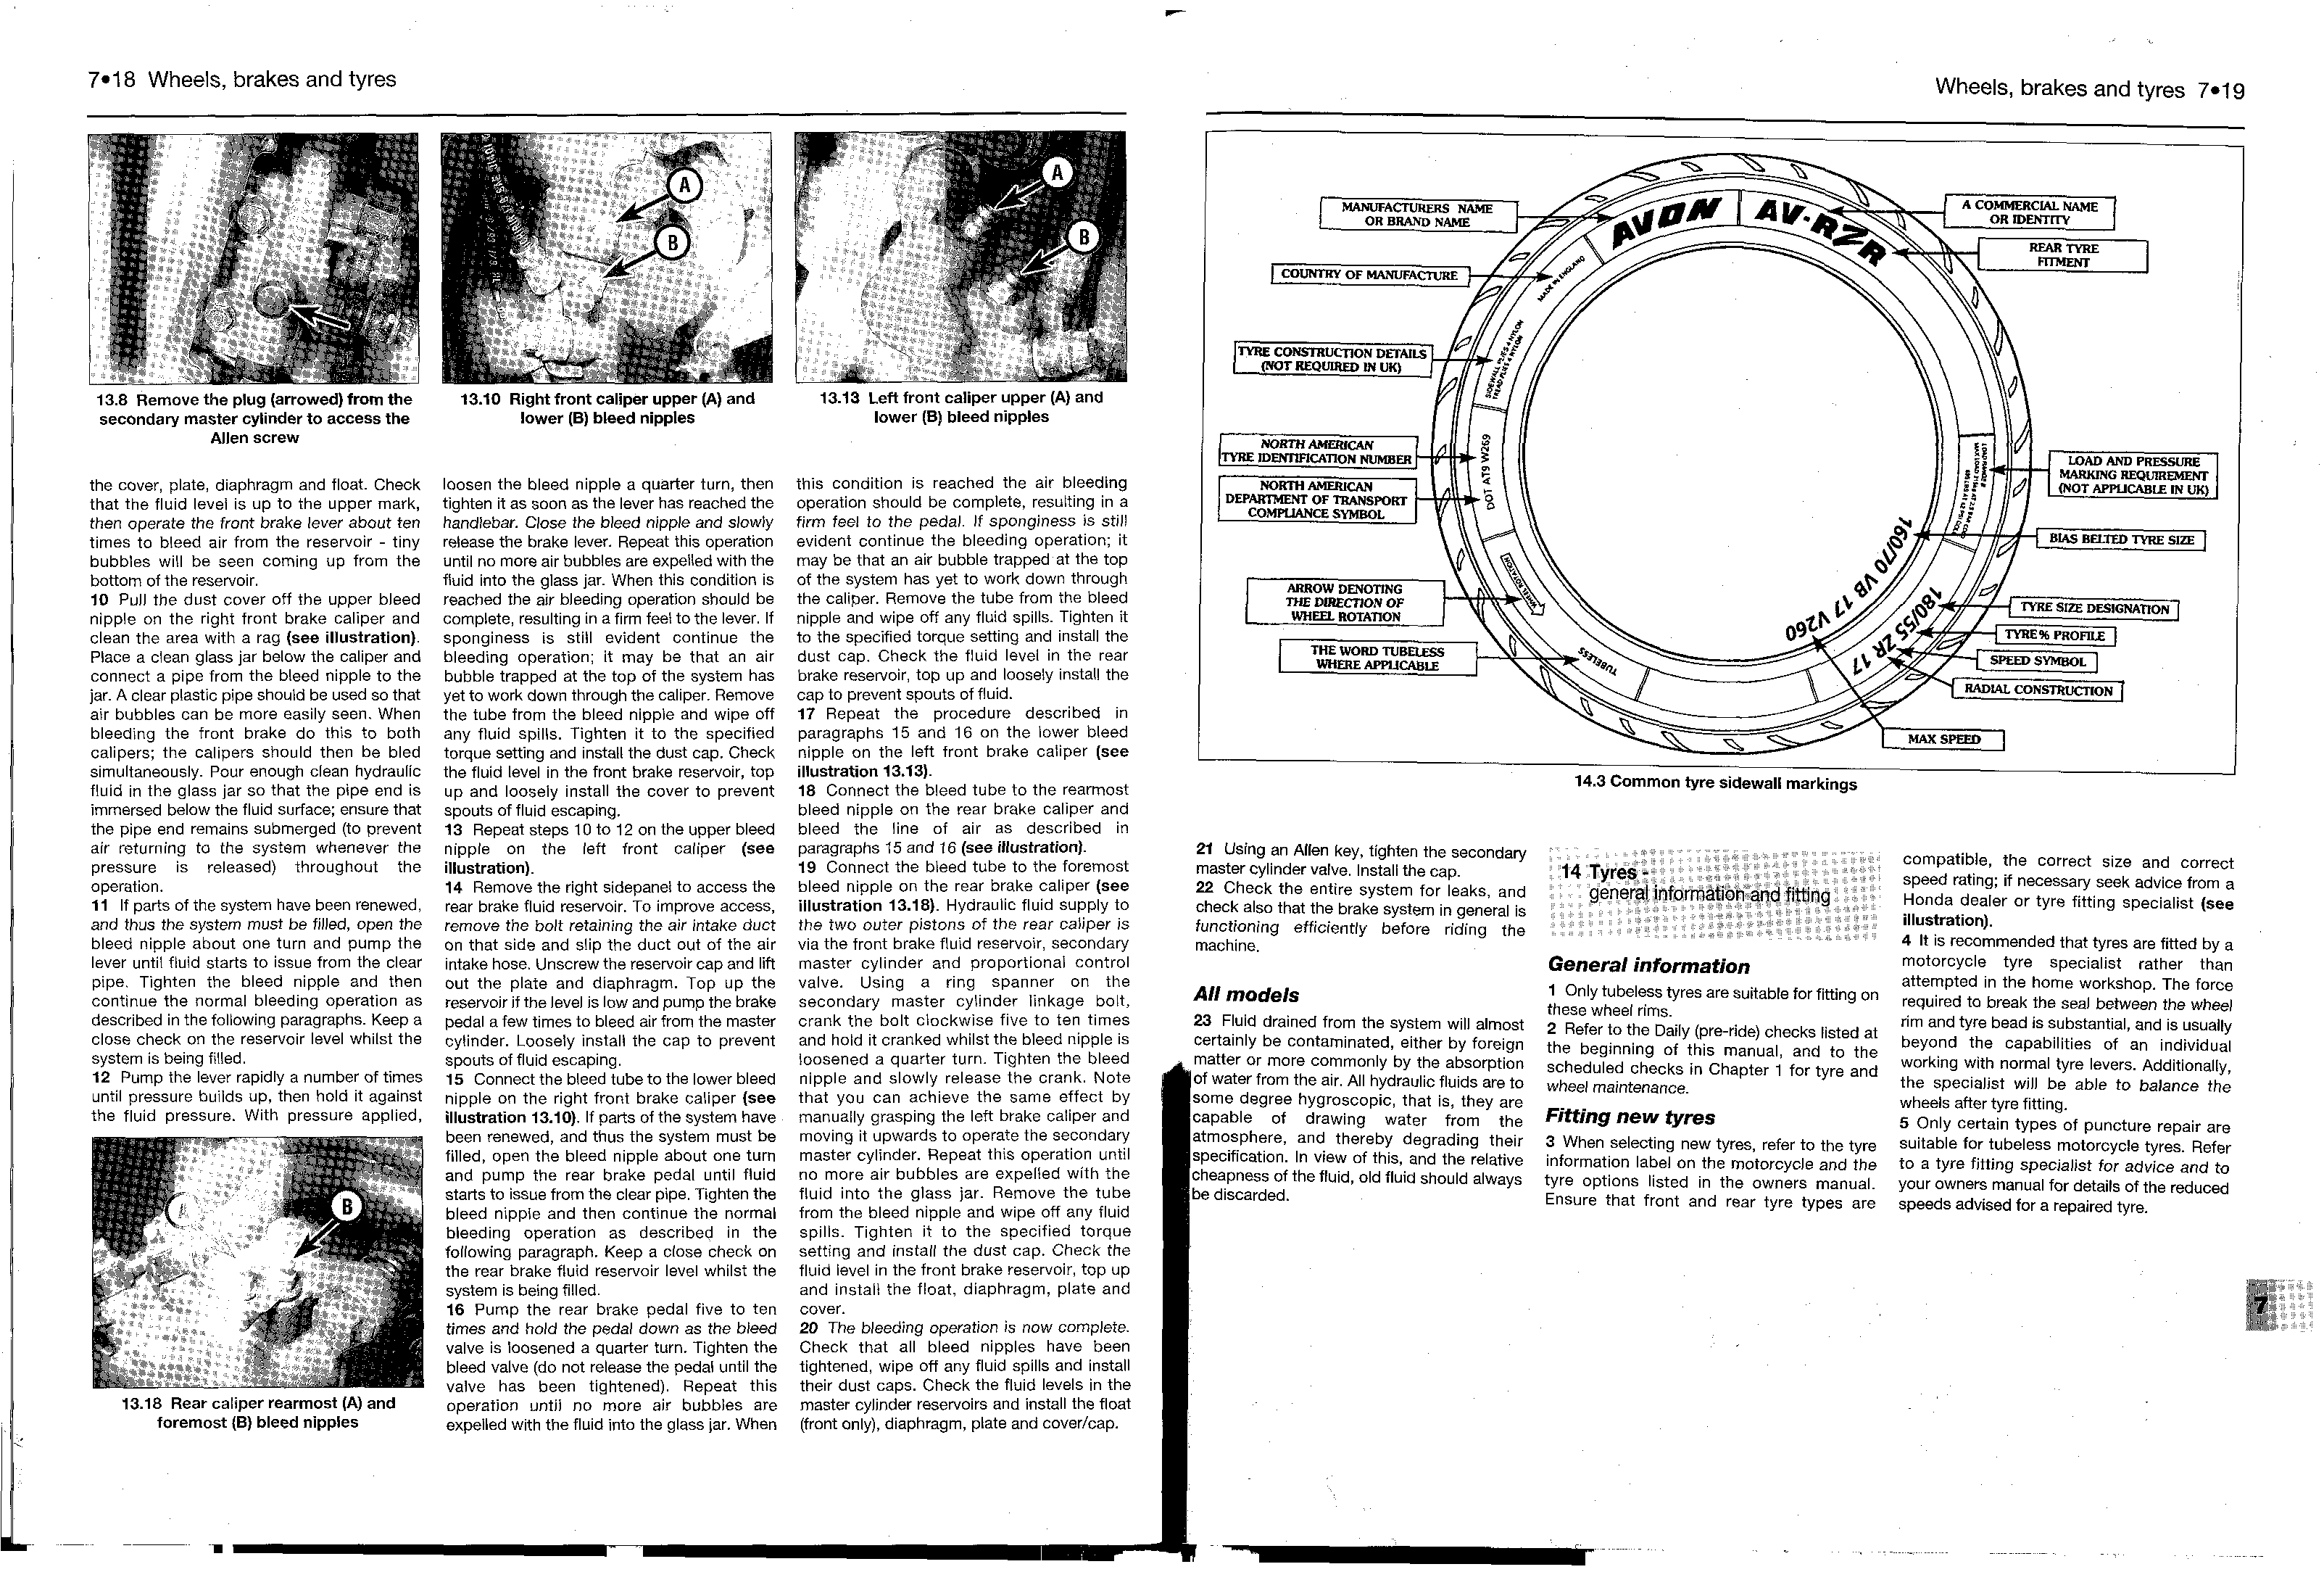
- At the time of writing UK Jaw requires that tread depth must be at least 1 mm over 3/4 of the tread breadth all the way around the tyre, with no bald patches. Many riders, however, consider 2 mm tread depth minimum to be a safer limit. Honda recommend a minimum tread depth of 1.5 mm (0.06 in) for the front tyre, and 2.0 mm (0.08 in} for the rear.
- Many tyres now incorporate wear indicators in the tread. Identify the triangular pointer or TWl mark on the tyre sidewall to locate the indicator bars and replace the tyre if the tread has worn down to the bar.
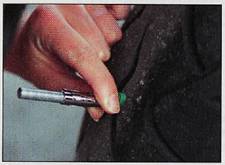
1. Check the tyre pressures when the tyres are cold and keep them properly inflated.
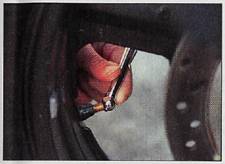
2. Measure tread depth at the centre of the tyre using a tread depth gauge.
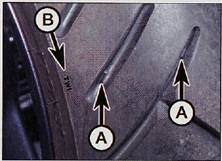
3. Tyre tread wear indicator bars (A) and location marking on sidewall (B).
|
Loading/speed |
Front |
Rear |
|
All 600
models and 1000 K models onward |
36 psi
(2.5 Bar) |
42 psi
(2.9 Bar) |
|
1000 H,
J models: |
|
|
|
Up to 90 kg (198 Ib) load - solo
|
36 psi
(2.5 Bar) |
42 psi
(2.9 Bar) |
|
90 kg (198 Ib) to max load* - pillion |
42 psi
(2.9 Bar) |
42 psi
(2.9 Bar) |
*Refer
to Dimensions and Weights in Reference section for
details of maximum
loading |
Notes
|
